Purchase Orders
Overview:
Purchase Orders can be raised when purchasing services or stock items from suppliers. Purchase Orders are multi-currency and, once completed, can be e-mailed directly to suppliers. When stock is received, the corresponding Purchase Order can be used to identify a destination location and automatically update inventory levels at that location. Purchase Orders can be posted directly into your accounting package to track orders made and maintain current accounts payable information.
In this document:
- Listing Purchase Orders
- Viewing Purchase Orders
- Creating Purchase Orders
- Drop Shipping / Delivering Supplies to Another Location
- Emailing Purchase Orders
- Receiving Ordered Products
- Partially Receiving Ordered Products
- Updating for Xero Customers
- How to create Lot Codes/Child Codes from a Purchase Order?
Listing & Searching Purchase Orders
Select ‘Purchase Orders‘ from the Buy and Sell > Inwards Goods area. You will then be presented with a list of pending or already fulfilled purchase orders. You can search for particular orders by using the search box located next to the ‘New’ button near the top of the screen or the advanced search button directly below that. The pending (undespatched) purchase orders will have an edit option for you to amend, then update or post. If you don’t have anything listed, create a purchase order by selecting ‘New.’
Viewing Purchase Orders
All purchase orders have ‘View’ and, when appropriate, ‘Edit’ , ‘Delete’ and ‘Print’ links.
Creating Purchase Orders
Create a new purchase order by clicking the ‘New’ button on the purchase order list. If the new purchase order closely resembles prior orders, you can can save time and effort by copying the relevant prior order and using it as a template for your new order. See the section ‘Copying’ below.
Required Info
When creating a new purchase order, begin by selecting a supplier from the drop down ‘Supplier’ menu. If the supplier is not in that list, you will need to go back to ‘Contacts‘ and create a new supplier from there before proceeding with the purchase order. Enter the date, currency, item description, unit of measure, unit price, quantity and tax rate. If you want to track lots codes and / expiry dates, add that information here too. (See Stock Item Expiry Dates for more information). Then press ‘insert.’ The sales tax and totals will be added automatically. Finally save the new order.
Optional Info
Vinsight also integrates with accountancy packages (like Xero). You can put the expense and asset ledgers in the accounting area for when you post purchases to your accounting package. This allows you to post all of your purchase orders directly into your accounting software for approval without having to re-type anything.
Copying
To copy a prior order, select the relevant order from the list and click ‘view’. The order will open and can be copied by clicking on the ‘Actions’ button and selecting ‘copy’ from the drop down menu. Finally click ‘edit’ and amend the newly copied order as required.
Saving
If you are entering a long or complicated order, you can save as you go along by selecting ‘Save and Continue Editing’ from the ‘Save’ drop down menu. If inputting several orders at once, click “Save and Add New” to go straight to new Purchase Order template.
Drop Shipping / Delivering Supplies to Another Location
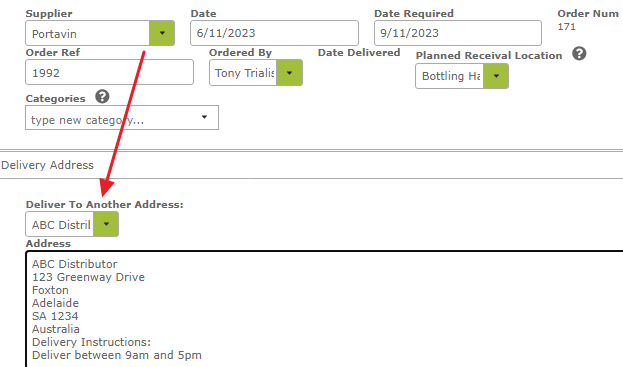
On some occasions you may want the product you are ordering to be shipped somewhere other than your default delivery address. For example, you may want to order bottles to go to bottling company, or order something out of stock and deliver it directly to your customer. On these occasions, when creating your new purchase order, you should click on the ‘Addresses’ tab just under the ‘Supplier’ box. This will expand the ‘Addresses’ box and give you the option to select another saved address from a drop down menu or directly enter a new address.
E-mailing Purchase Orders
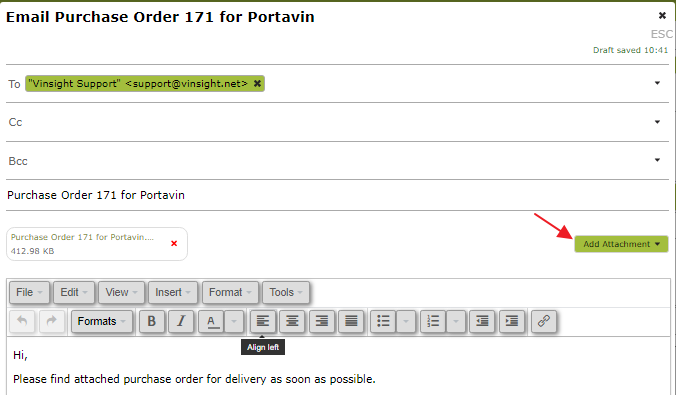
Once saved, a purchase orders can be directly e-mailed to the relevant supplier by clicking the ‘Email’ button at the top of the screen.

This will bring up an email with the order attached to it. You can add further attachments from your own file system (if desired) by using the ‘Add Attachment’ button.
Receiving Ordered Products
When the product ordered is received, open the relevant purchase order and click the ‘Receive’ button. This will automatically update inventory levels to reflect the new stock. It is possible on our some of our Subscriptions to do Partial Receipts of purchases to different locations and at different times. Read more about partial receipting further down the page

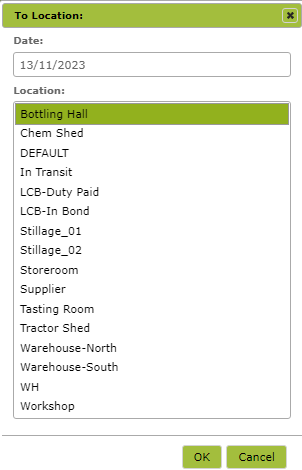
On our multi-stock location subscriptions, clicking ‘Receive’ will bring up a list of locations and enable you to select the location at which the inventory should be added. If the relevant location is not on the list, you will first need to add the location by going to ‘Stock Locations’ on the ‘Orders and Inventory’ tab.
As soon as you select the location, Vinsight will ask if you would like to save the “unit price” as the “Standard Cost” of the item, see “Setting standard cost“.
Once a location is selected, it will be recorded on the Purchase Order under the heading ‘Received To’. Also, you can select “View” or “Void” receipt if you need to update or change any detail.

If you need to change the date that a Purchase Order was received on, simply edit the updated order and update the Date. The new date will reflect on all related purchase receivals as well as the purchase order itself.
Partial Receipting of Purchases
On some of our subscriptions, if you need to receive purchased items to multiple locations or take delivery in multiple shipments you can use split receipts to help with this. You need to use the “Preview Receipt” option to change the location, amount and date of the part receipt, then repeat this for any further receipts.

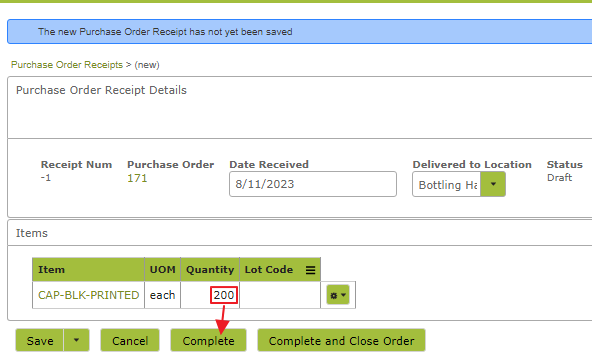
Then change the amount, location or date. In the example below I am receiving only 200 of the 300 units I ordered. If receiving only part of an order you should click ‘Complete’ rather than ‘Complete and Close Order’ as the order will need to remain open to receive the remaining quantity at a later date.
When you are ready to receive the remainder of the the order, return to the main order and repeat the below process:

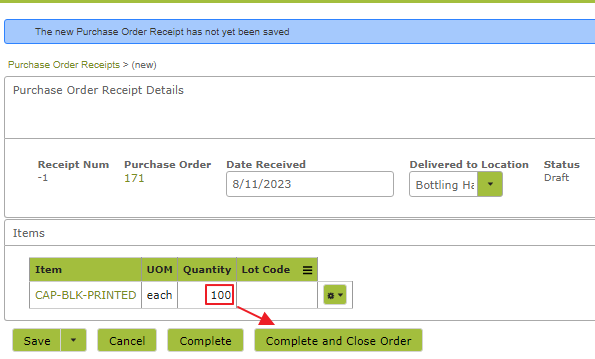
Vinsight will auto-suggest the correct remaining balance. In this example, 300 were ordered, 200 have already been received, so Vinsight will suggest 100 units. If this is the final receipt you should click ‘Complete and Close Order’.
You order should now show multiple receipts and a final delivery date indicating the order is closed:

How to create Lot Codes/Child Codes from a Purchase Order?
When creating a Purchase Order, before you mark the order as “Receive” you can add create and add a new “Child Code” by entering a “lot code” in the blank square as per below:

Vinsight will automatically ask if you would like to “Add child”.

You will be ask if you would like to create the “Lot Code” and, if you need, you can edit the provided code

Once you select “Split Item”, the Purchase Order Item updates to the “Child Code”, then you save and “Receive” the order, select the planned receival location, and Vinsight will ask if you would like to update the Standard Cost. As soon as the order has been marked as “Received” it will look as per below:

Finally, the Child Stock Item will be like this:

Updating for Xero Customers
By selecting the ‘Post’ option you can post your completed order from Vinsight directly into Xero as an accounts payable invoice. Your accounting staff can then manage payables from Xero without having to re-enter invoices.