Overview
This document outlines the steps you need to take to import vessels into Vinsight. It also includes some trouble-shooting tips if you run into difficulties. If you are new to Vinsight, the initial Vessels import does a lot of set up work in your App. For this reason, it may appear more involved than your initial import of Stock Items, Sales Orders or Contacts. This page should help you work through any issues you encounter.
In this document:
Video - How to Import Data in Vinsight
The following video takes you through the Vinsight import process. While it does not deal with Vessels specifically, if you are new to importing in Vinsight, the video will give you an overview as to how the importing process works.
Importing Vessels - Initial Steps
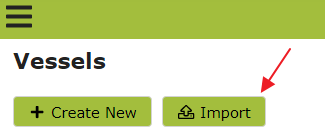
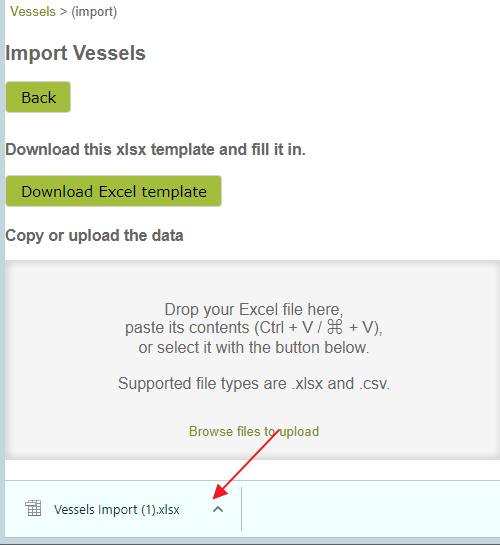
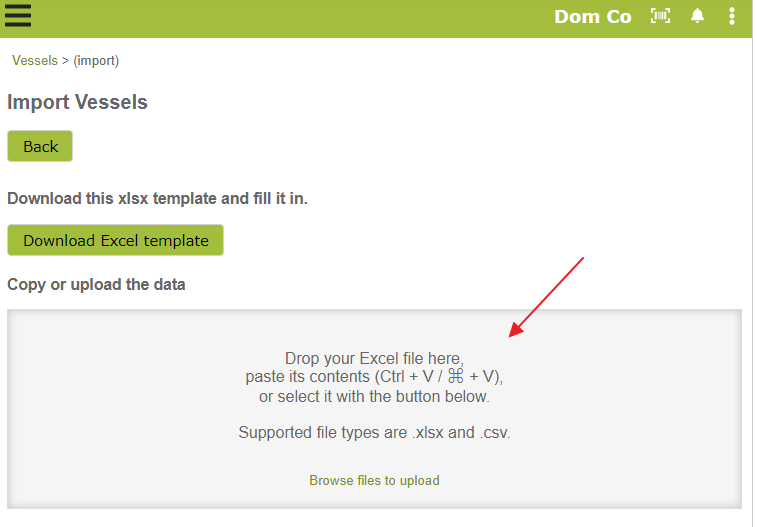
To import Vessels, go to the Vessels list (Make > Vessels), and click on the 'Import' button next to '+ Create New' at the top of the page:
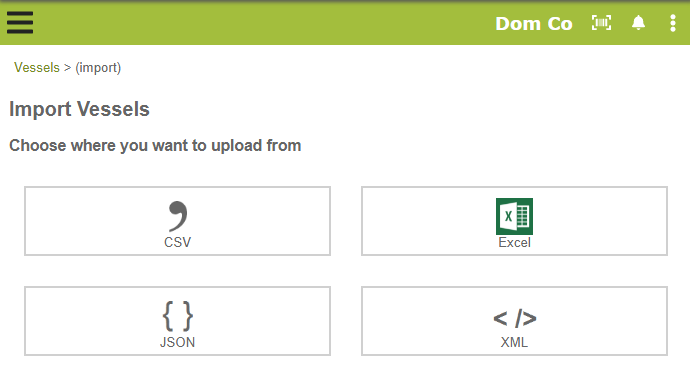
From there, select the format of the data you want to import. To import from a spreadsheet you will need to use the 'Csv' or 'Excel' option.
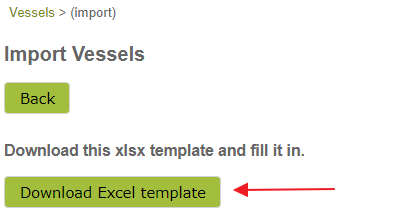
This will take you to the next step. Here you can download the template that you will need to fill in:
Open the template up from your downloads area:
You will see that the template is already populated with sample data. This data will be different depending on the variant (e.g. Wine, Spirits, Beer, Cider) of the App you are using. This data is there to help you, and give you a sense as to how to fill in each column. (When you have completed the spreadsheet and are ready to import, you will need to delete the sample data to prevent it from being imported into your App).
The number of columns may seem daunting at first. This is in part because we also use data from this spreadsheet to populate a number of areas of the app, such as Vessels, Vessel Groups, Vessel Types, Batches and Bulk Receivals. Not all columns are required to be completed in full during your initial import. The minimum data required for importing empty and full vessels is set out below.
Importing Empty Vessels - Data Required
If the Vessels you are importing are empty, only the first 8 columns (A - H) of the spreadsheet will be relevant, namely 'Vessel Code (*)' through to 'Location'. For a more detailed explanation of each of these columns and what they represent, see Column Explanations below.
If you already have your Vessel Types and Vessel Groups, set up in Vinsight, the only columns you are absolutely required to complete are those with an asterix '(*)', namely 'Vessel Code' and 'Type Code'.
However, if you are new to Vinsight and this is your initial import of Vessels, more columns are required to complete this set-up for you.
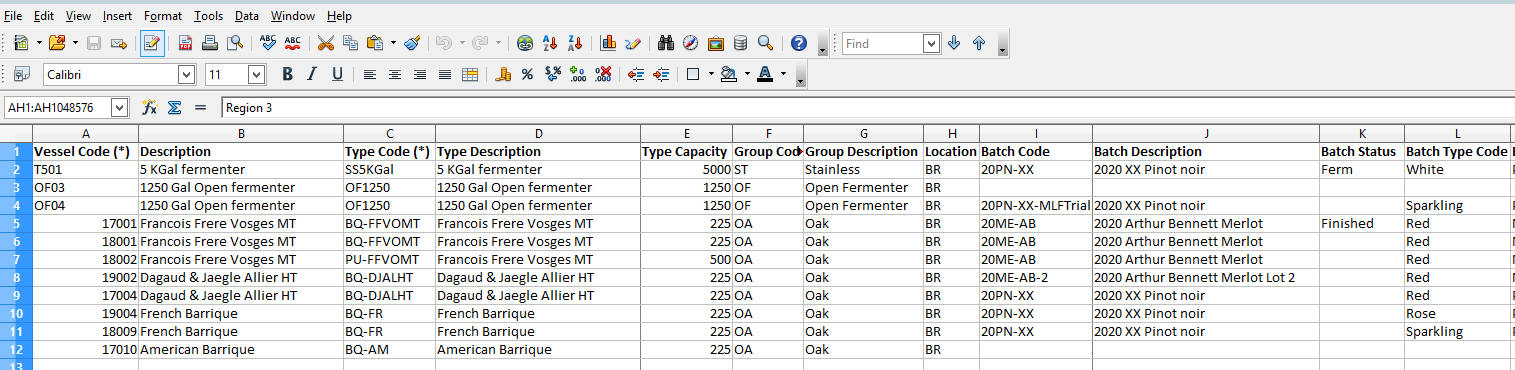
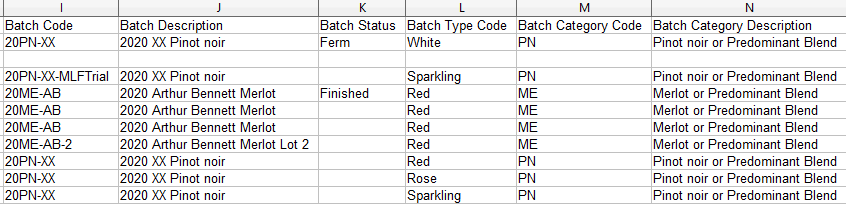
In an initial import, or an import that uses a new 'Type Code', you will be required to complete the 'Type Capacity' and 'Group Code' columns as well in order to import without errors. These additional columns are only required for the first occurrence of each new type code on the list. If you look at the following example, you can see that each time, I entered a new 'Type Code', I also entered the 'Type Description', 'Type Capacity' and 'Group Code', for that new Type Code. In the same way, if the 'Group Code' is a new one, its a good idea to add 'Group Description' as well. Again, look at Column Explanations if you are unsure of what values to put in these columns or if you want to understand further how these values will be used in the App.
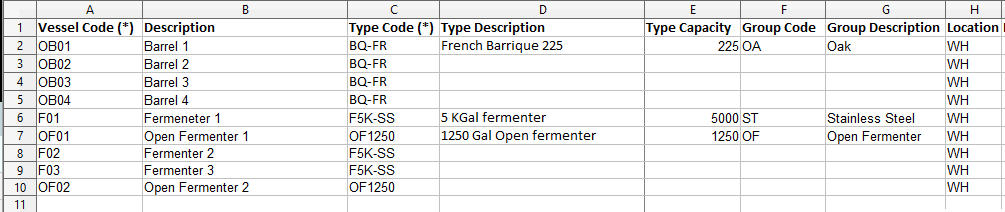
While the extra information is only required for new occurrences of 'Type Code's, there is no harm in repeating the information if it is easier this way. The following spreadsheet will do exactly the same job as the one pictured above . . .
Note, the 'Location' column is only relevant to those on multi-location subscriptions. It relates to the specific Vessel Code, rather than the type code, as different Vessels of the same type could be held in different locations. If you wish a Vessel's location to be recorded, you will need to fill out every row with this information.
Summary of Minimum Data Requirements:
Existing Type Code: Vessel Code, Type Code
New Type Code: Vessel Code, Type Code, Type Capacity, Group Code
Importing Non-Empty Vessels - Data Required
If the Vessels, you are importing contain product, you can include this information as part of the Vessels import. This is what columns I through AJ are for. Again, use the sample data to help you understand the data that goes in each column. For a more detailed explanation of these columns and what they represent, see Column Explanations below.

Once you add a 'Batch Code' to a Vessel Import row, several other columns are then required to be completed. These columns are 'Batch Type Code', 'Batch Category Code' and 'Designation Code'. That is because these are the minimum requirements to create a Batch. These additional columns are only required the first time you include the particular Batch Code in an import, but as with 'Type Codes' above, there is no harm in repeating the values, if it easier for you that way.
If you include a 'Volume' that is greater than 0, you will also need to fill in at least one of the 'Percent' columns.
If the batch is of a single vintage, variety and region, or if you are not including the vintage, variety and region information on the import, you should put '100' in the 'Percent 1' column. This simply indicates that 100% of the batch is as described.
If the batch is a blend of product of different varieties, or vintages or regions etc. you can include this information in the additional 'Vintage 2,' 'Variety 2', 'Region 2', 'Sub Block 2' columns. In that case you would want to complete the 'Percent 2' as well as the 'Percent 1' column to indicate what percentage of the batch these second source values represent. If you have more than 3 different sources, you can add additional columns yourself, namely 'Vintage 4', 'Variety 4', 'Region 4', 'Sub Block 4', 'Percent 4'. Just copy paste existing headers into new columns and then change the number value.
Summary of Minimum Additional Data Requirements:
Batch Code, Batch Type Code, Batch Category Code, Designation Code, Volume, Vintage 1, Variety 1, Region 1, Percent 1
Completing the Import
Once you are happy with the data, it is time to import. First make sure you have deleted the sample data from the sheet. Then you can highlight the whole table (including the headers) and then copy it (CTRL + C). Once you have done that, you can go back to Vinsight and paste (CTRL + V) the data straight in to the importer.
Don't worry too much about this step. The data doesn't go into Vinsight straight away. Rather it just checks the data to make sure nothing is missing or invalid. You will still have the opportunity to cancel the import if things don't look right.
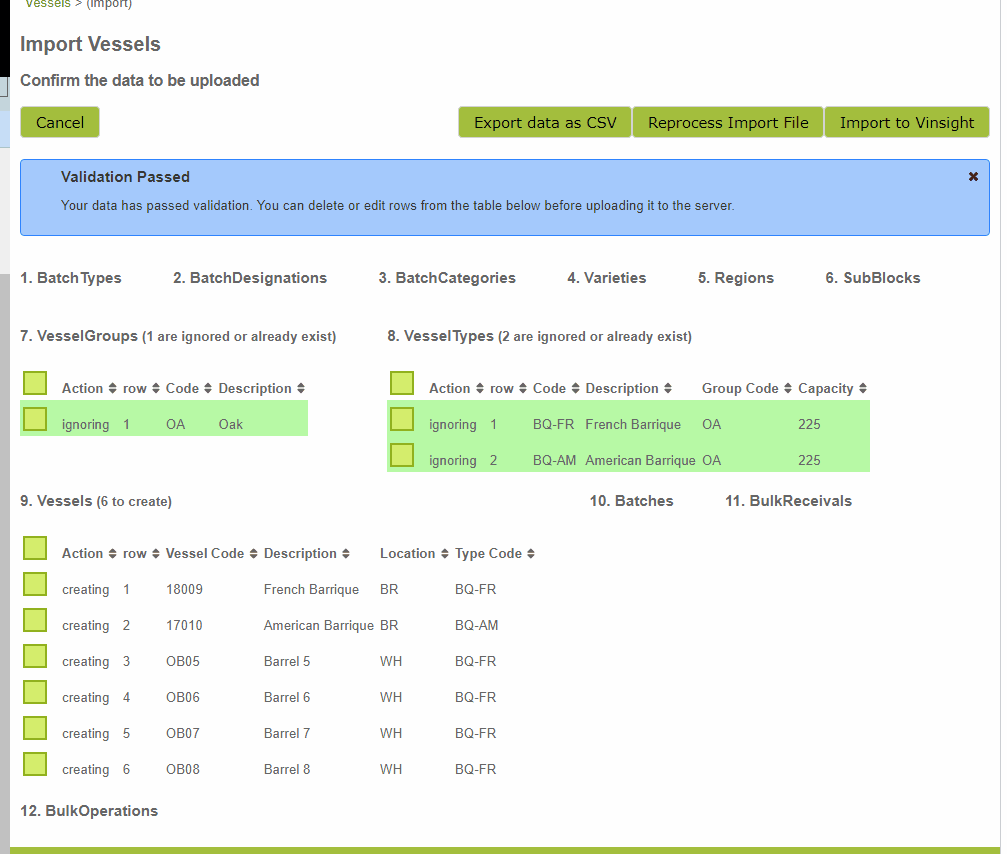
If everything in your spreadsheet is okay, you will get a blue message indicating that your data has passed validation.

The information below that message is simply explaining what the import will do. For example, in the following screenshot, the Vessel Groups and Vessel Types are being 'ignored' as the ones I included in the spreadsheet were already recorded in Vinsight. With respect to the Vessels, it is updating information on Vessels I already had loaded into Vinsight and is creating two new ones. As I didn't include any batch information, the information relating to those areas is empty.
If this is your initial import into Vinsight, most of the lines listed below the validation message will have the action 'creating'. You shouldn't need to do anything with these lines, as Vinsight will have worked out what to do with each line. However if you spot an obvious mistake, you are able to edit the data from here.
In the following example, I accidentally included a couple of lines of the sample data in my import. I can prevent this data from importing by changing the action for those two lines from 'Creating' to 'Ignoring' . . .
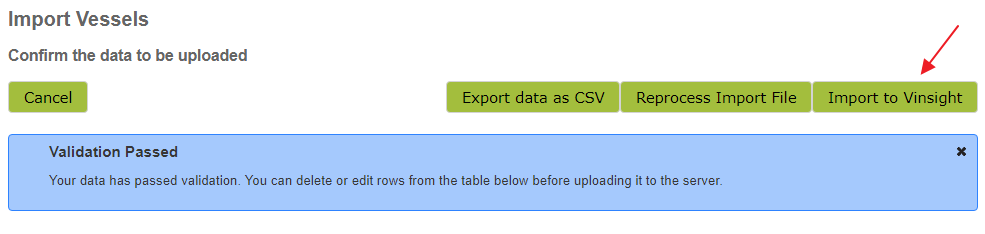
To complete the import of data into Vinsight, click the 'Import to Vinsight' button.
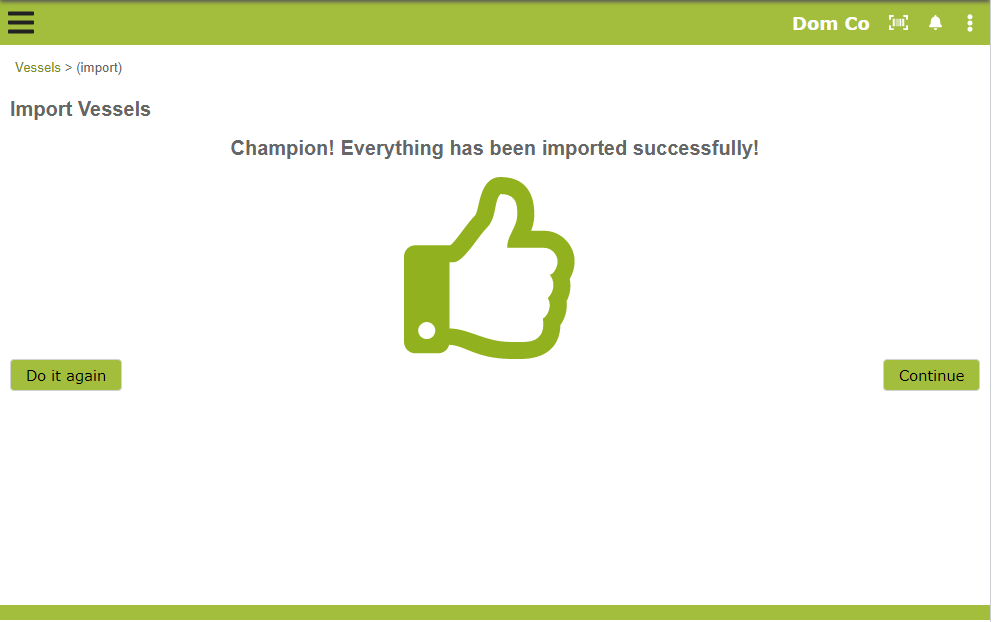
Once the import is complete, you will see the following message.
Error Messages:
If this is your initial import of Vessels into Vinsight, you are bound to get some error messages on your first go, particularly if you are uploading a large spreadsheet. Some common reasons for errors are . . . .
Failing to include a Vessel Code:

Repeating a Vessel Code:

Missing a Type Code:

Failing to include Group Code - only an issue with new Type Codes:

Failing to add Type Capacity - only an issue with new Type Codes:
You may not get a warning for this. Rather you may find that the Type Code imports with a '0' capacity. In any event, ensure that each new Type Code has the correct capacity listed.
Missing the 'Batch Type Code', 'Batch Category Code' or 'Designation Code' - only an issue when including Batch information.

Failing to put the value '100' in the column 'Percent 1', or, if completing more than one 'Percent' column, ensuring the values in those 'Percent'' columns add up to 100.
Same batch, different composition:

This message is a warning (so will not be in the 'red' form seen above). With any warning, you will not be prevented from importing the data as is. However, it is a good idea to read the message in case you have made a mistake in your data. The above error was generated when a Batch Code was described as being 100% of one variety (e.g. Merlot) in one row, whereas in another row the same Batch Code was described as being made up of two varieties, (e.g. 80% Merlot and 20% Cabernet). A similar error could be generated if the 'Region' sources for the same Batch Code differ from row to row. Depending on what the difference is, this could be intended or not intended. If you get a warning like this, check the lines relating to the Batch Code mentioned and ensure you haven't made any mistakes.
How to Fix Errors
When you get an error message, it is important not to panic. The messages are there to help you understand what may be wrong in your spreadsheet or what might be missing, so reading them should give you some helpful clues.
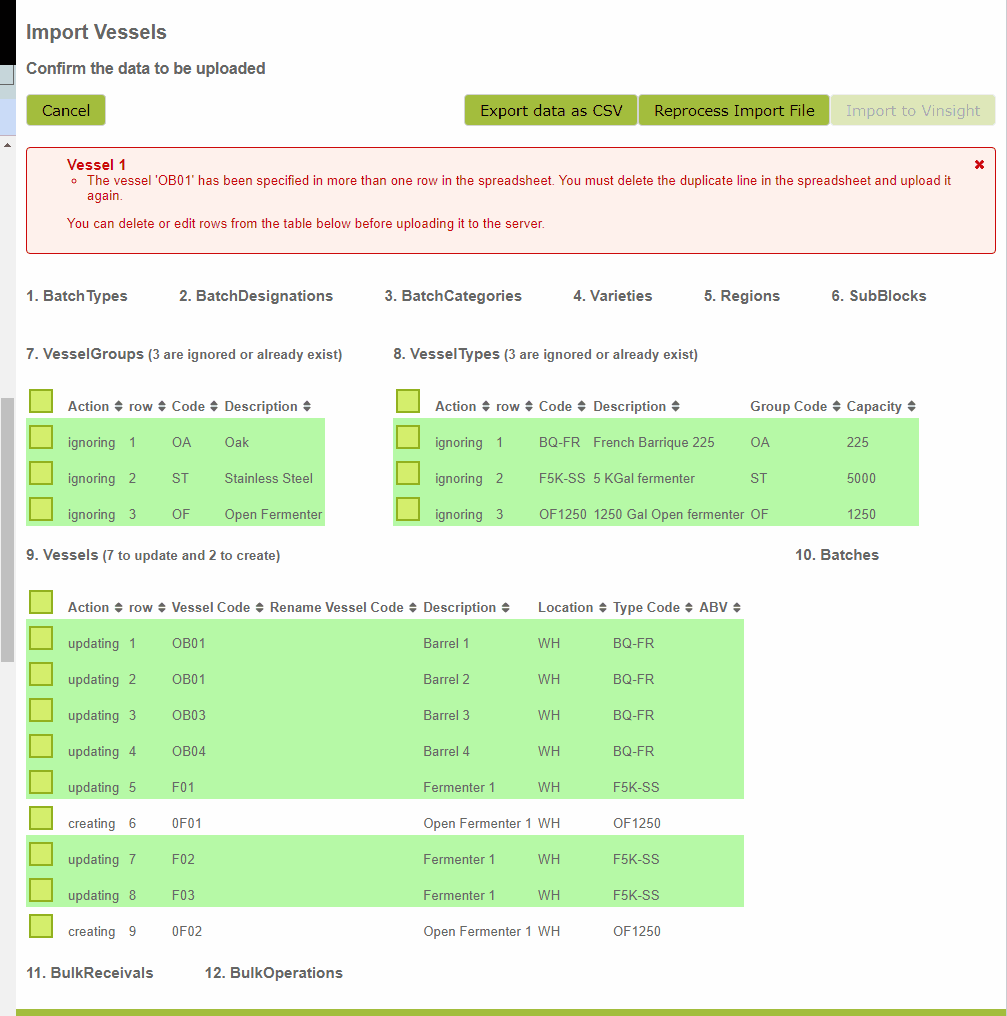
If you are importing a small spreadsheet and you can quickly spot the error in the information set out below the message, you can edit the data from this screen. In the following example, I have mistakenly included the same Vessel Code 'OB01" twice. I can see from looking at the Vessels list below that the second row should have been 'OB02'. I therefore click on that value and edit it from there. As soon as the problem is corrected, the red error message disappears and is replaced with a blue one indicating the data has passed validation. I can now click the 'Import to Vinsight' button and complete the import.
However, if you are importing a large sheet, or have a large number of errors, it is probably best to click the 'Cancel' button and go back to the spreadsheet itself to fix the issues.
Important: If you get a long string of error messages and you are unsure which rows they are referring to, instead of trying to fix everything at once and re-importing the same sheet, try copy -pasting just the first few lines (or even just the first line) of your spreadsheet (together with column headers) into the importer.
You may get no error, in which case you will have worked out that the issue is not with that row or rows, or you may just get one or two. If you do still get an error at least you will have narrowed down the row(s) it could be in. At this point, read the message carefully. It is likely to be one of the messages listed here and you might then be able to work out what caused it.
Once that one is fixed, maybe include a few more rows and do the same thing. You will soon start to get the hang of the process and the types of things that cause issues. You may at this point be able to spot additional mistakes in your spreadsheet without having to continue with this process, as you often have the same error on more than one row.
Column Explanations:
Vessel Code: This is the name by which you identify the particular vessel. It is the name that will appear on the drop-down list when e.g. selecting which Vessel to fill in an operation
Description: This is just a place to put the description (or full name) of the Vessel. E.g. "OB09" might be "Barrel 9".
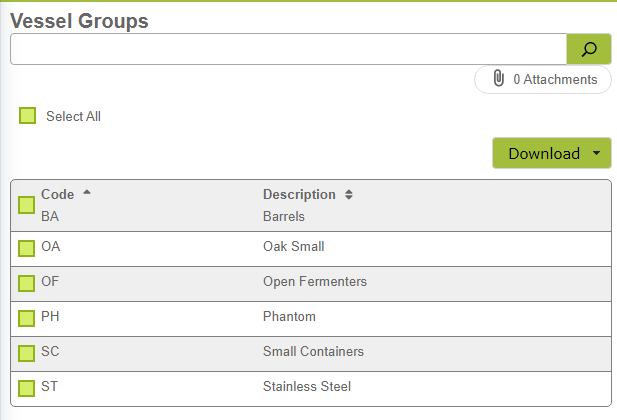
Group Code: This is the broadest category of vessels. After import, you will be able to find a list of all your Group Codes at Settings > Vessel Groups. This list will include the 'Group Code' and the 'Group Description'.
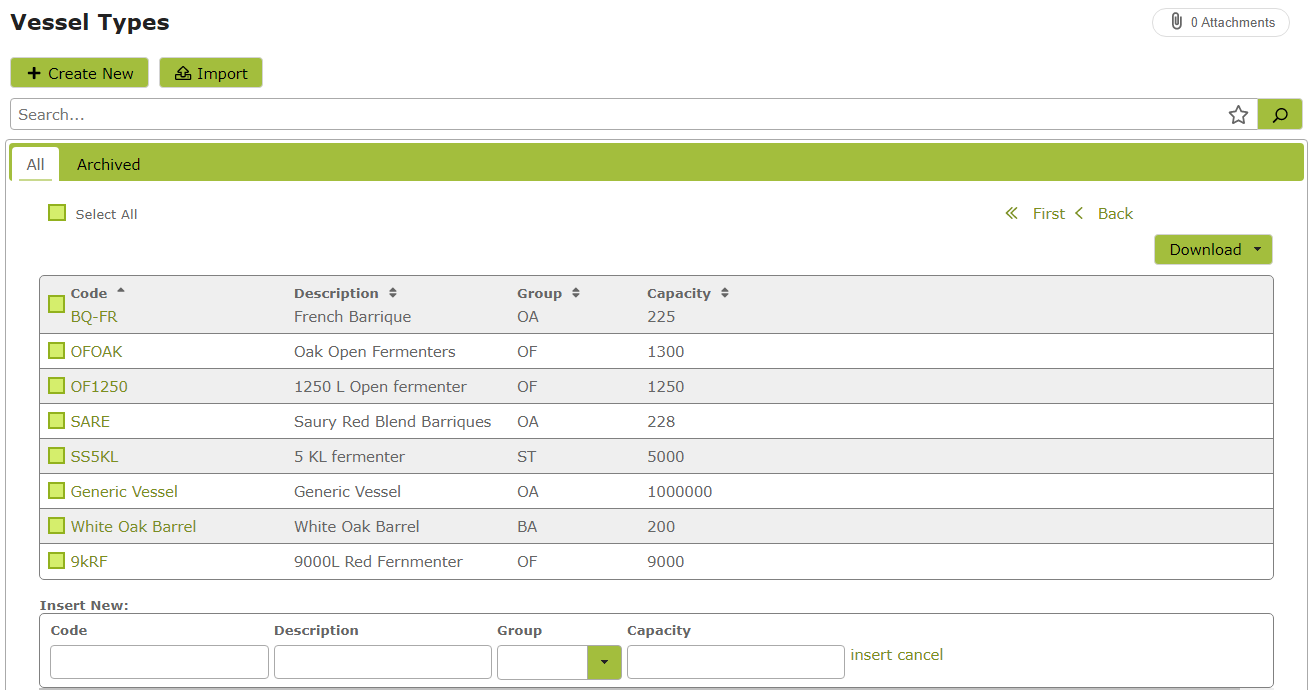
Type Code: This is a more specific category of vessels. You could think of a Vessel Type as being the blueprint for a group of vessels, so any group of vessels that have the same dimensions, capacity and made of the same material could be a distinct Vessel Type. After import, you will be able to find a list of all your Vessel Types at Settings > Vessel Types. This list will include the 'Type Code', 'Type Description' and 'Type Capacity'
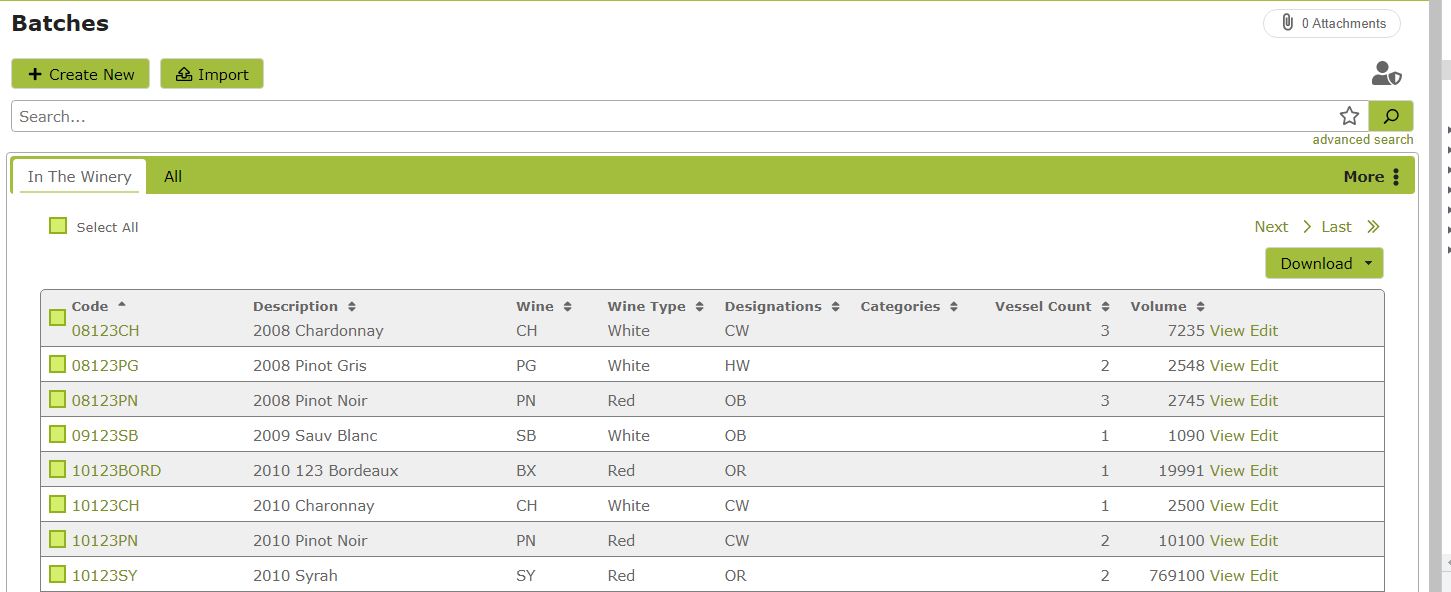
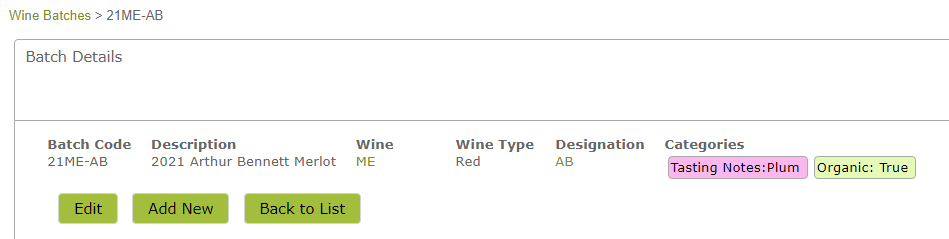
Batch Code: This is the code by which you identify your batch. After import, you will be able to find a list of all your Batches at Settings > Batches. This list will include the Batch Description, Batch Type Code (Wine Type), Batch Category Code (Wine), and Batch Designation Code (Designations).
Batch Status: The Batch status refers to the status of the batch in a particular Vessel. Examples of statuses could be 'juice', 'ferm','rkd', 'finished', 'heads', 'hearts', 'tails'. The same batch code could have a status of 'ferm' in one vessel and 'finished' in another. You don't need to include a Batch Status if not relevant to you, or if you would prefer to add this information later.
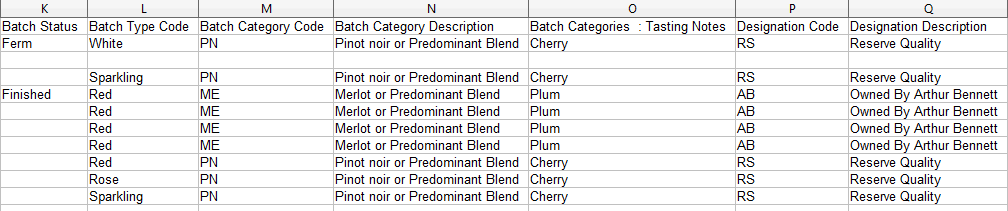
As well as being visible in Batches, the Batch Category Code will also be recorded in the Wine / Batch Categories part of the App, together with the Batch Category Description

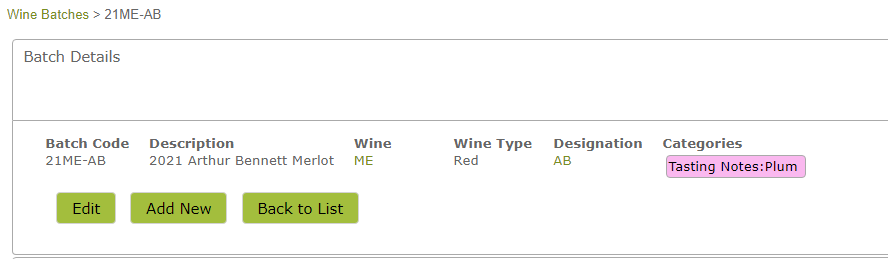
Batch Categories : Tasting Notes This is an example column to show you how you import batch categories. The sample data shows a 'Tasting Notes' category with values of 'Plum' and 'Cherry'. After import, you will be able to see this on your Batch as follows:
You will also be able to use these categories to filter or group reports.
If you are doing your initial Vessels import, I wouldn't worry too much about categories yet. You can always add them later. If you do add additional categories, it is probably best to do them from the Batches import page rather than from here. The following example from the Batches import sheet . . . .

would add two categories to the batch when imported:
We have, included 'Batch Categories : Tasting Notes' example on the Vessels import as well, so that new customers are aware of this feature. Other suggested uses: "Organic Status": Conventional | Certified | Transitional, or "Provisional Allocation": Black Label | Reserve | House Brand etc.
Designation Code and Designation Description are fields that are used to detail ownership. These fields will end up populating the Designations area of the App. A batch requires a Designation Code, you will need to complete this field if importing a non-empty vessel.

Volume: This is where you put the current volume of the vessel. If you don't include it, the vessel will be imported as empty and no batch information will be included.
ABV: This is an optional column, likely to be of more relevance to our distillery and some brewery customers, who are using the 'ABV Plugin'. It is where you put the Alcohol By Volume value of the Batch.
Total Cost: This is an optional column for including the cost of the batch. If you are on a subscription that includes costs, this cost will flow through to the product composition when you e.g. bottle it.
Rename Vessel Code: For an initial import, you would keep this column empty. This column is simply there, in case a situation arises in the future where you want to rename your vessels in bulk. In this situation, you would need to complete the 'Vessel Code' column together with the 'Rename Vessel Code' one to rename your Vessels. You may need to include the "Type Code" column to keep the validation happy even though you are really using that column.
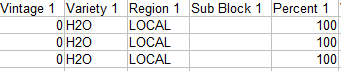
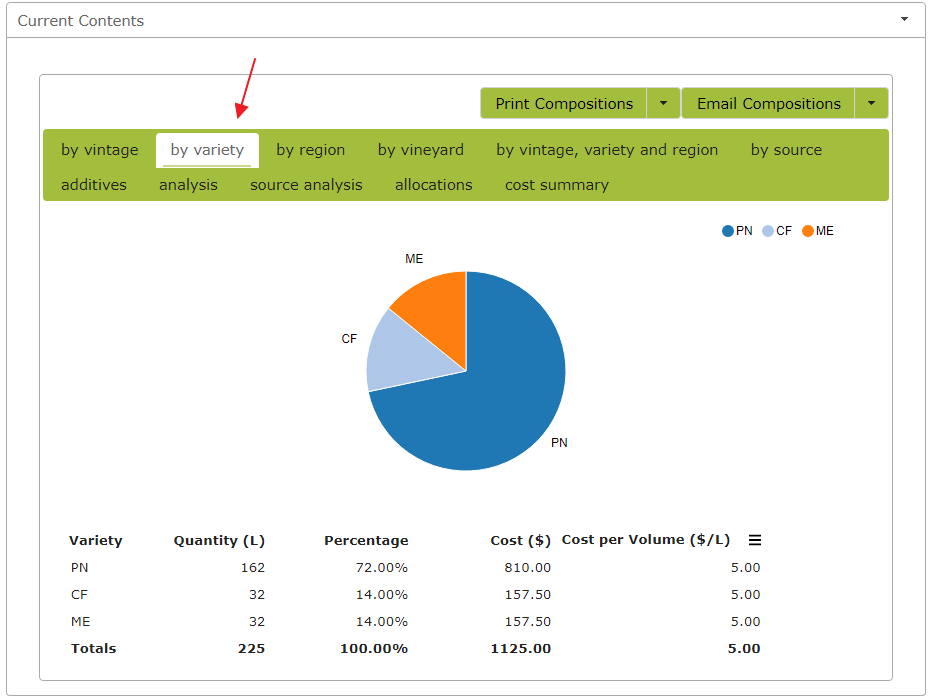
Vintage, Variety, Region, Sub Block, Percent: These columns allow you to describe your batch in more detail, identifying the make-up / source of the blend. After import, this information will appear in the composition area of a batch. For example, after importing the following data

the 'Variety' tab of this batch composition will look as follows. As you can see, by clicking the various tabs, you can also view the composition by vintage and region
For brewery and distillery customers, this information is often of less relevance. However, as the columns are required to be completed, look at the sample data for examples on how to complete.
For a Distillery, you data may look something like the following:

For a Brewery, something like the following would be sufficient;