Overview
Stock Adjustments allow you to change the Units in Stock for Stock Items at a specific time and location. Use Stock adjustments to:
- Initialise Stock Levels
- Record changes to stock levels e.g. breakages, expired product
- Perform Stock Takes.
In this document:
Opening Stock
When you first import StockItems into Vinsight, you can record the number of items in stock on the StockItems import spreadsheet. The importer will allow you to bring quantities of each stock item into a single location. However, recording opening stock levels as part of the initial stock items import is optional. If you do not have this information to hand or if you want to initialise the stock levels at multiple locations, you can instead use the Stock Adjustment or Stock Take features described herein after you have imported your stock. It is also important to note that once a stock item has been imported, you cannot use the importer to later change stock quantities. Again you should use Stock Adjustment or Stock Take features for this.
Adjusting a Single Stock Item
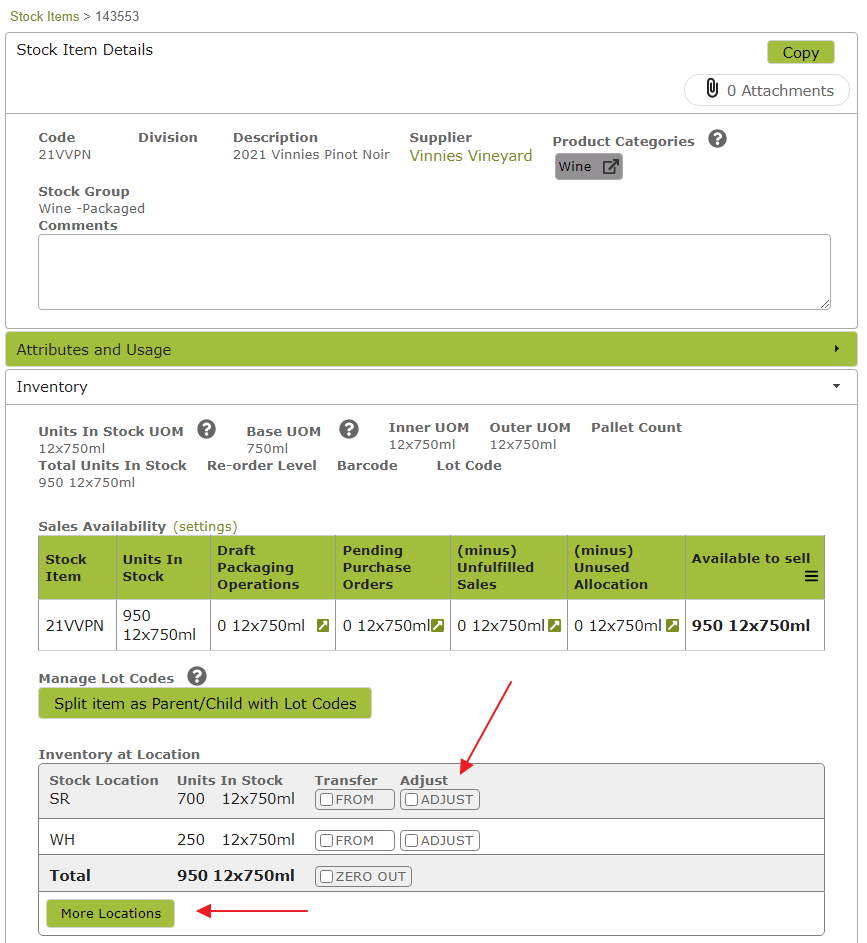
If you need to adjust the inventory quantities of a number stock items at once, you should use our Stock Adjustment, Stock Count Stock Take features described below. However for a single stock item, you can adjust it from inside the Stock Item itself.
To adjust a single stock item, open the relevant item and go to the Inventory area. You will see an ‘Adjust’ option next to each location where you currently have stock. If you want to add stock to a location which currently does not hold the product, you will need to click the ‘More Locations’ button
Click the ‘Adjust’ checkbox at the Location you want to adjust the stock at. In the resulting pop-up screen, complete details of the adjustment and then click ‘Adjust Item’.
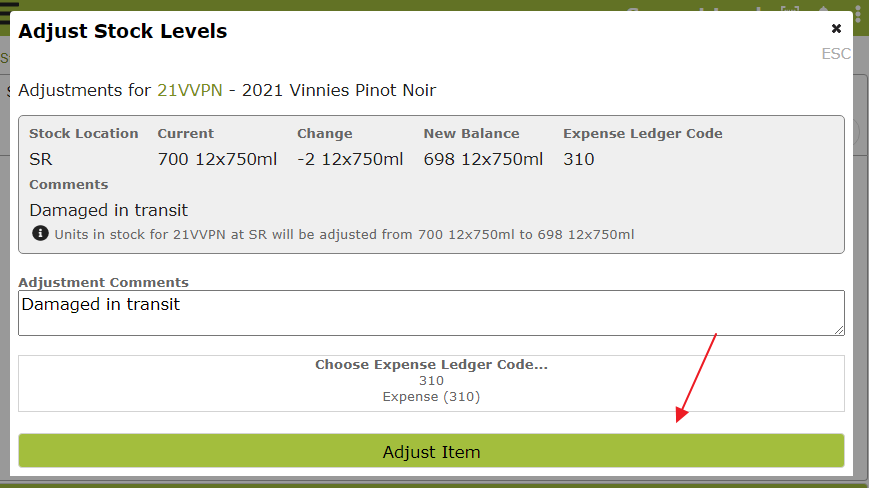
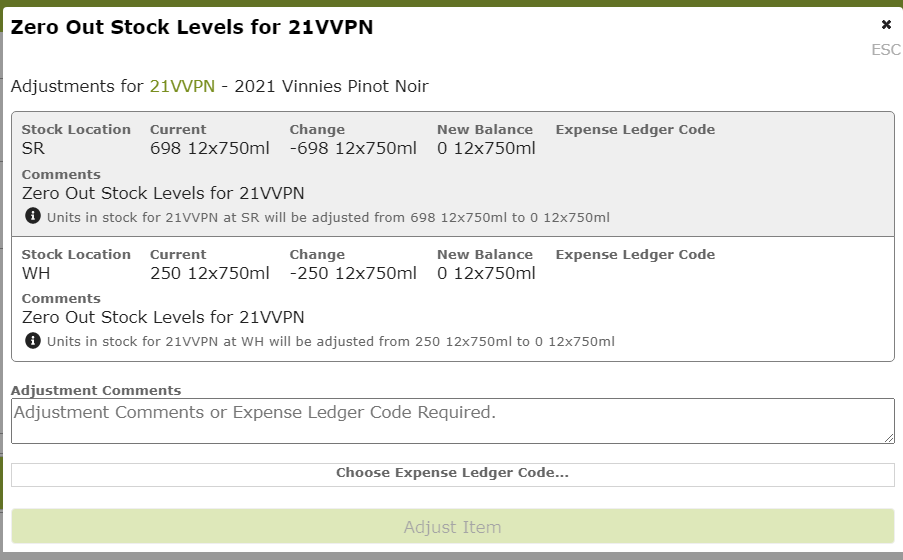
Note you will be unable to click the ‘Adjust Item’ button until you have entered either an Expense Ledger Code or Adjustment Comments. Once you click “Adjust Item” the movements for the Stock Item will be processed instantly, at today’s date.
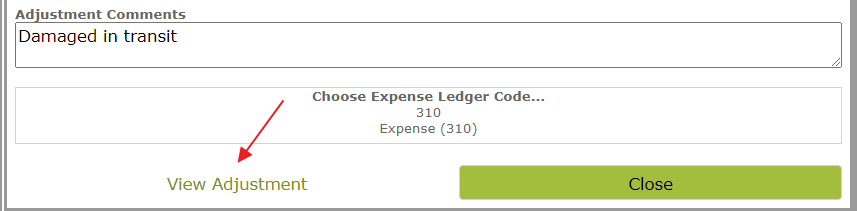
To view the adjustment you just made, you can click on the ‘View Adjustment Link’
Alternatively, you can go to Count > Stock Adjustments from the main menu and open the adjustment from the list.
All the adjustments you make within a single day will be added as line items to a single adjustment record. So if you first adjust this Stock Item in the SR location and then make a second adjustment in the WH location, or a second adjustment of a different stock item, they will all appear as separate line items in the one adjustment.
If you wish to prevent additional adjustments being added to the same record, you can close the adjustment, by navigating to it and clicking ‘Complete’.
Any adjustments created on a new day will automatically be recorded on a new adjustment, whether or not the prior one has been ‘Completed’.
Zero Out Stock
You are also able to ‘Zero Out’ the Stock from inside the Stock Item, by selecting the ‘Zero Out’ option next to the ‘Total’.
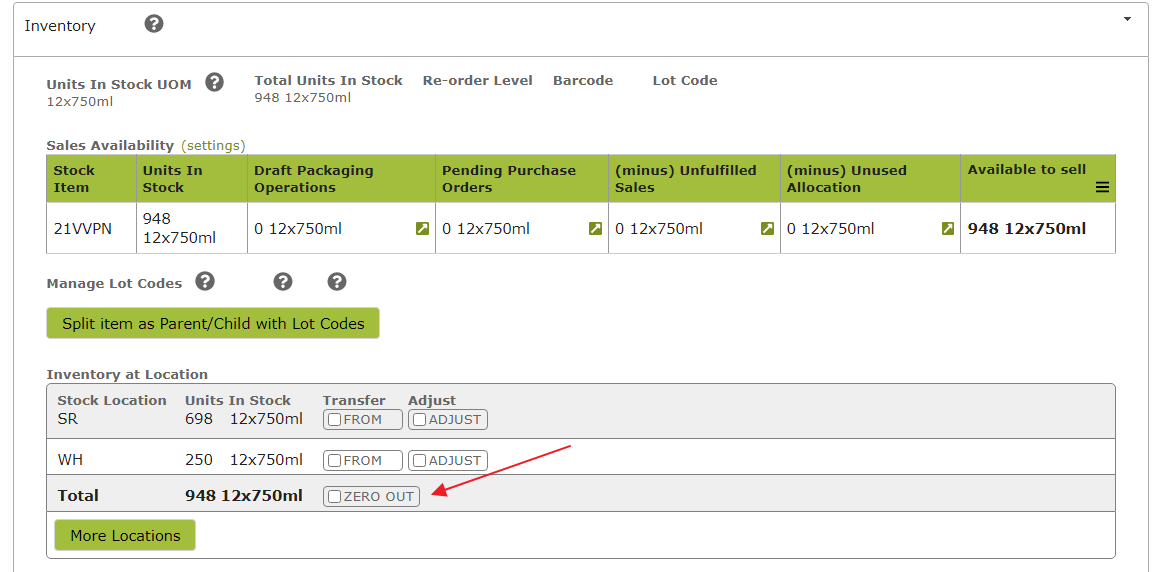
This will zero out the stock at all locations.
To Zero out stock at a single location, use the ‘Adjust’ option instead.
Transfer Stock
Finally, you can also use this area of the stock item to transfer stock from one location to another. You can read about this here Stock Transfers.
Adjusting Quantity of Multiple Stock Items
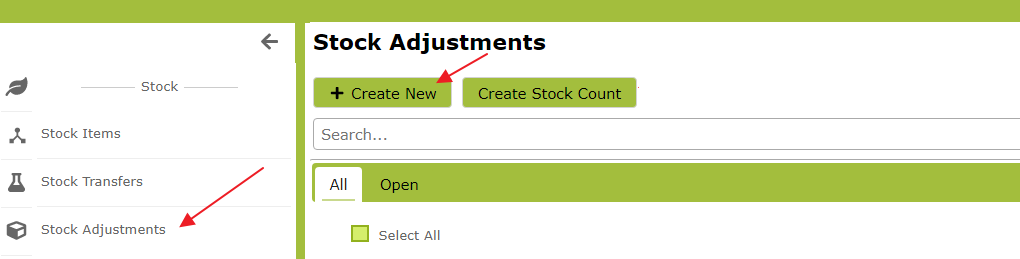
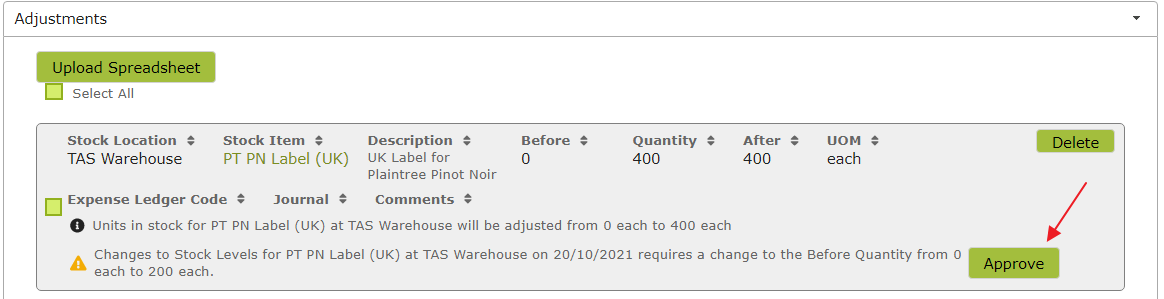
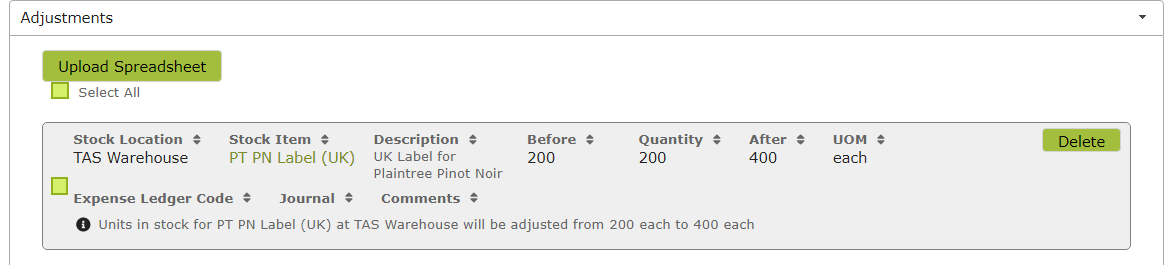
Use the Stock Adjustments feature to adjust the quantity of multiple stock items at once. To create a Stock Adjustment, navigate to Count > Stock Adjustments and click ‘Create New’.
In the next screen set the Adjustment Date. If the items you are adjusting are from a single location, select the Stock Location at the top of the page. If not, select each location as you add a new row. Note the ‘Date’ and ‘Stock Location’ will determine the initial stock level for each Stock item in each row.
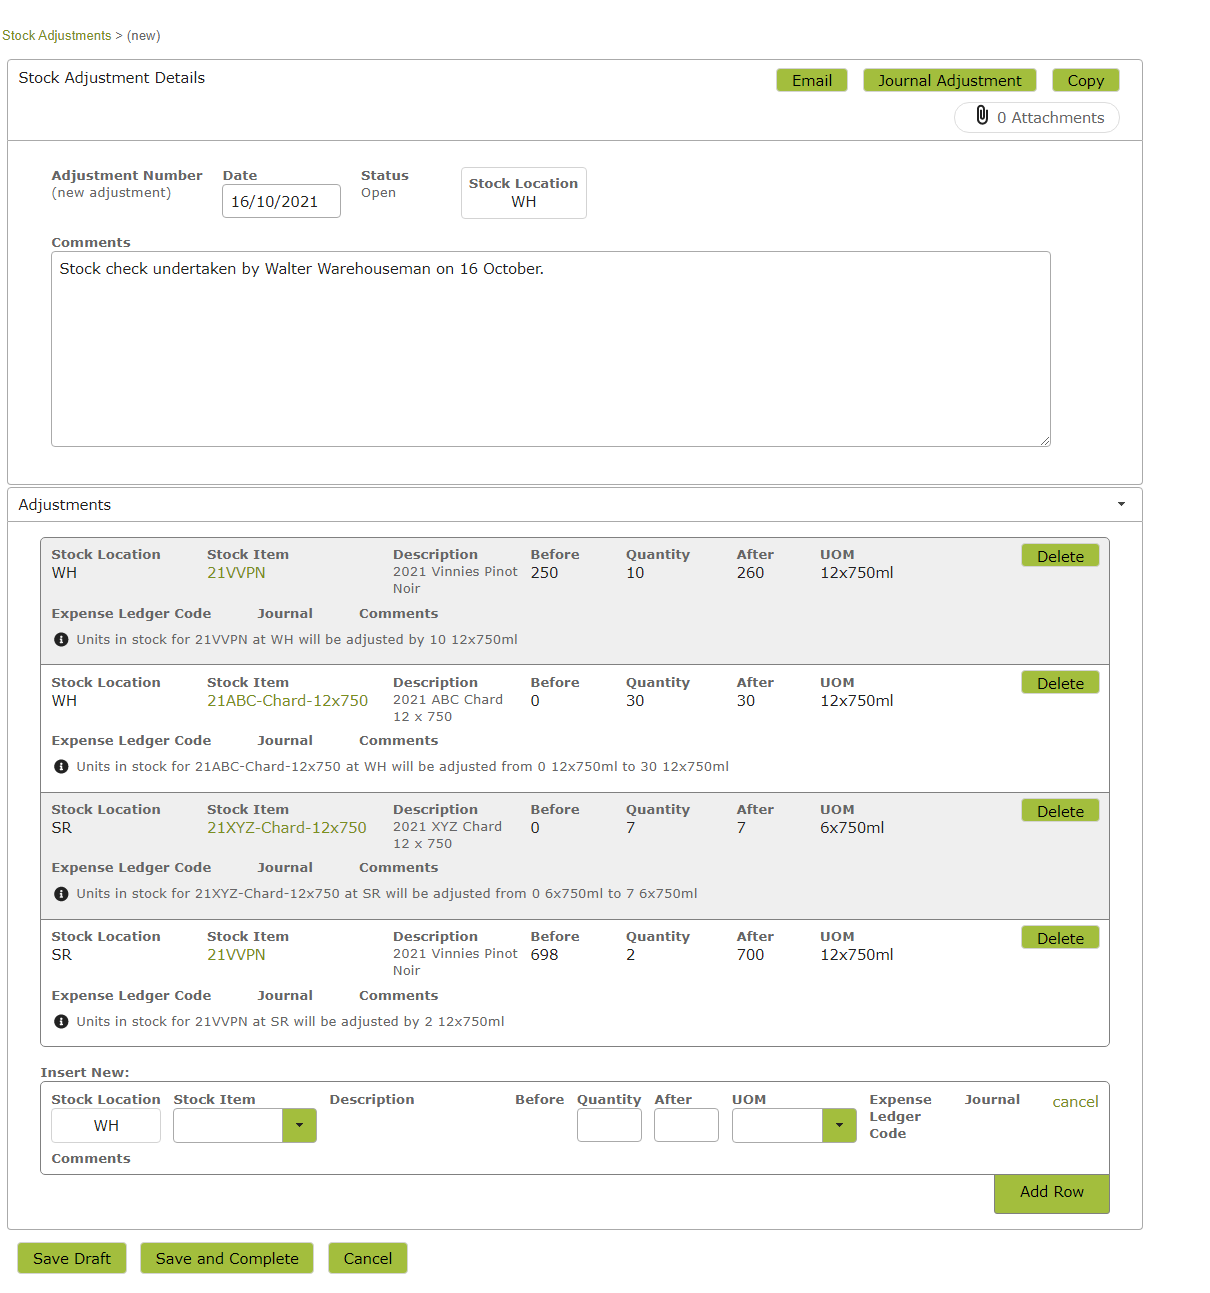
Click ‘Save Draft’ to save the draft or ‘Save and Complete’ to action the stock movements.

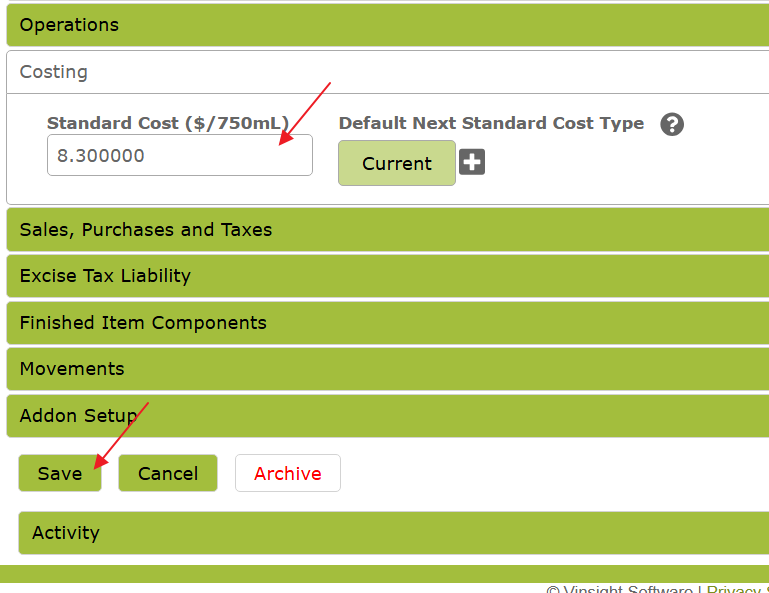
Adjusting Standard Cost of a Stock Item
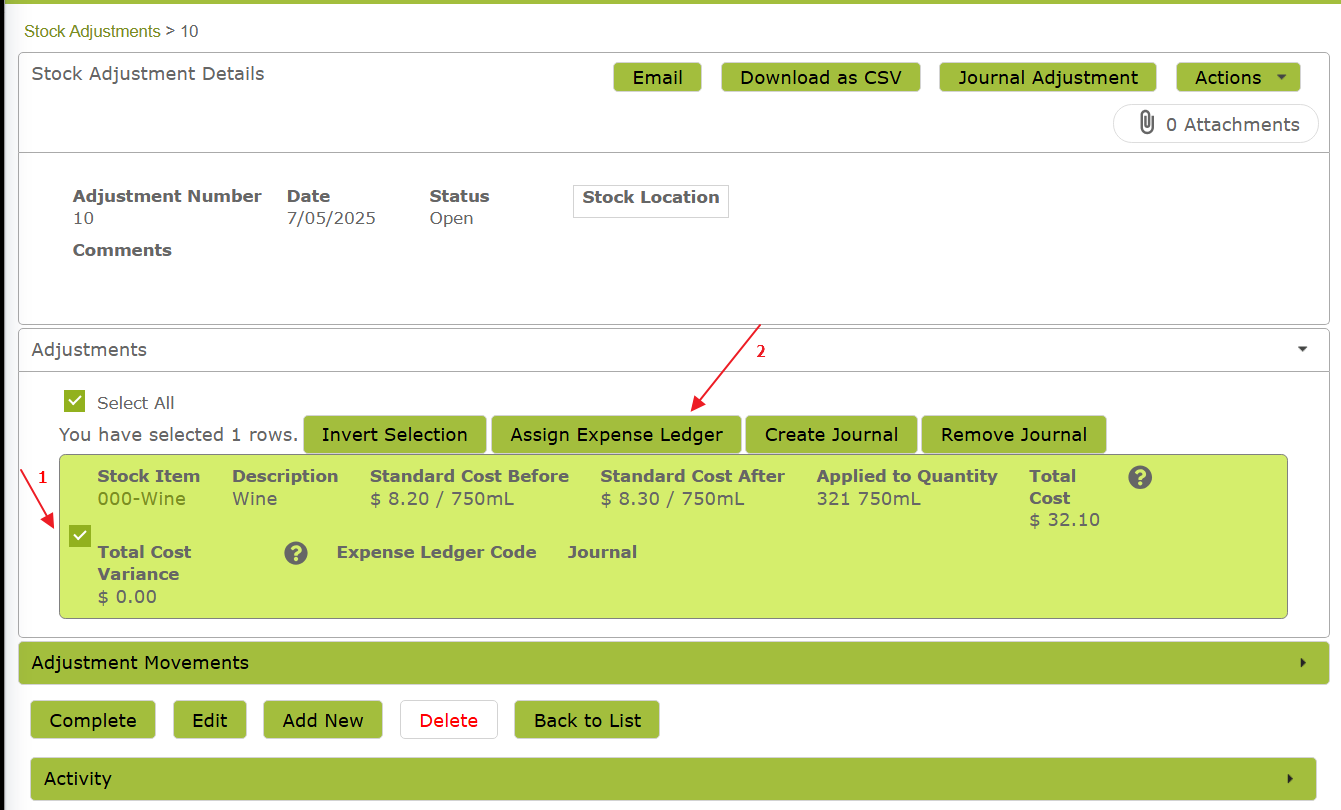
Whenever you edit the Standard Cost of a Stock Item, a line item is created in an open adjustment, which can be found on the Stock Adjustments list.
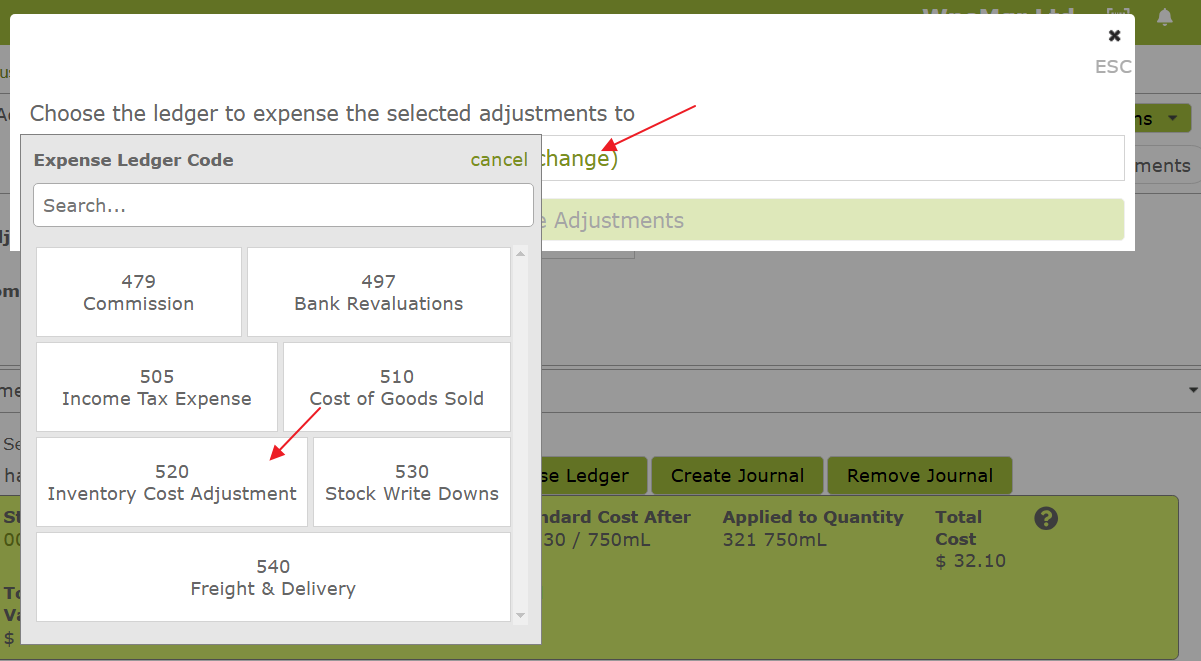
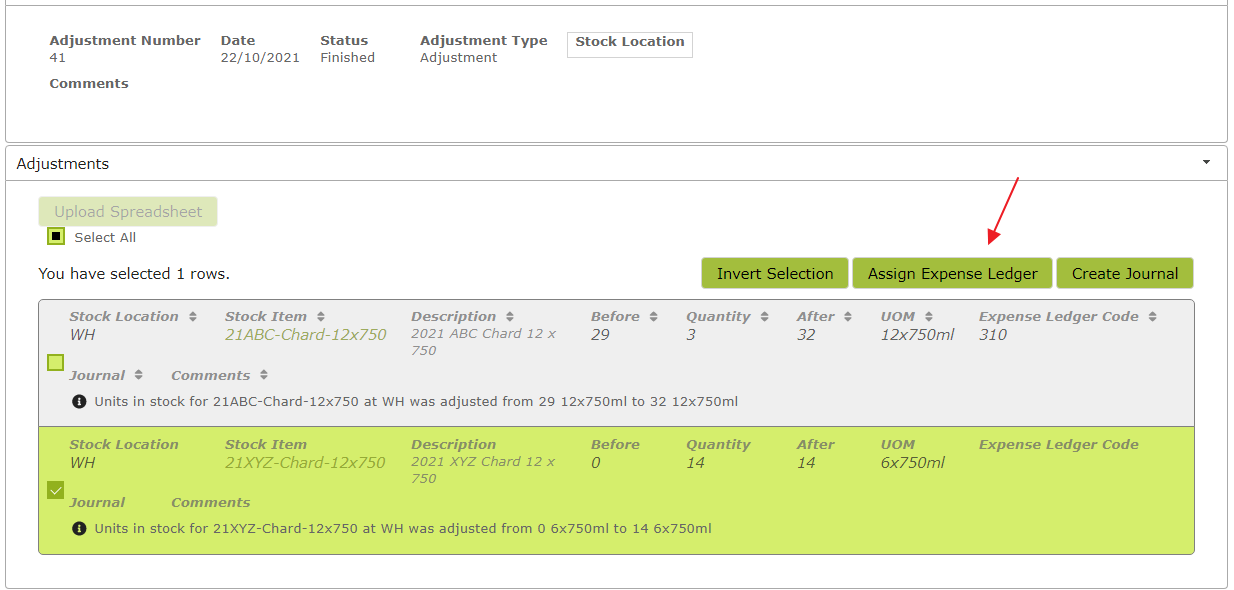
When you open the relevant Stock Adjustment, you will need to assign an expense ledger to the valuation change by selecting the line item(s) and clicking Assign Expense Ledger.
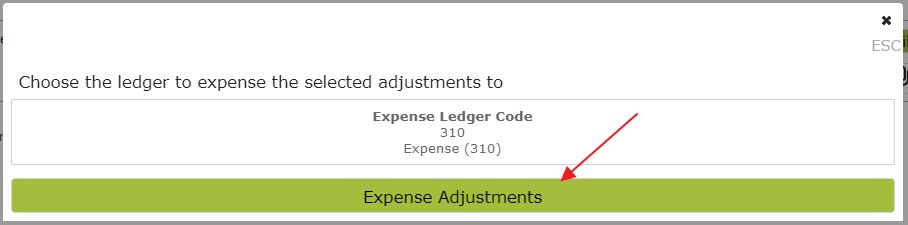
Next, choose the ledger to expense the selected adjustments to,
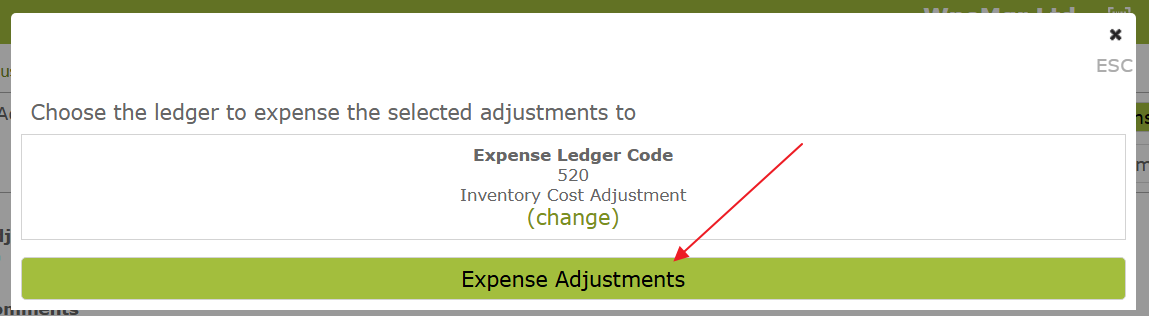
and click ‘Expense Adjustments’ to save that choice.
Once a ledger has been selected, you will be able to journal the adjustments, by selecting the line items you with to journal and clicking the ‘Create Journal’ button. The system will prevent you from making a journal if one has already been created for that line item.
Stock Count
The Stock Count feature is there to make it easy for you to count and record the quantities of all stock at a single location using the app. You can use this feature to perform an organisation-wide stock take. You will just have to create a new stock count for each of your locations. This feature is designed so that you can walk around the warehouse with a mobile device and enter stock counts directly into Vinsight.
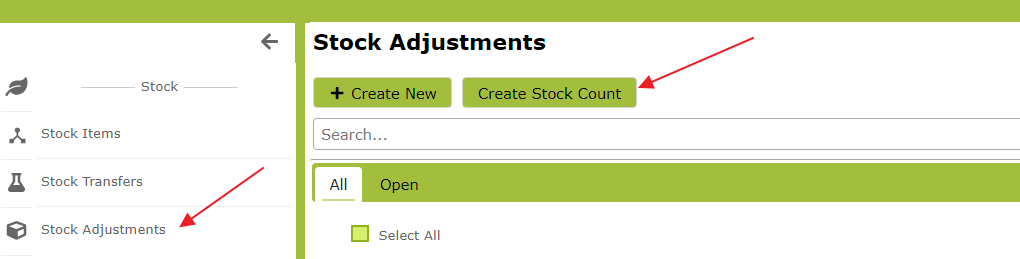
To perform a stock take, go to Count > Stock Adjustments from the main menu. From there, click the ‘Create Stock Count’ button
Select the location you wish to count the stock at, as well as any other filters that you require. Ensure you select your filters carefully, as going through the count process will require you to enter a ‘count’ for every item in the list.
Then click the ‘Create Stock Adjustment’ Count button.

Then click the link to view the Stock Adjustment. . .

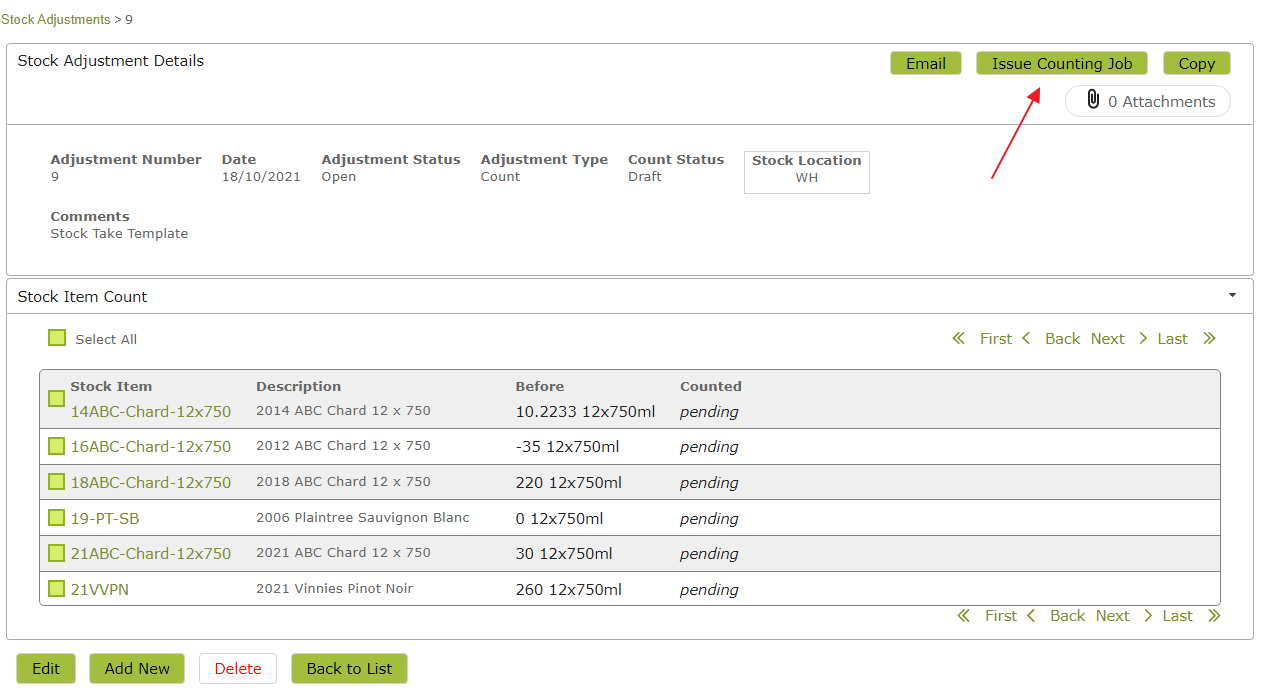
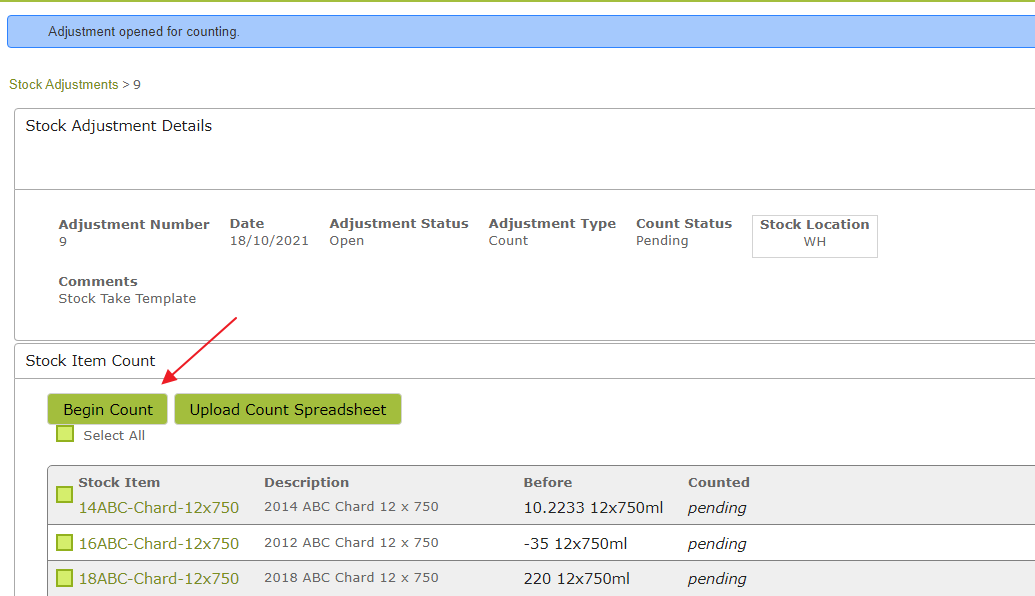
Clicking on the ‘View Stock Adjustment’ link will take you through to the prepared adjustment. As I selected all Sales Items at the ‘WH’ location above, the prepared adjustment will be prepopulated with these stock items. The adjustment will be in draft form. To start counting, click the ‘Issue Counting Job’ button in the top right of the page. This will open the adjustment for counting.
Click ‘Begin Count’ to begin the count
Click ‘Add Count’ next to the first item you are counting. If you can’t see it on the list, use the search bar to search for it. If you have Vinsight bar codes set up, you can scan the bar code from your mobile device to bring up the relevant stock item instead.
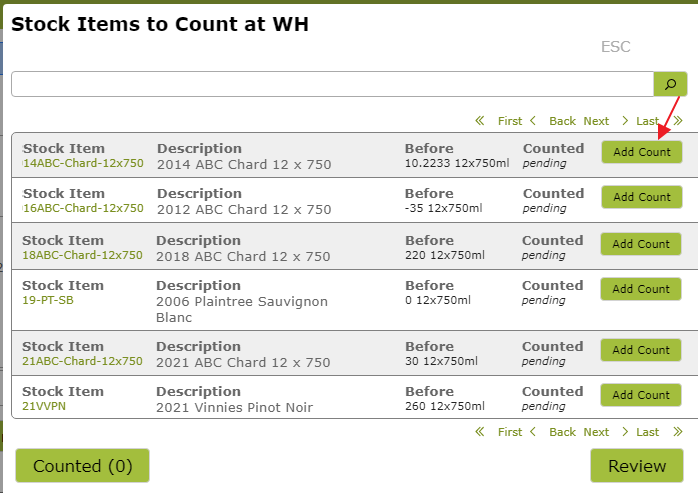
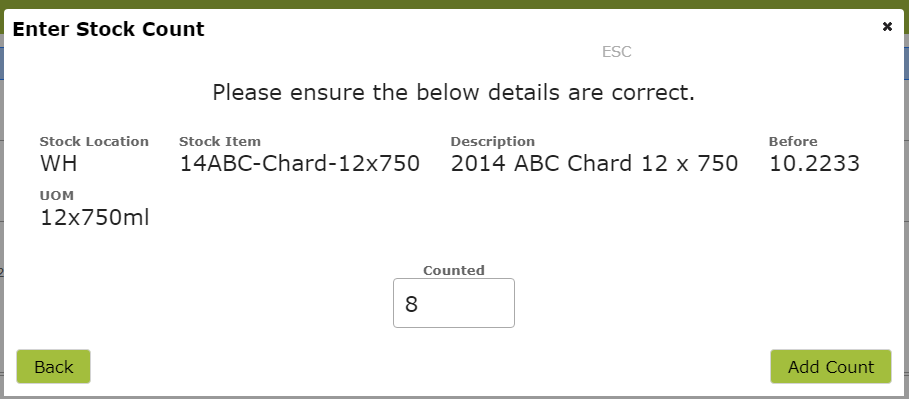
Enter the quantity in stock counted. The quantity counted may be larger, smaller or the same as the currently recorded ‘Before’ figure for that stock item.
As each count is entered, the stock item counted will be removed from the list. To review the items you have counted so far, click the ‘Counted’ button at the bottom of the pop-up.
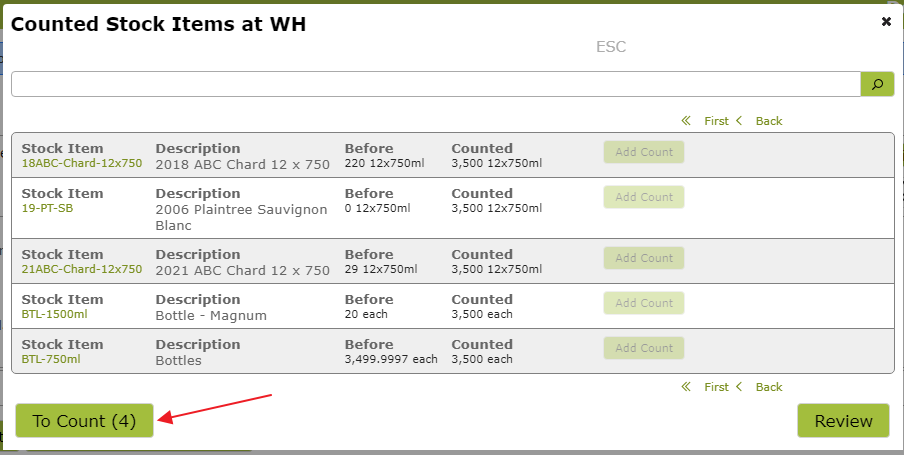
You can return to the count in progress by clicking the ‘To Count’ button.
Once the count is completed, you will see a screen similar to the following listing each stock item counted, together with its ‘Before’ and ‘Counted’ figures.
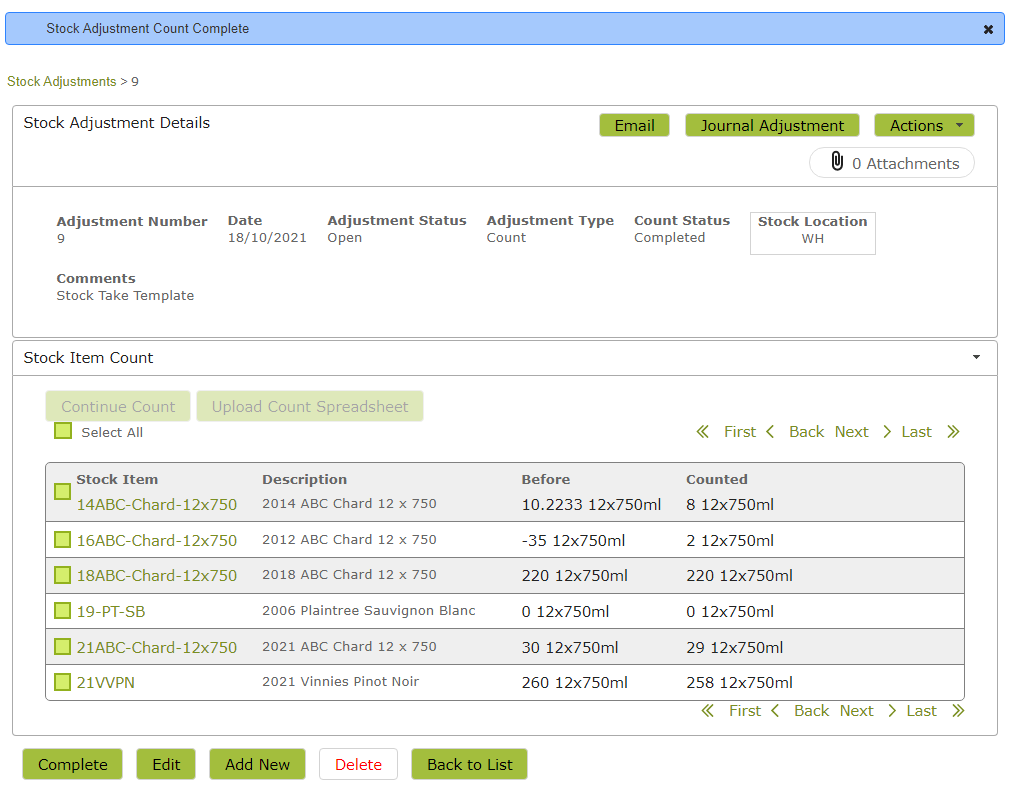
You can edit the list at this point, if you believe you have made any errors in the count.
To action the stock changes recorded, you will need to click the ‘Complete’ button at the bottom of the page.
Stock Take – Using spreadsheet
If you prefer to input the stock count figures by spreadsheet, you can download, complete and upload a spreadsheet covering single or multiple stock locations, use the ‘Stock Take’ on the Stock Items list. You can read more about this here, Stock Take
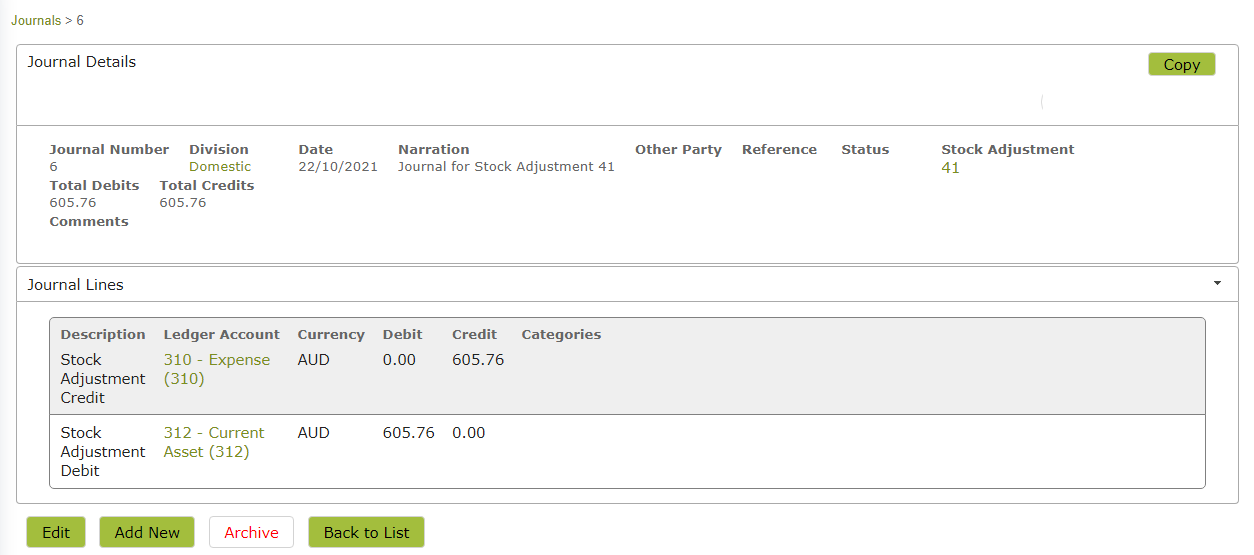
Stock Adjustments Journal
The Stock Adjustments feature also enables you to create a journal to account for the accounting losses or gains that result from any adjustments made.
To create a journal, first open the relevant adjustment. You will need to ensure that the Expense Ledger Code has been set for each of the items on the list you wish to journal. You can do this by selecting relevant Stock Items and clicking the ‘Assign Expense Ledger’ button. In the following image, only one of the listed items is missing an expense ledger code, so I select this one and click the ‘Assign Expense Ledger’ button.
This will take you to a pop-up where you can select and assign the account required.
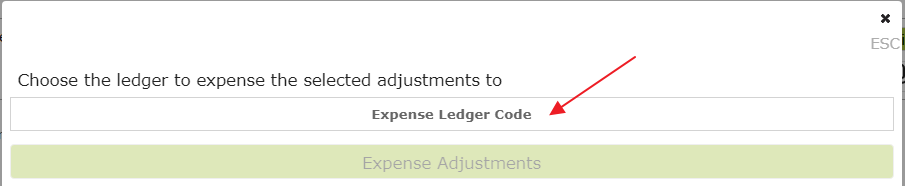
Select an account from the drop down list provided and click ‘Expense Adjustments’ to assign the account.
Before creating a journal, you should also ensure that the Standard Costs on your items are up to date. Standard Costs are used to set the values in the journal so accurate standard costs will ensure the accuracy of your journal. You will also need to ensure that the relevant stock items have their Asset Ledger code set, so Vinsight knows which account to debit.
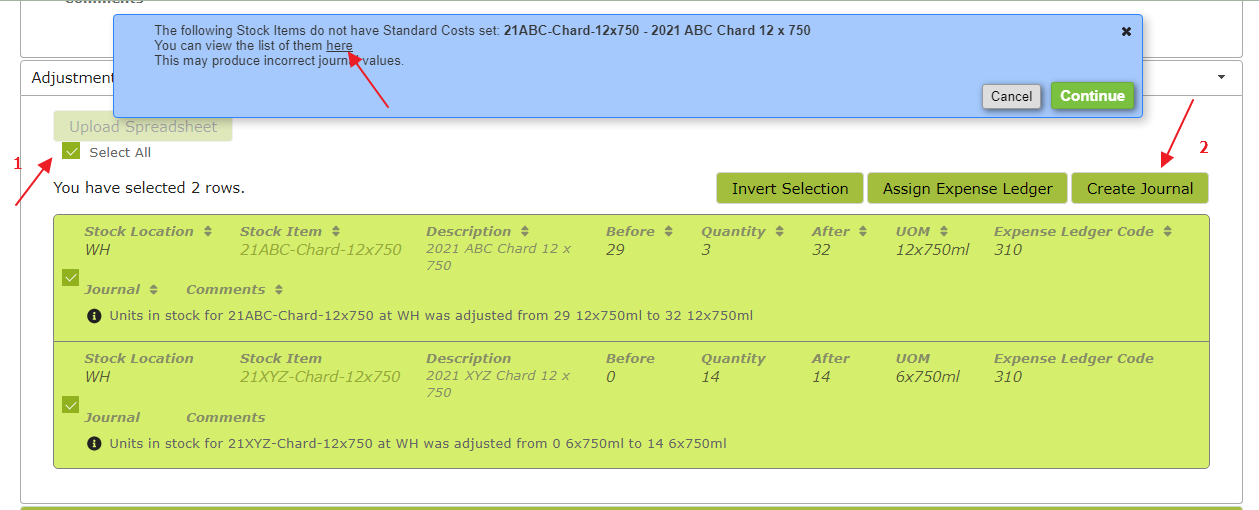
To create the journal, select the rows you want included and click the ‘Create Journal’ button.
If any of the items on the list do have have their Standard Costs set at all (i.e. if they are zero), you will get a notification to this effect, and a link to those stock items so you can update them. Vinsight will not prevent you from continuing to create your journal if you are happy for the Standard Cost of the relevant item to be zero, however this will likely defeat the purpose of the journal as there will be no value to journal.
You will also get an error message if any of the relevant stock items do not have their Asset Ledger Codes set. Again, click the link in the error message to navigate to a list of the Stock Items missing this ledger code.
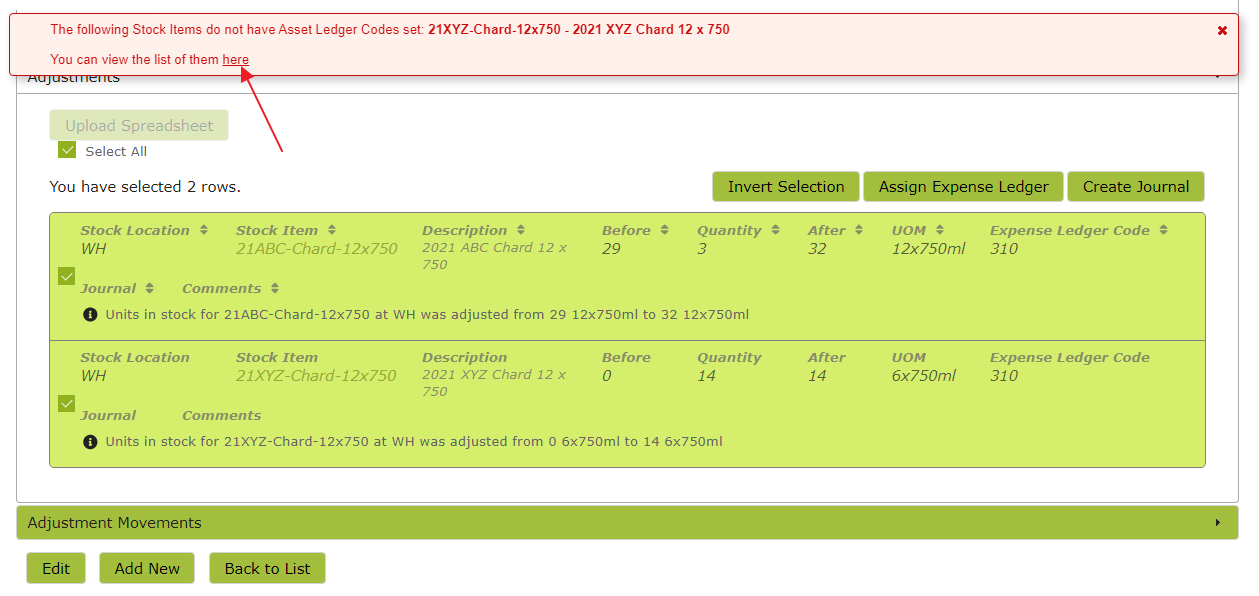
After fixing any errors, return to the adjustment and try clicking ‘Create Journal’ again. Once the journal has been successfully created, you will get a notification with a link to the journal created. You can also navigate to the journal from the journals list found at Account > Journals.