Customising Sales Orders for Printing or Emailing – Invoice Templates
Overview:
Coming soon: Sales Order Print and Email will shortly move to this new template style by default. Until that change is released, continue using the current templates and follow the existing documentation, Customising Sales Orders for Printing and Emailing
You can customise a Sales Order before printing or emailing it and save that format for future use as an Invoice Template. This way you can use the Sales Order to create Tax Invoices, Packing Slips or similar and can specify information to include or exclude. There is also flexibility to change how these documents look, including themes, layout, pricing display, and custom remittance or footer text. While this feature is new, old-style templates remain available under Legacy Templates in the Print and Email menus. We encourage you to move to the new template style as legacy options will be phased out over time.
In this document:
-
- Customising Sales Orders / Invoices
- Themes
- Printout Types, Title and File Name
- Exclude Non-Inventory Items
- Hide Kits
- Display Amounts As
- Logo and Company Settings
- Custom Remittance Instructions and Footer
- Advanced Layout Controls
- Showing, Hiding and Re-ordering Properties
- Conditionally Show or Hide Properties
- Moving Regions
- Stylesheet
- Saving Your Changes
- Deleting a Template
- Combined Print Templates
- Converting Legacy Templates
- Setting a Default Template per Customer
- Printing from the Sales Order List
- Customising Sales Orders / Invoices
Customising Sales Orders / Invoices
You can customise the format of your Sales Order from the Sales Order page by clicking ‘Setup / Edit Print Templates…’ on the Print drop-down menu . . .
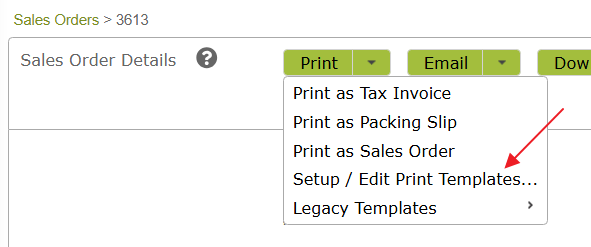
From there, click on the template you wish to edit. If creating a new template, it won’t matter which link you pick as you can change between printout types on the editing page as well.
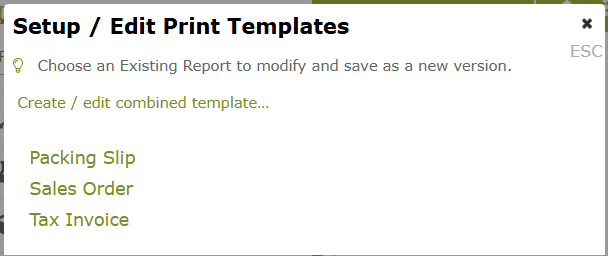
Once you have the editing page open there are a number of things you can do to customise the templates.
- Themes
- Printout Types, Title and File Name
- Exclude Non-Inventory Items
- Hide Kits
- Display Amounts As
- Logo and Company Settings
- Custom Remittance Instructions and Footer
- Advanced Layout Controls
- Showing, Hiding and Re-ordering Properties
- Conditionally Show or Hide Properties
- Moving Regions
- Stylesheet
- Saving Your Changes
- Deleting a Template
- Combined Print Templates
- Converting Legacy Templates
About the on-screen preview: The preview in the template editor is there to help you see the effect of your choices — which regions and properties are shown or hidden, and how they are ordered. It is not always an exact representation of the final printed or emailed PDF. Some details, such as page breaks, repeating footers, exact logo positioning, and fine layout spacing, can differ between the browser preview and the finished document. Print or download a PDF when you need to confirm the exact result of your settings.
1. Themes
Before you edit your template, we recommend selecting a theme.

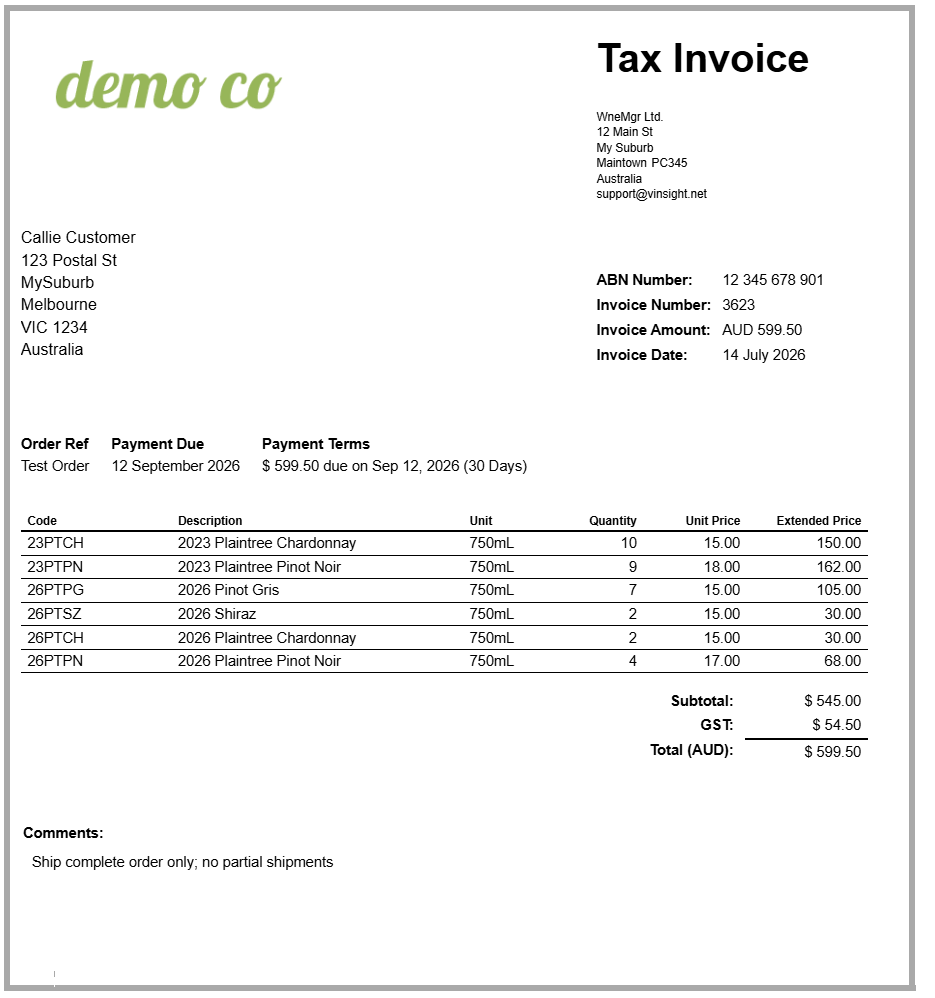
If you have been using the App for a while, the Standard theme is the one that will create sales documents that most closely resemble the historic Tax Invoices and Sales Orders created by the App. If you want to try something a little different, take a look at Theme 1. As you click between themes on the App, you will be able to see the changes they make to your orders.
Standard Theme:
Theme 1:
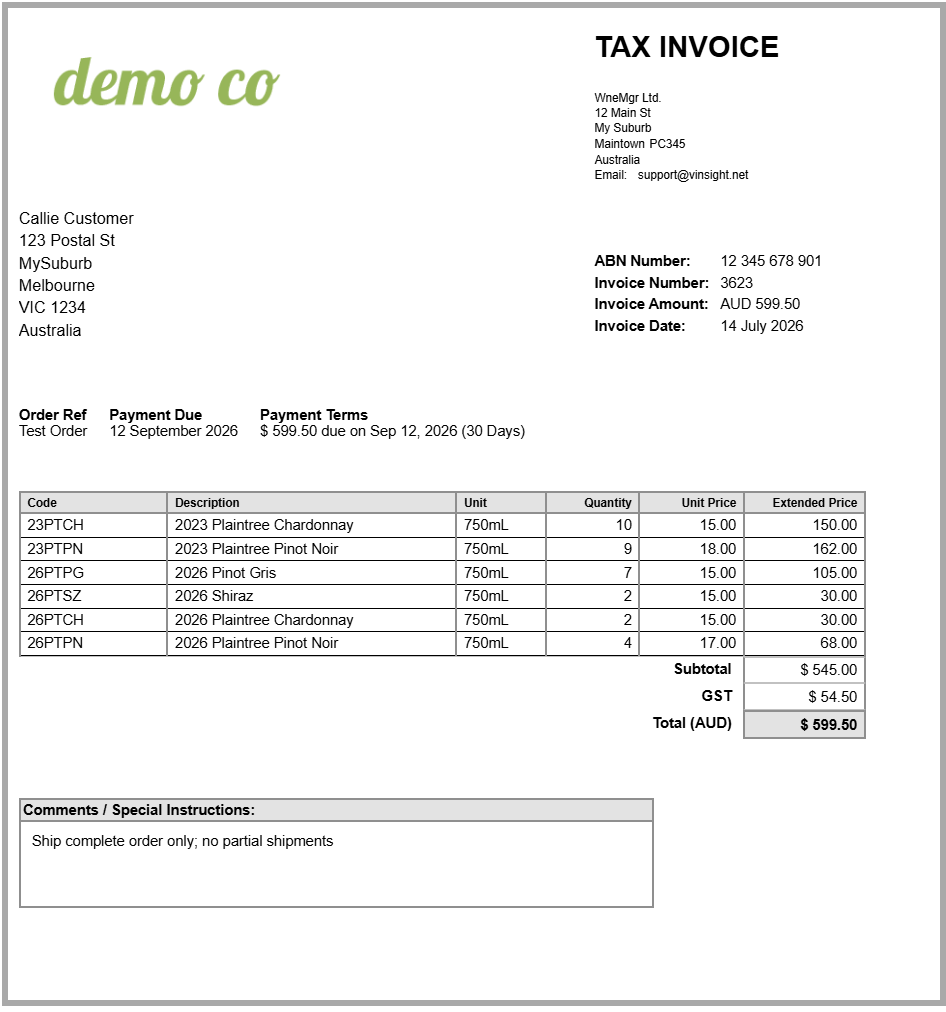
If you have some understanding of HTML and CSS, there is also some ability to customise a theme further. See ‘Stylesheet‘ below. We have included Theme 2 as an example of the types of changes you can make, if you have these skills.
2. Printout Types, Title and File Name
Printout Types:
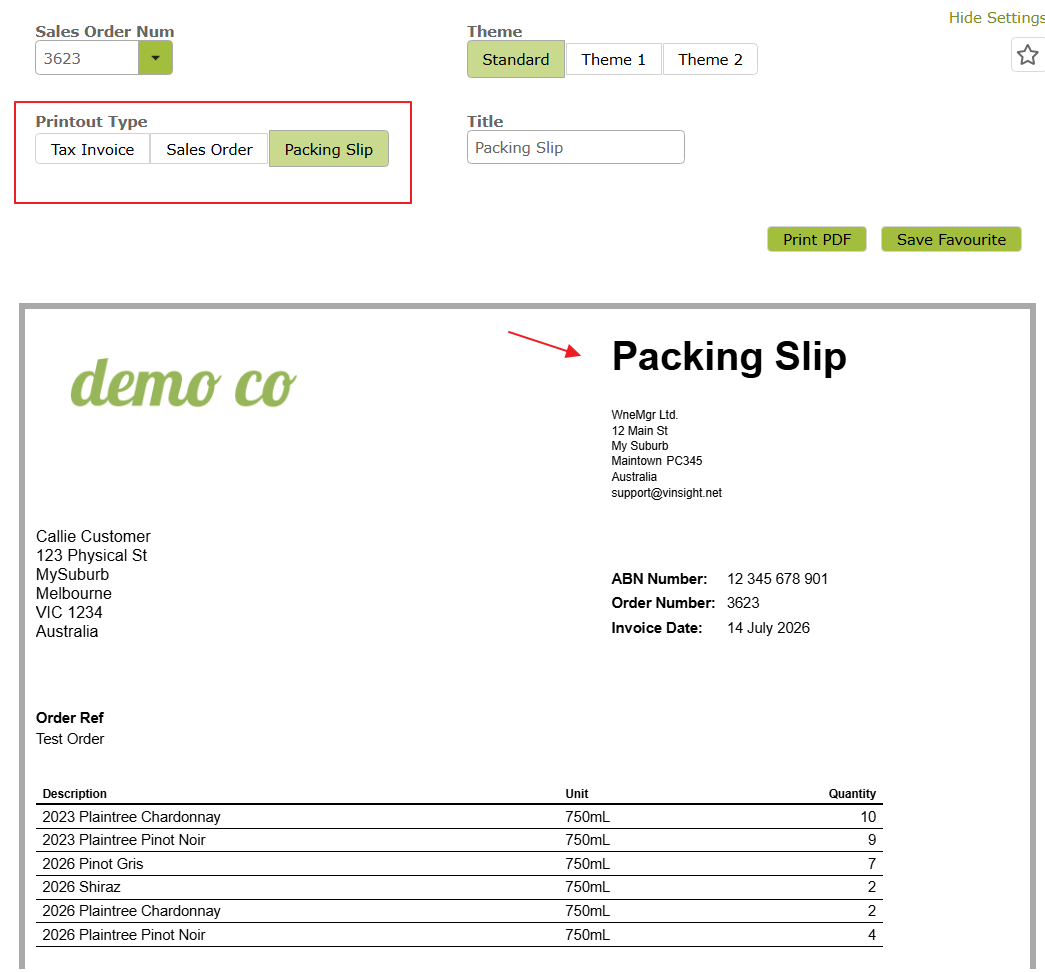
The printout type parameter lets you quickly select a document type that includes some default settings, hiding and showing different regions depending on the type. For example, a Tax Invoice printout type will, by default, show pricing and payment information, whereas a Packing Slip will hide pricing, subtotals, and remittance instructions. You can however customise the exact information shown by selecting properties to hide and show yourself. See Showing, Hiding and Re-ordering Properties below.
Selecting a printout type will also change the heading at the top of the printout, so that it reads Tax Invoice, Sales Order or Packing Slip depending on the printout type selected.
Title:
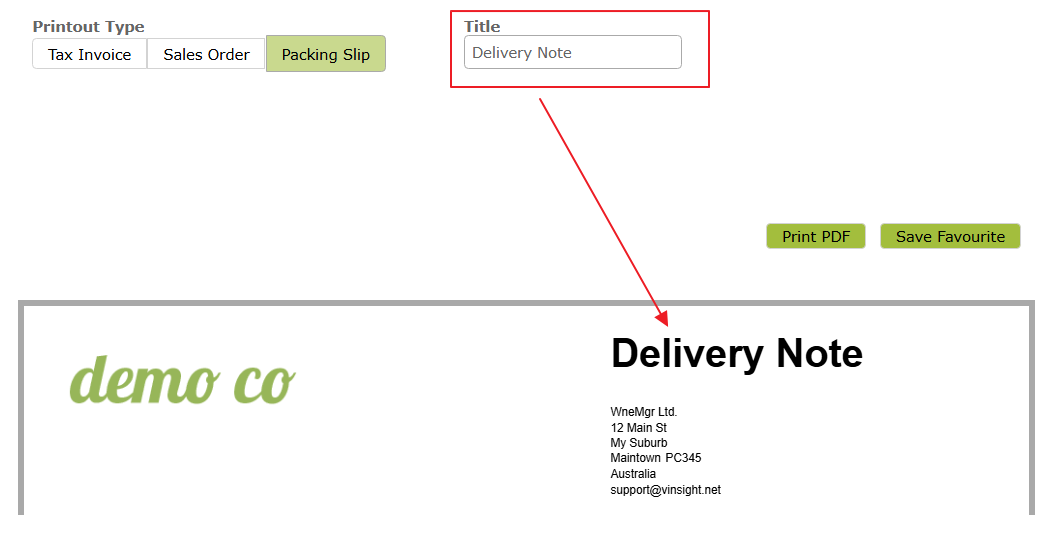
You can also change the ‘Title’ field directly if you want different wording on the printed document.
A field can be included in the Title, if required. Just click the field-picker, select a field from the drop-down list, then click the ‘Add Field’ button. 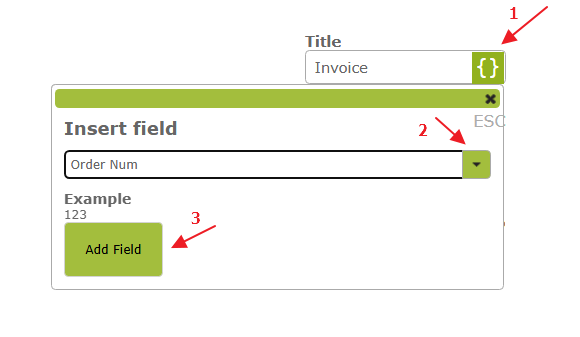
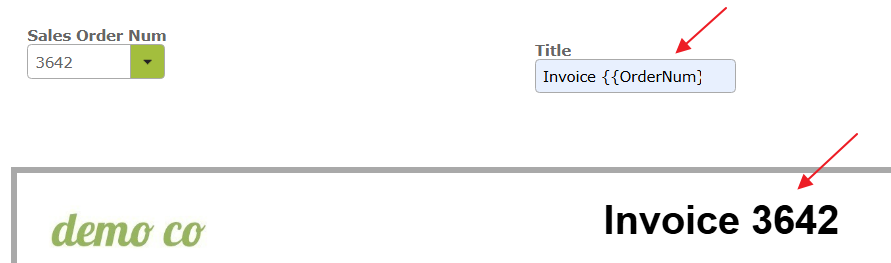
You will see the result in the preview and printed document.
File Name:
You also have the option of adding a File Name if you wish the downloaded or emailed file to have a specific name. The order number and customer are appended to any name selected here. For example if you typed “Delivery Note” into the ‘File Name’ field. . .

that name will be used in the file name and email subject line.
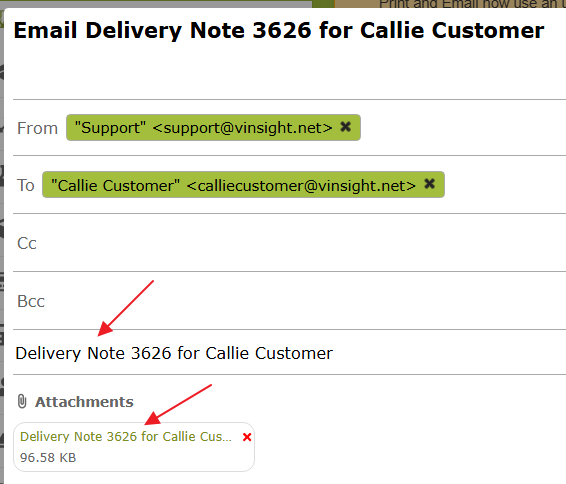
If you leave the ‘File Name’ field blank in a template you are setting up, the ‘Printout Type’ will be used for the instead, so the email subject and attachment file name above would instead be ‘Packing Slip 3626 for Callie Customer’.
3. Exclude Non-Inventory Items
When “Exclude Non-Inventory Items’ is set to ‘YES’, order lines for stock items that have ‘Track Inventory’ off are hidden, except parent and composite/kit stock items (those stay listed). This is included to enable you to hide things like shipping or freight charges on e.g. a packing slip.
Defaults by Printout Type:
- ‘Tax Invoice’ and ‘Sales Order: off (all order lines are shown)
- ‘Packing Slip: on (non-inventory lines are hidden)
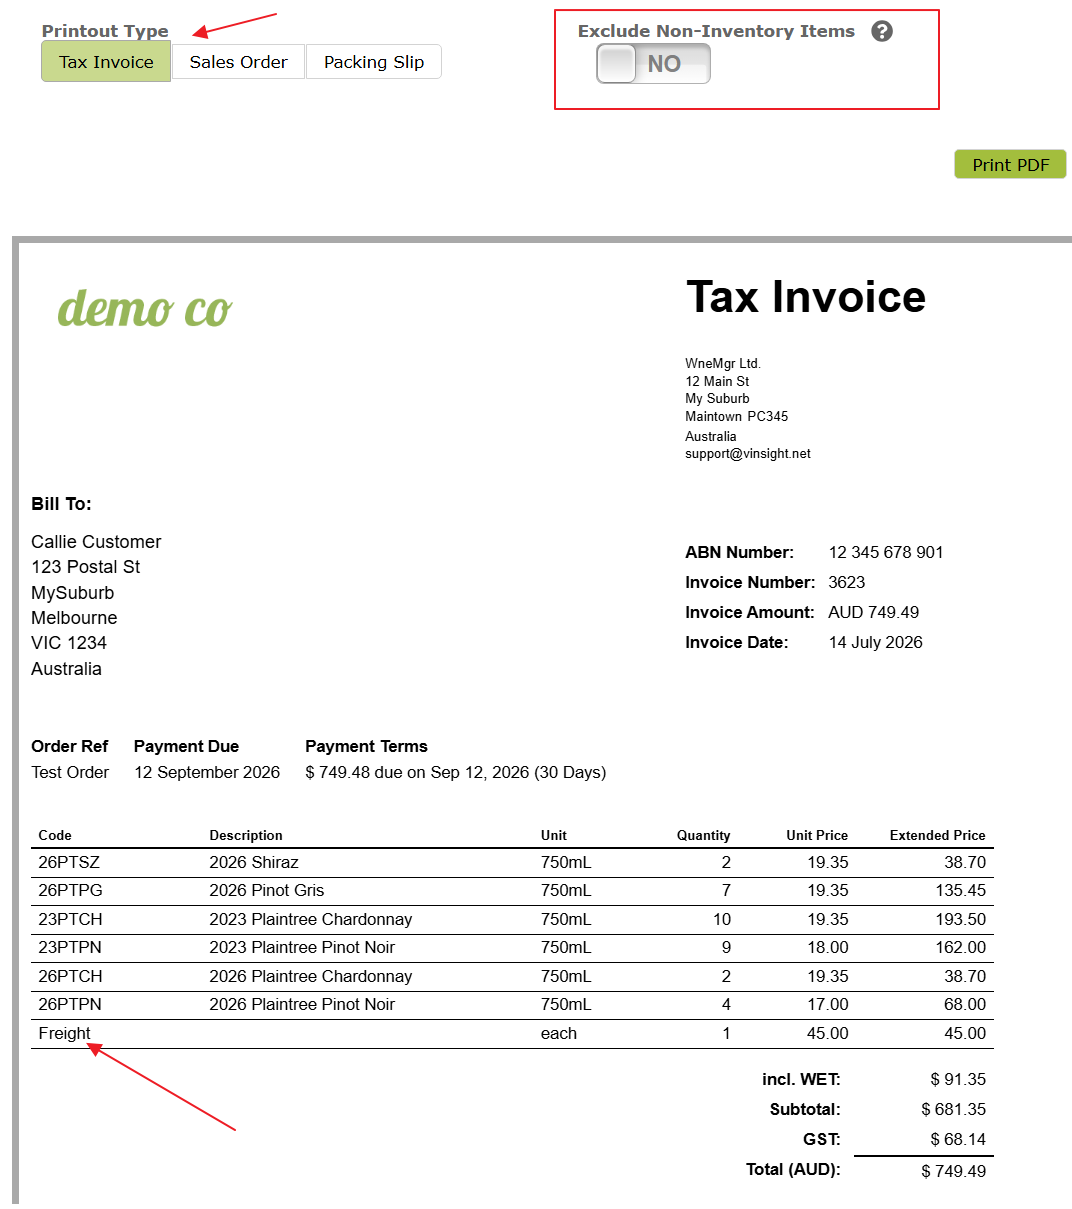
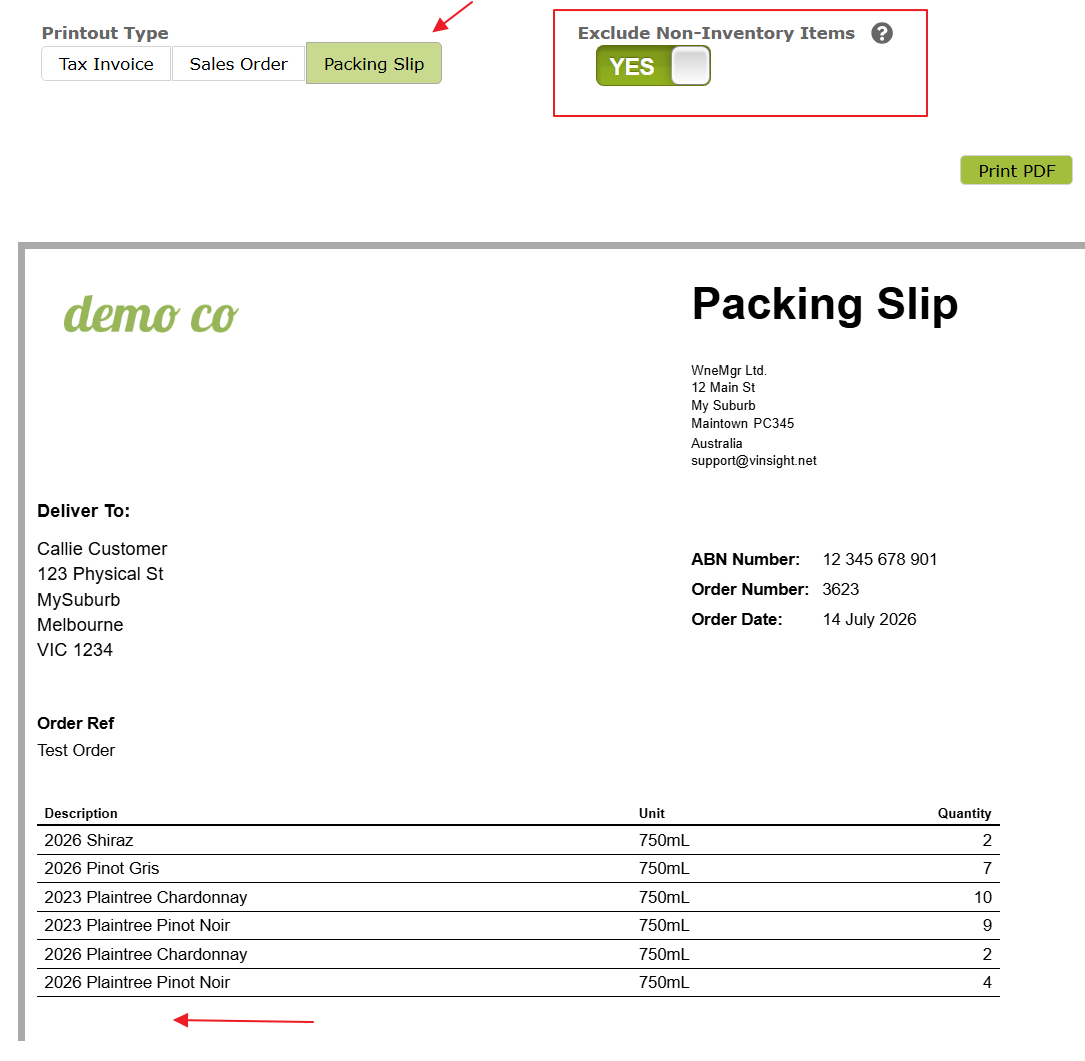
The following shows the Stock Item attributes for the ‘Freight’ item being used in this example. As its ‘Track Inventory’ attribute is set to ‘NO’ it is considered a ‘non-inventory’ item on the Sales Orders it is added to, and will be excluded from the ‘Packing Slips’ by default.
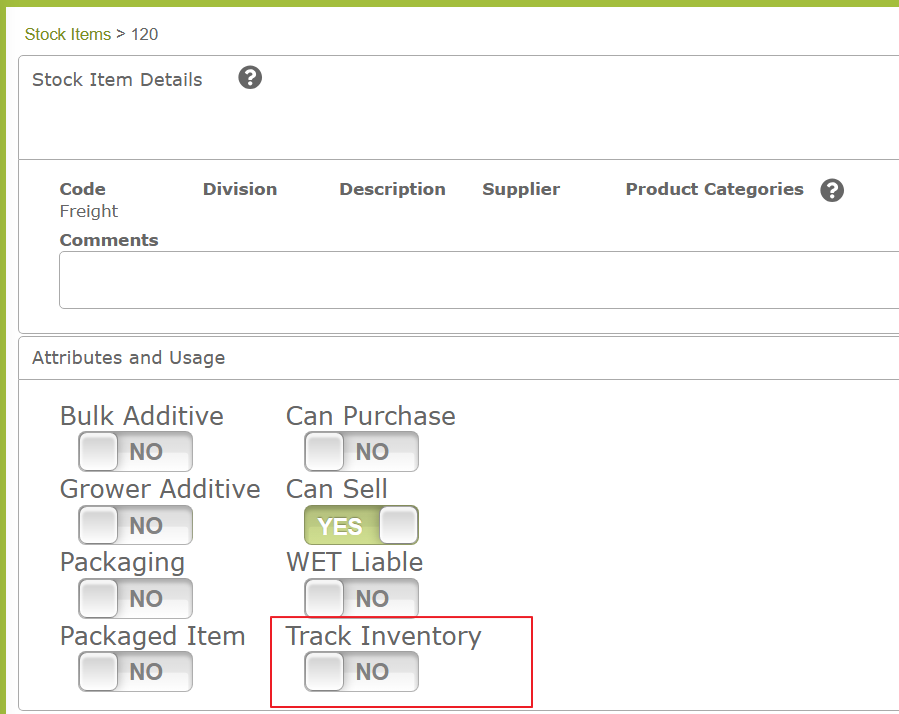
Changing Printout Type resets this parameter to that type’s default. You can override this default by changing the ‘Exclude Non-Inventory Items’ parameter yourself and saving the template as a favourite — see Saving Your Changes.
Tip: Order totals are not recalculated. On priced printouts, visible lines may not add up to the total if non-inventory items are excluded.
4. Hide Kits
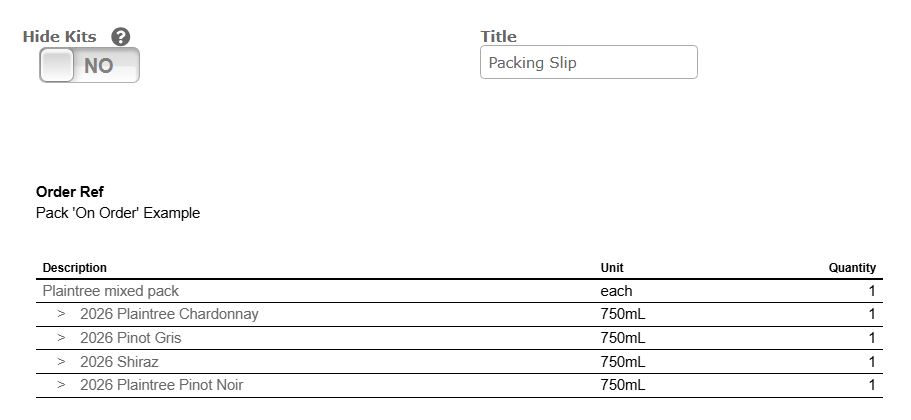
This parameter is only relevant to Sales Orders that include to kits or composite stock items that have been marked as ‘On Order’, rather than ‘On Despatch’. An ‘On Order’ kit will display the child component items in a Sales Order, whereas an ‘On Despatch’ kit will not. (See Composite Products (Kits) for more information regarding the difference between the two, and when to use each type). By default, an ‘On Order’ kit will display as follows with both the parent and child component items listed.
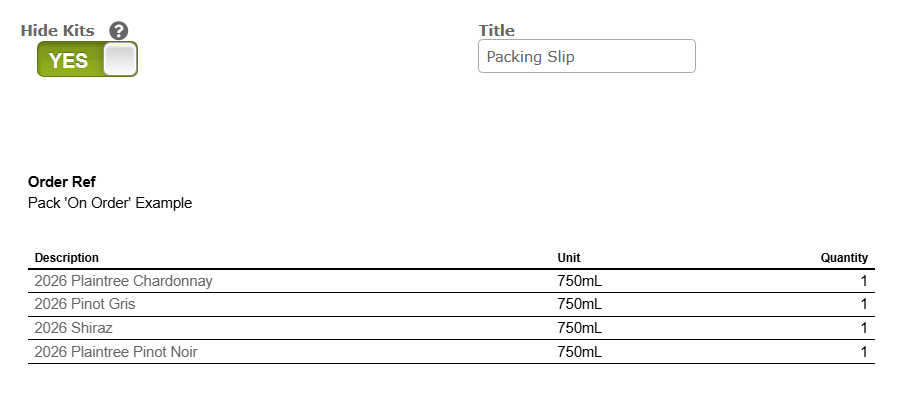
When ‘Hide Kits’ is set to ‘YES’ the composite item will be hidden and only the components will be displayed.
5. Display Amounts As
The ‘Display Amounts As’ setting controls how unit and line prices are shown, and how taxes appear in the subtotals section.
- Tax Exclusive: Prices exclude tax. Tax is shown separately at the bottom of the order.
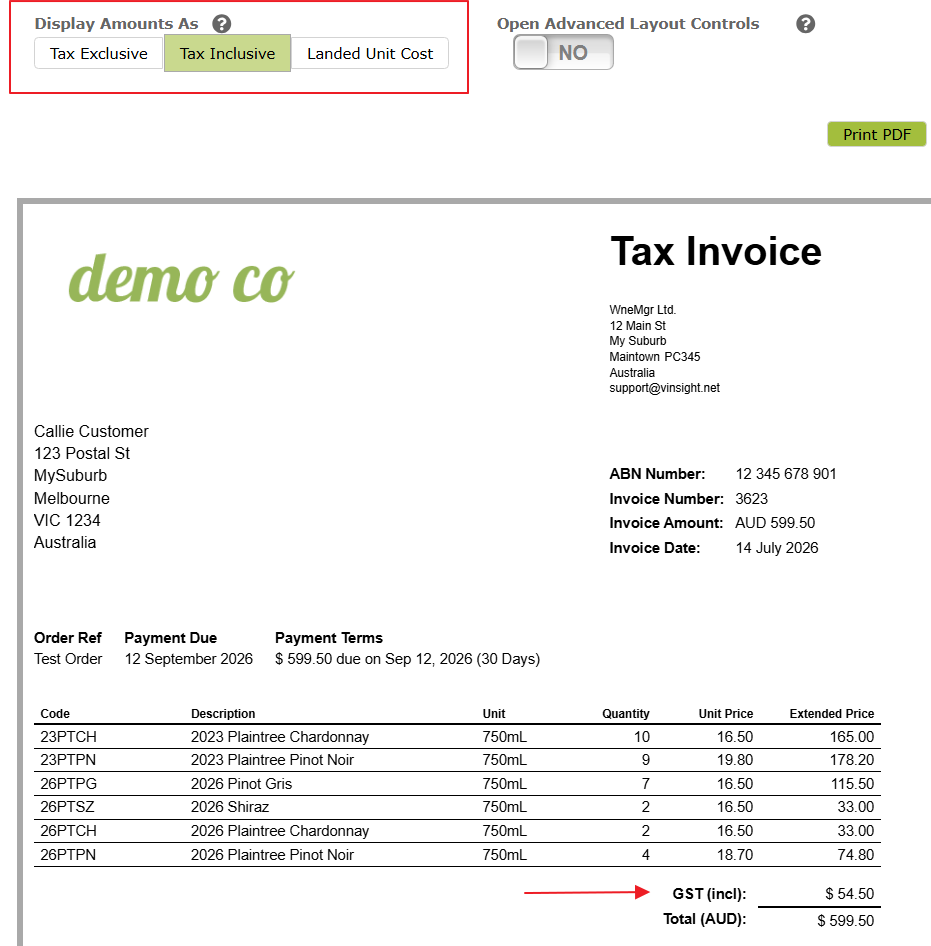
- Tax Inclusive: Prices include all taxes. A tax breakdown is shown under the order total.
- Landed Unit Cost: Prices include all taxes except sales tax. Sales tax is shown at the bottom; other taxes are broken out underneath the total.
There is no separate ‘Extended Landed Cost’ column in the new templates. When ‘Display Amounts As’ is set to ‘Landed Unit Cost’, the ‘Extended Price’ column shows the landed line total (the same idea as the old ‘Extended Landed Cost’). The column heading remains ‘Extended Price’.
If any properties are not showing as expected after changing this setting, turn on ‘Show Properties (to Add, Remove or Re-order)’ to see which have been enabled or disabled.
The following shows a ‘Tax Inclusive’ example. You can see a ‘Tax Exclusive’ rendition of the same invoice in the ‘Themes‘ section above.
6. Logo and Company Settings
The template will use the logo, company name, address, remittance instructions and footer set in the division. Go to Settings > Company Settings / Divisions and open the relevant division if you need to edit any of these details. The other information will reflect the detail entered into the Sales Order.
7. Custom Remittance Instructions and Footer
For template-specific remittance or footer text, turn on Open Custom Remittance & Footer Editors. This opens rich-text editors where you can override the division defaults for this template only. Leave a field blank to keep using the division setting.
You can insert merge fields (such as order number, customer details, or division bank account information) using the Add Field control in the editor.
When printed to PDF, the invoice footer repeats at the bottom of every page. If one PDF contains invoices from different divisions, the footer from the first rendered invoice will be used for all pages. The Invoice footer will display the Footer Logo from the Division settings. See Advanced Layout Controls below for instructions on how to adjust the size and positioning of the footer logo. You can also uncheck the footer logo on the property checklist, if you don’t want the logo to show on this template at all.
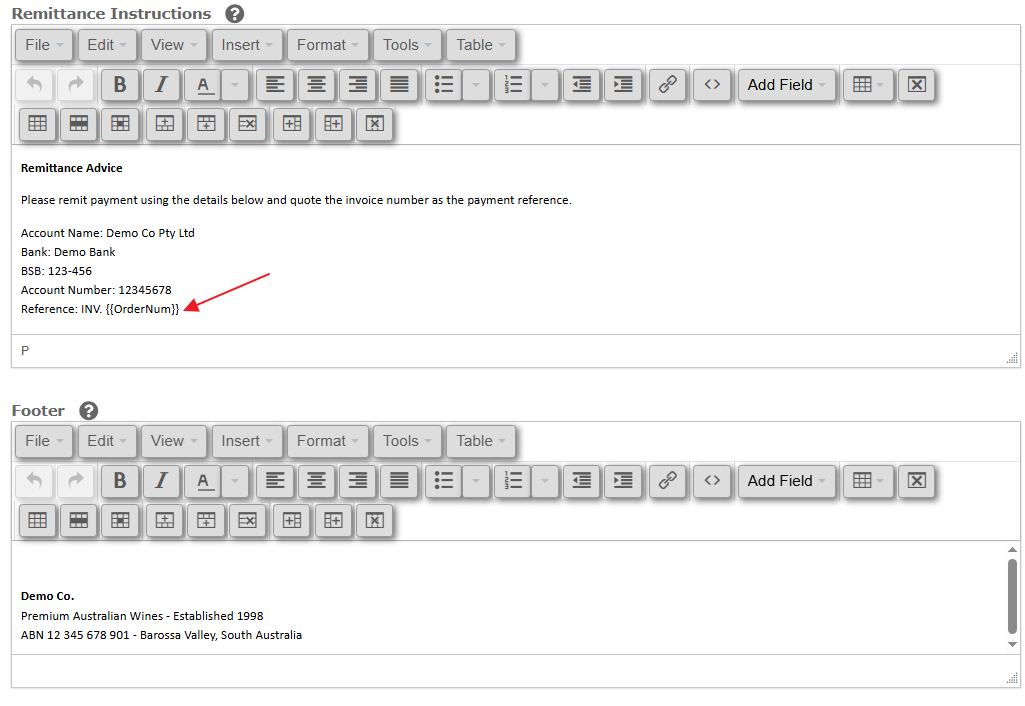
The following example shows how a Remittance Advice and Footer might display on a printed invoice, and how the {{OrderNum}} field is replaced with the actual Order Number in the remittance. Note, the footer will pin to the bottom of the page, while the Remittance Instructions will sit directly below the prior regions in the invoice.
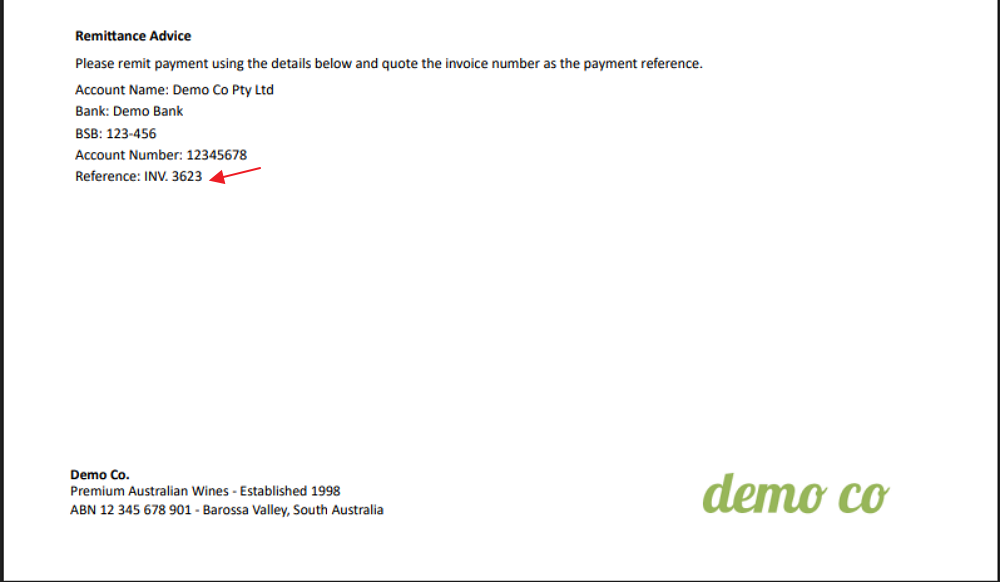
For additional remittance and footer examples see Custom Remittance Instructions and Footers Examples Page.
8. Advanced Layout Controls
For finer control over positioning, turn on Open Advanced Layout Controls. This exposes fields for:
- Logo Size and Logo Position
- Footer Logo Size and Footer Logo Position
- Company address position
- Envelope window address position — moves the customer address block (both postal and delivery addresses move together when both are shown)
- Push content down when moving envelope address — when enabled, moving the address down also pushes the rest of the page down; when disabled, the address can move without affecting other content
Size and position values use measurements such as mm, cm or in. For position, the first value shifts left/right (negative = left) and the second value shifts up/down (negative = up), separated by a comma.
In the following example, when first printed, my template looked like this.
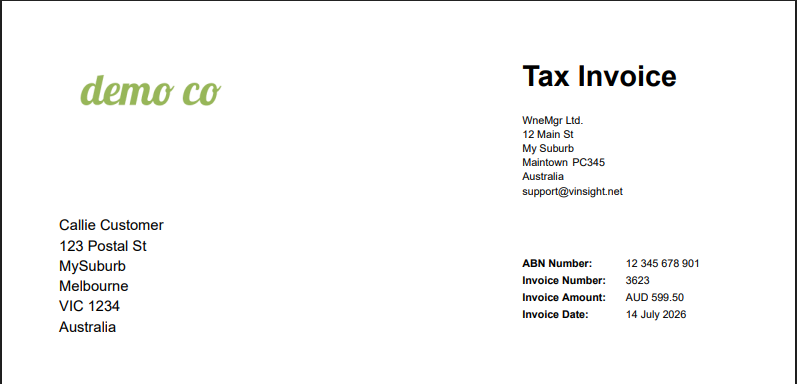
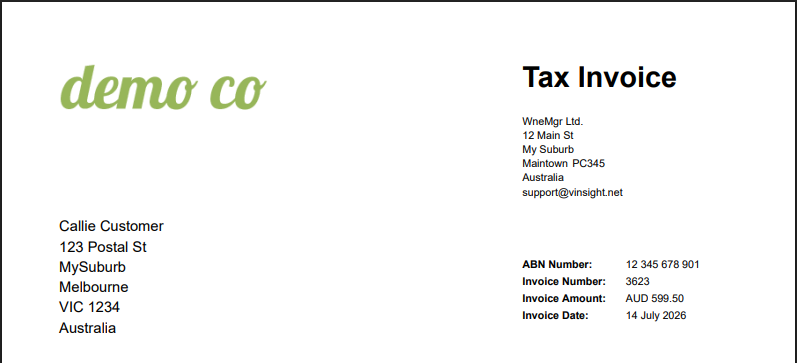
After making the following adjustments, increasing the size and moving it a little to the left and up . . .
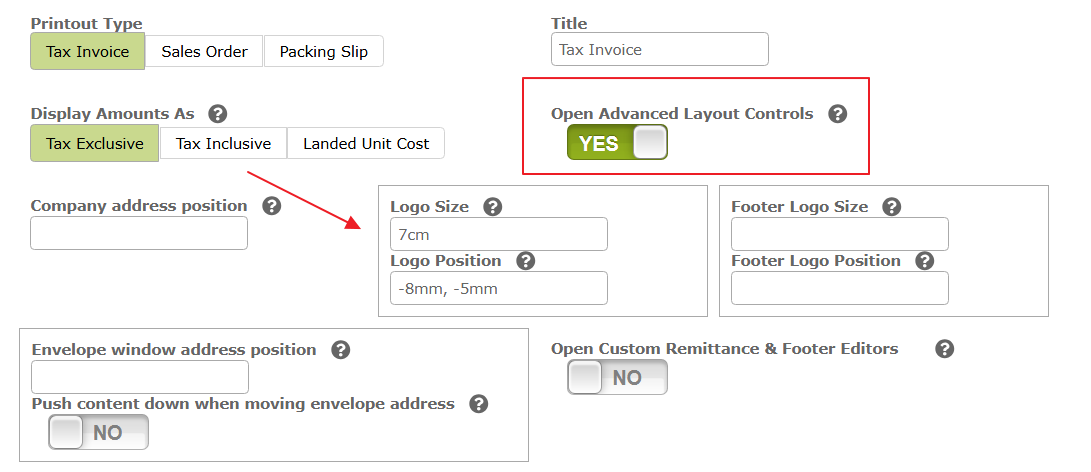
it changed to look as follows:
Tip: The on-screen preview is only an approximation, especially for logo, address, and footer positioning. Print or download a PDF to check the exact result. Getting these settings right can take a little trial and error, but once saved in a template, you should not need to adjust them again.
9. Showing, Hiding and Re-ordering Properties
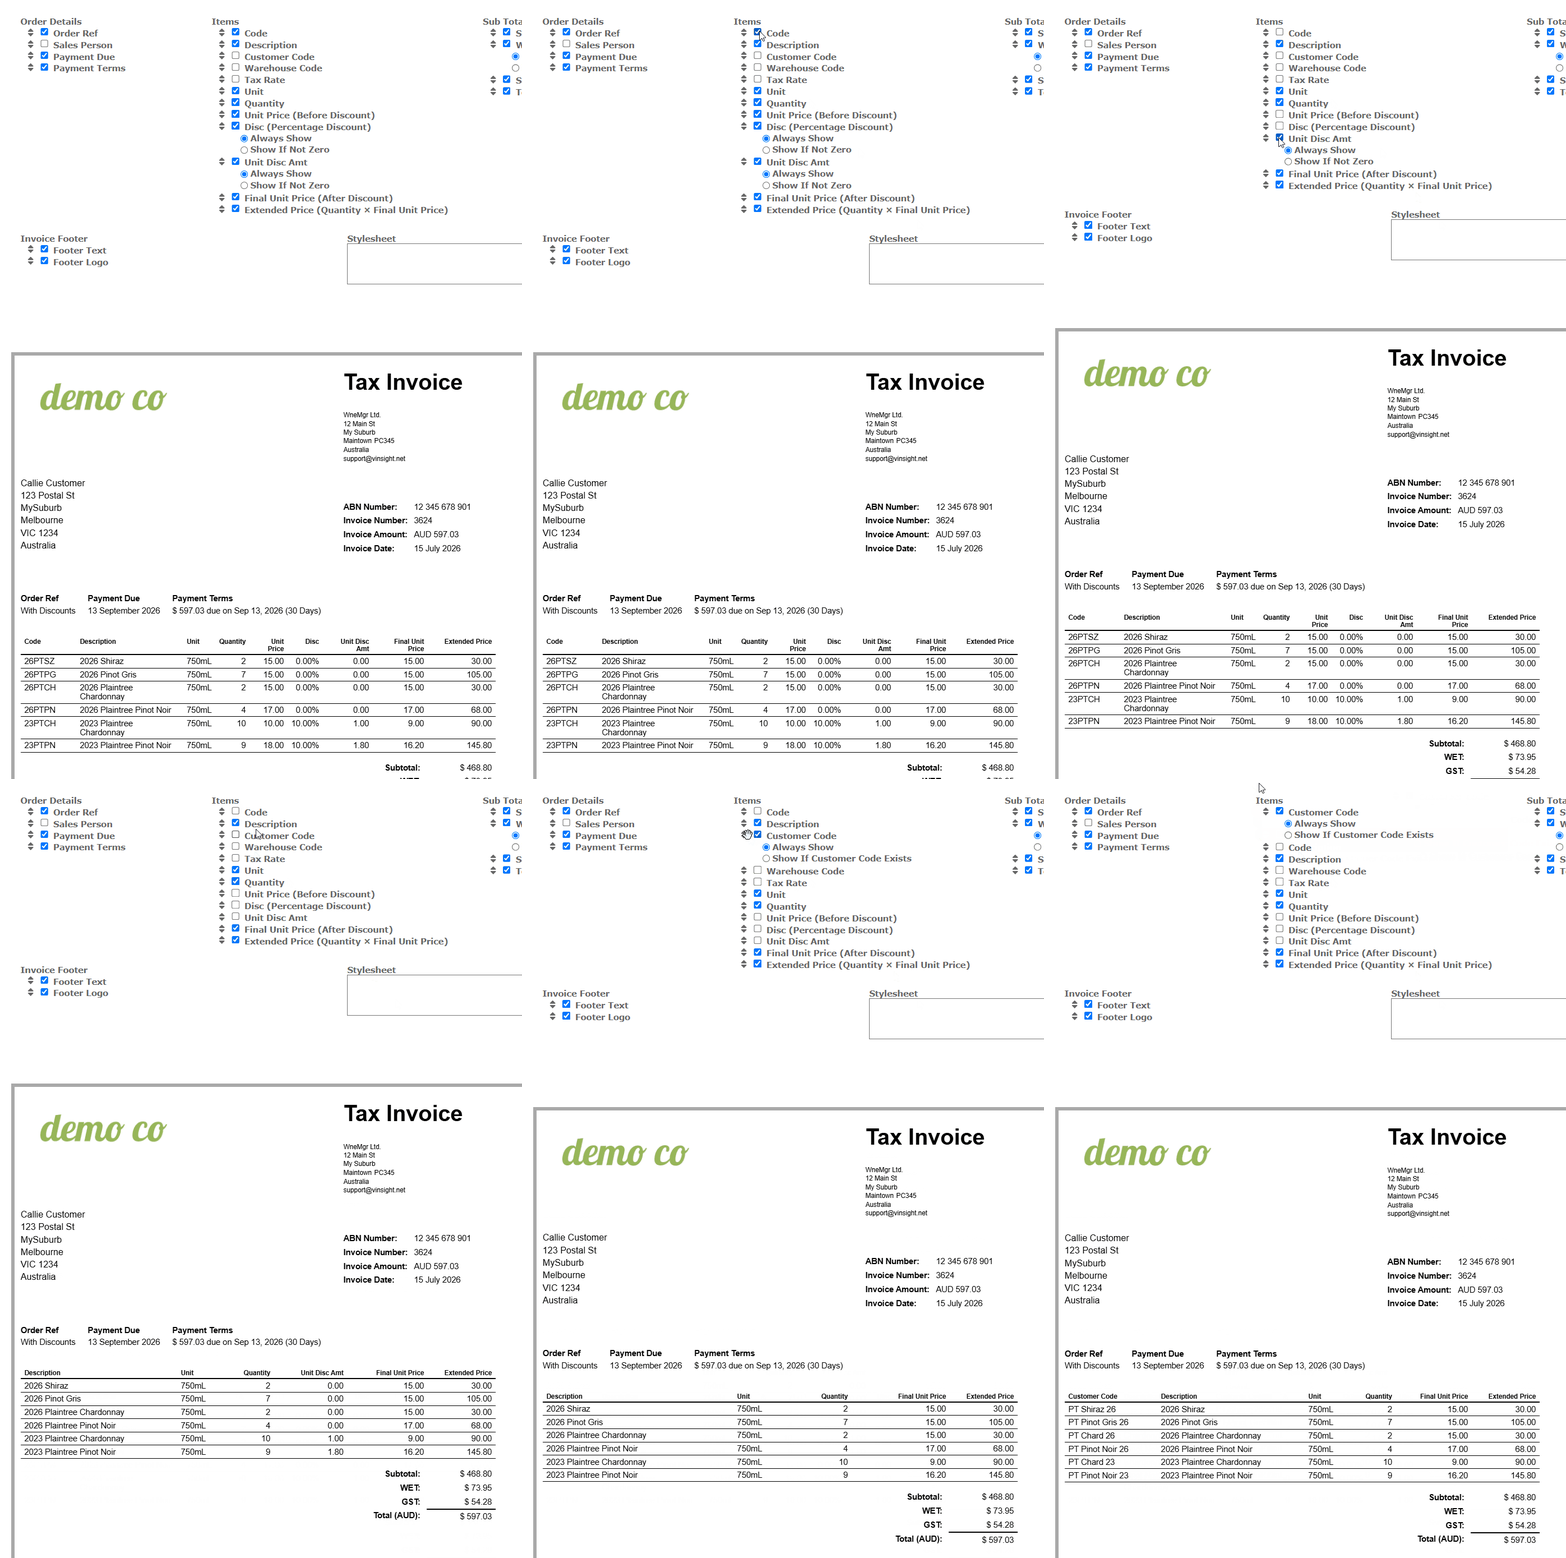
When you toggle ‘Show Properties (to Add, Remove or Re-order)’ to ‘YES’ you will see a large number of items listed with checkboxes next to them. You can use these to hide and show various regions and properties on the template. You can also drag and drop these check-boxed items to change the order of properties in the display. Some of the checkboxes such as those in the ‘Printout Regions’ list relate to entire regions of the template, while others (e.g. those in the ‘Items’ list) relate to individual properties.
In the following example, we hide and unhide some values in the Items area, and drag the properties into a different order.
10. Conditionally Show or Hide Properties
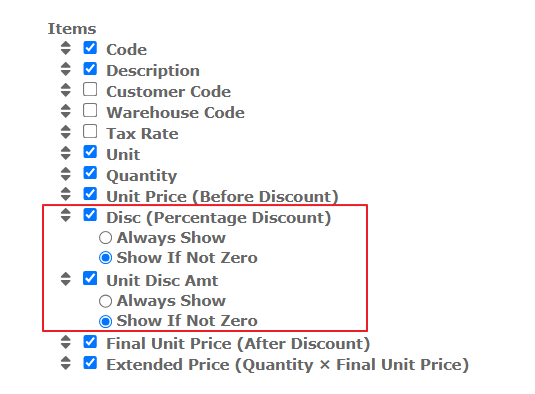
Some properties have the option of being shown only if certain conditions are met. For example, you can choose to show discounts only if they are non-zero.
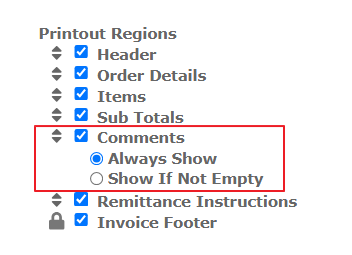
Similarly you can choose to only display the comments area if something is written in it.
Addresses:
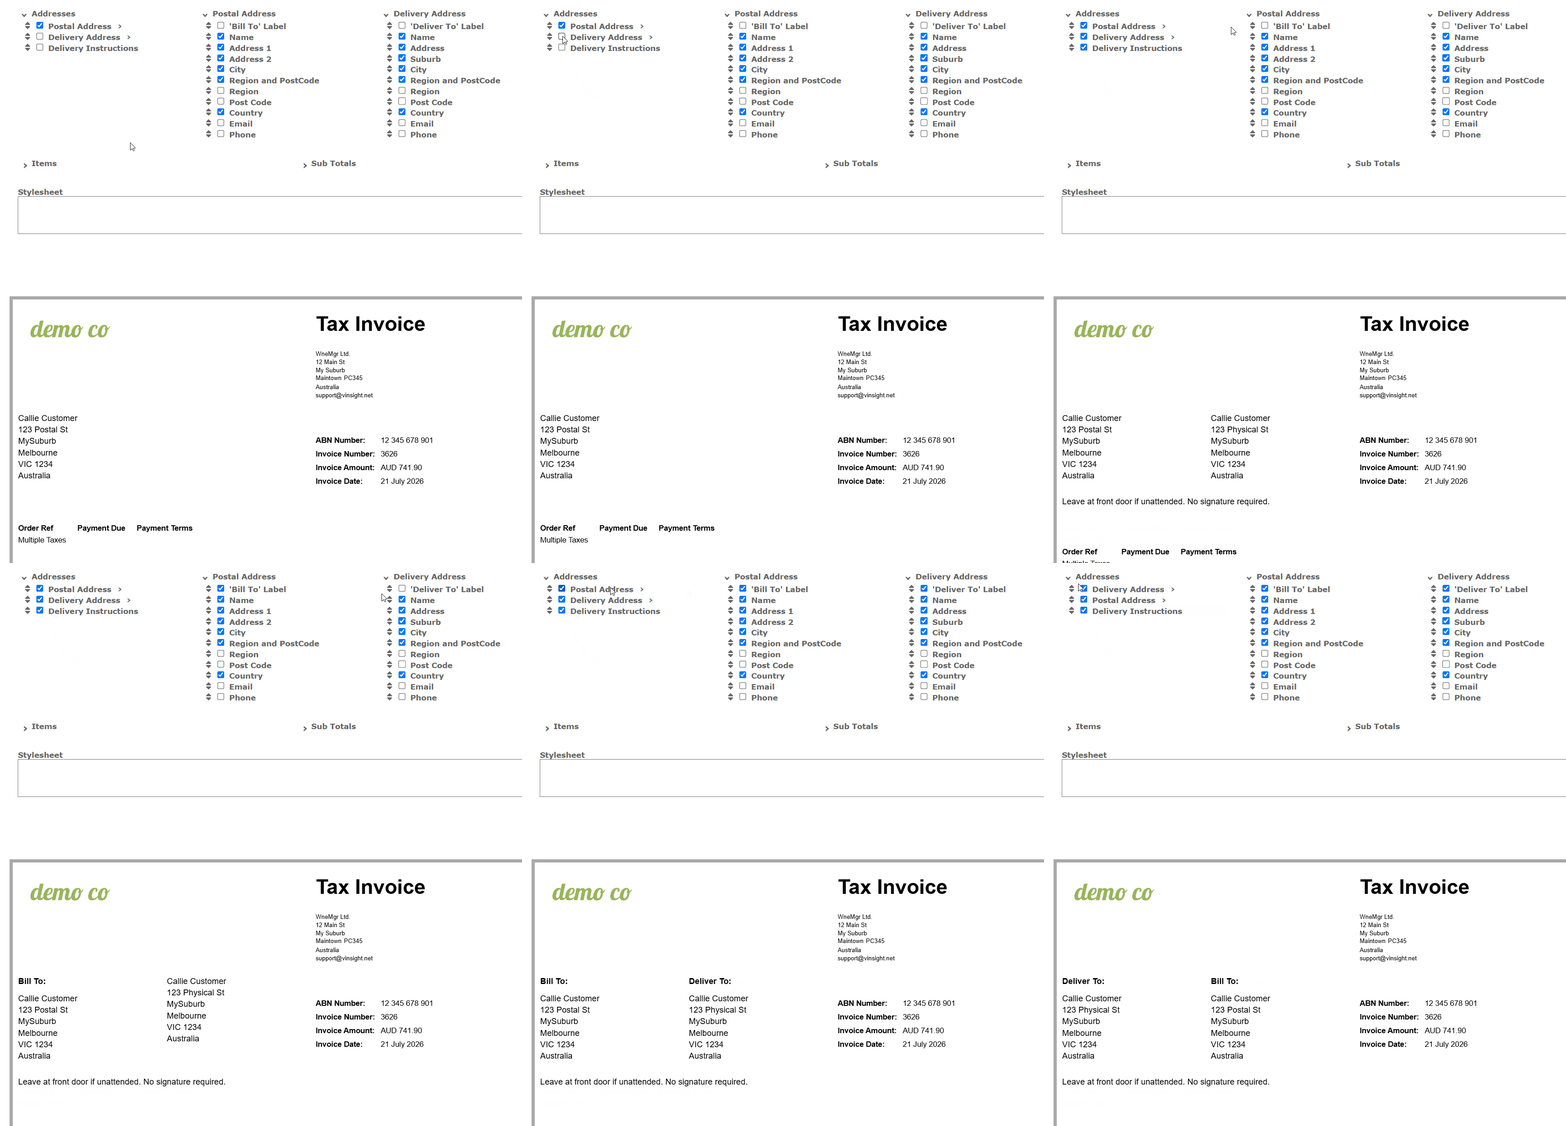
Use the Addresses checklist to show or hide the postal and delivery address blocks, and drag them to change their order. When both are shown, they appear side by side, with the first-listed address on the left. In the following demonstration, we use the property checklist to display the Delivery Address, Delivery Instructions, ‘Bill To’ Label and ‘Deliver To’ Label. Then we switch the order of the delivery and postal addresses. You can see the changes happen on the invoice preview below the checklist.
11. Moving Regions and Properties – using drag and drop
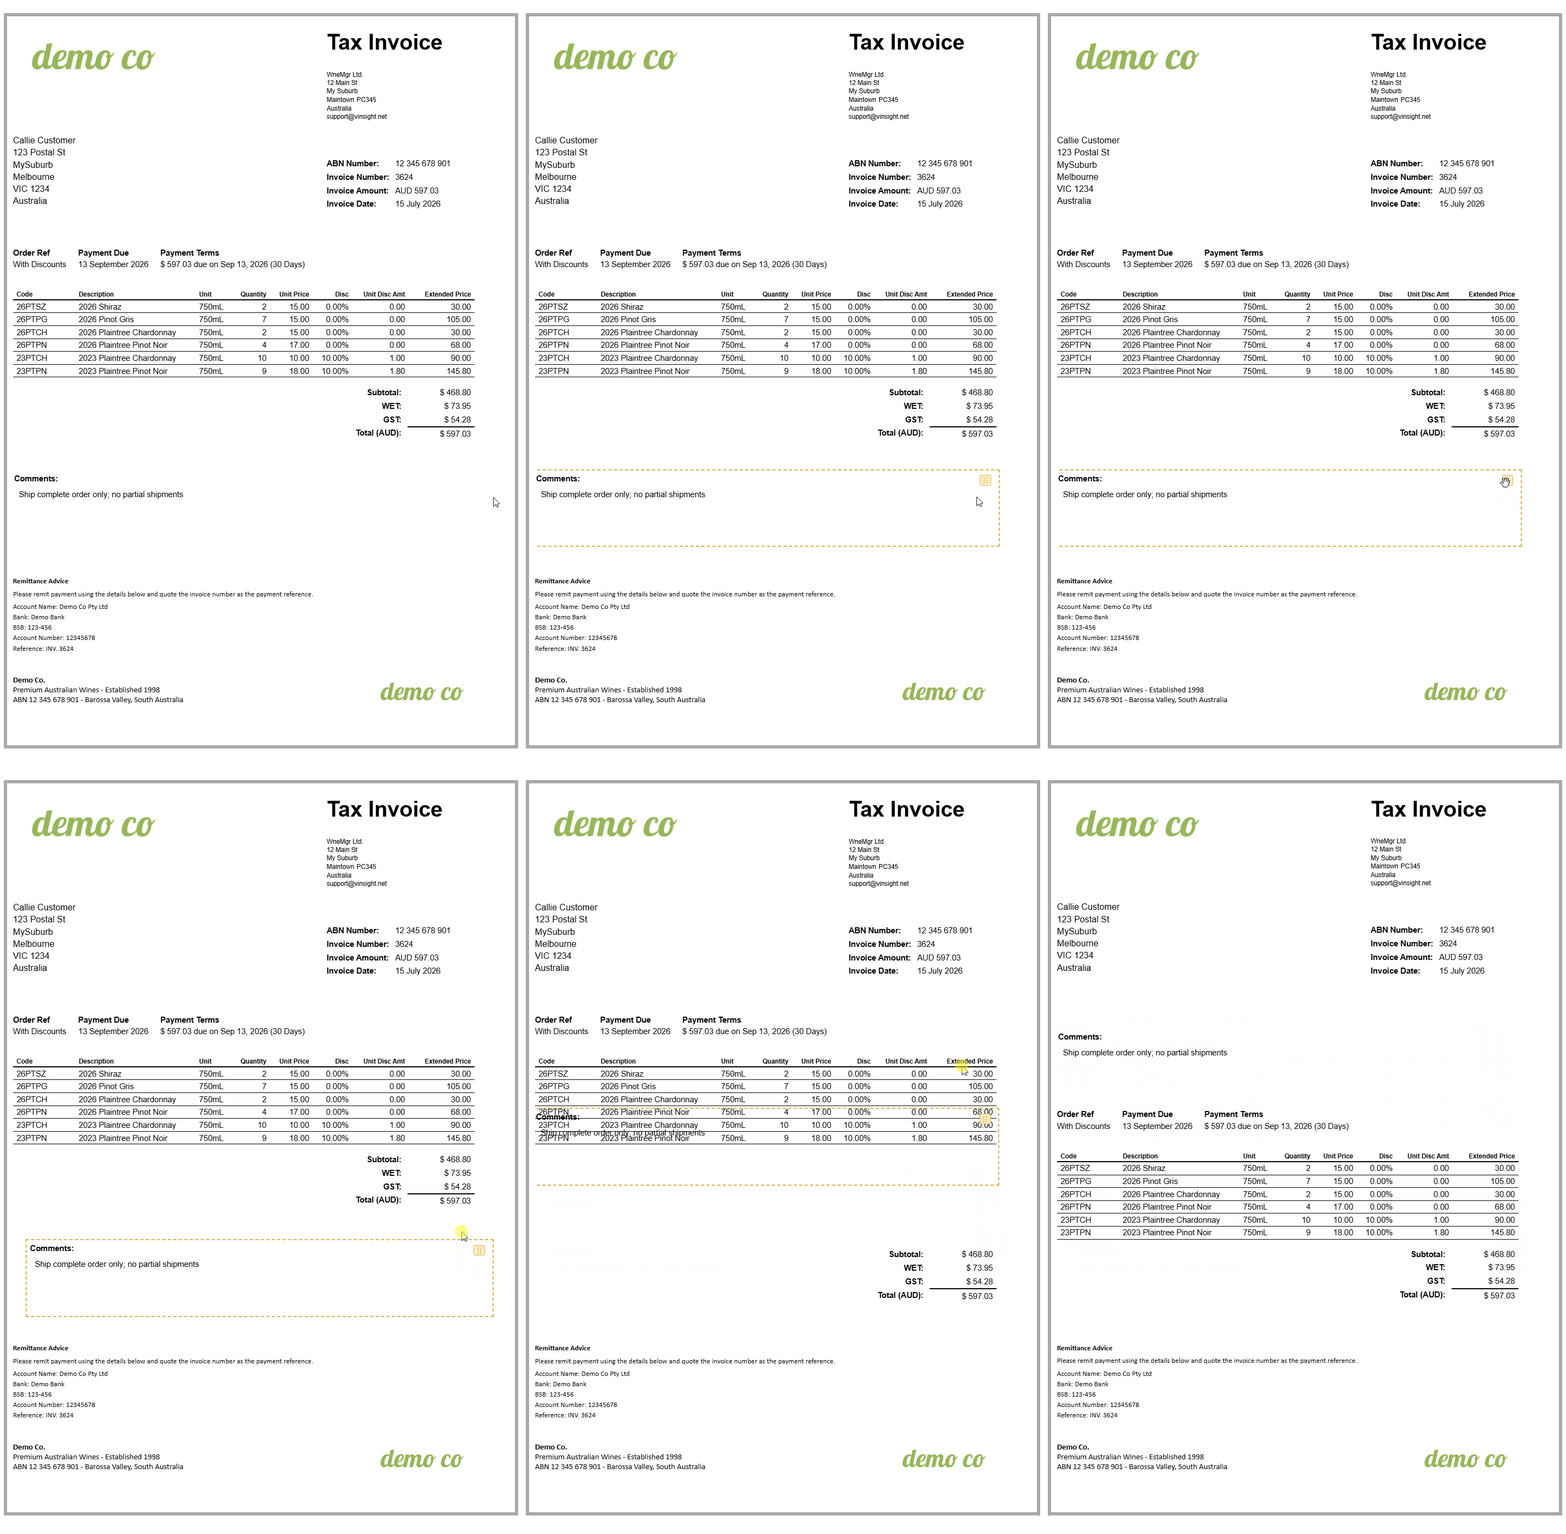
In addition to re-ordering or moving items using the checkbox list (as demonstrated above), the main regions of the page can be moved by simply dragging and dropping them on the template itself. In the following example we move the ‘Comments’ section to a different part of the page.
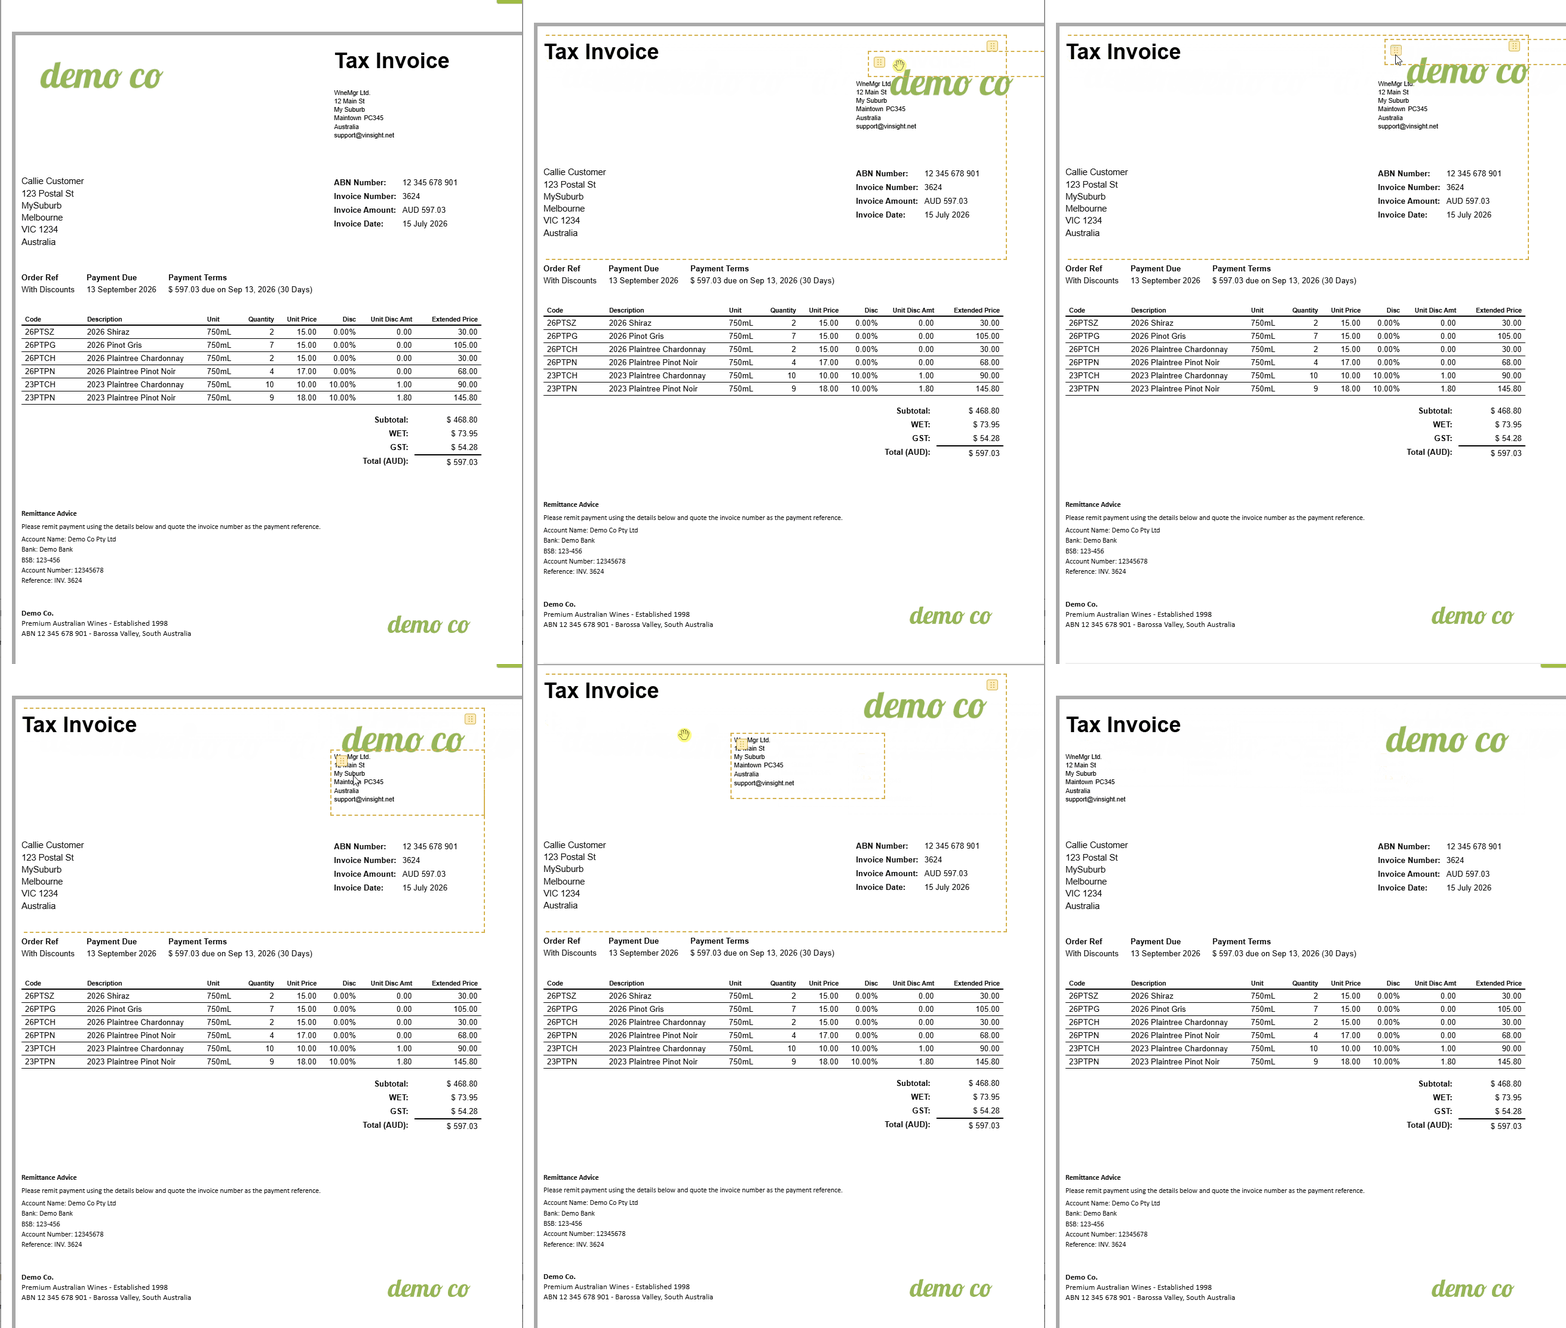
Header layout (top of the invoice)
The top of the printout uses a two-column layout. When you drag blocks within the header area — or reorder them under Header Layout in the properties checklist — you are changing which column (left or right) and which row each block appears in.
If you move blocks around, check the preview and print a PDF to confirm the result.
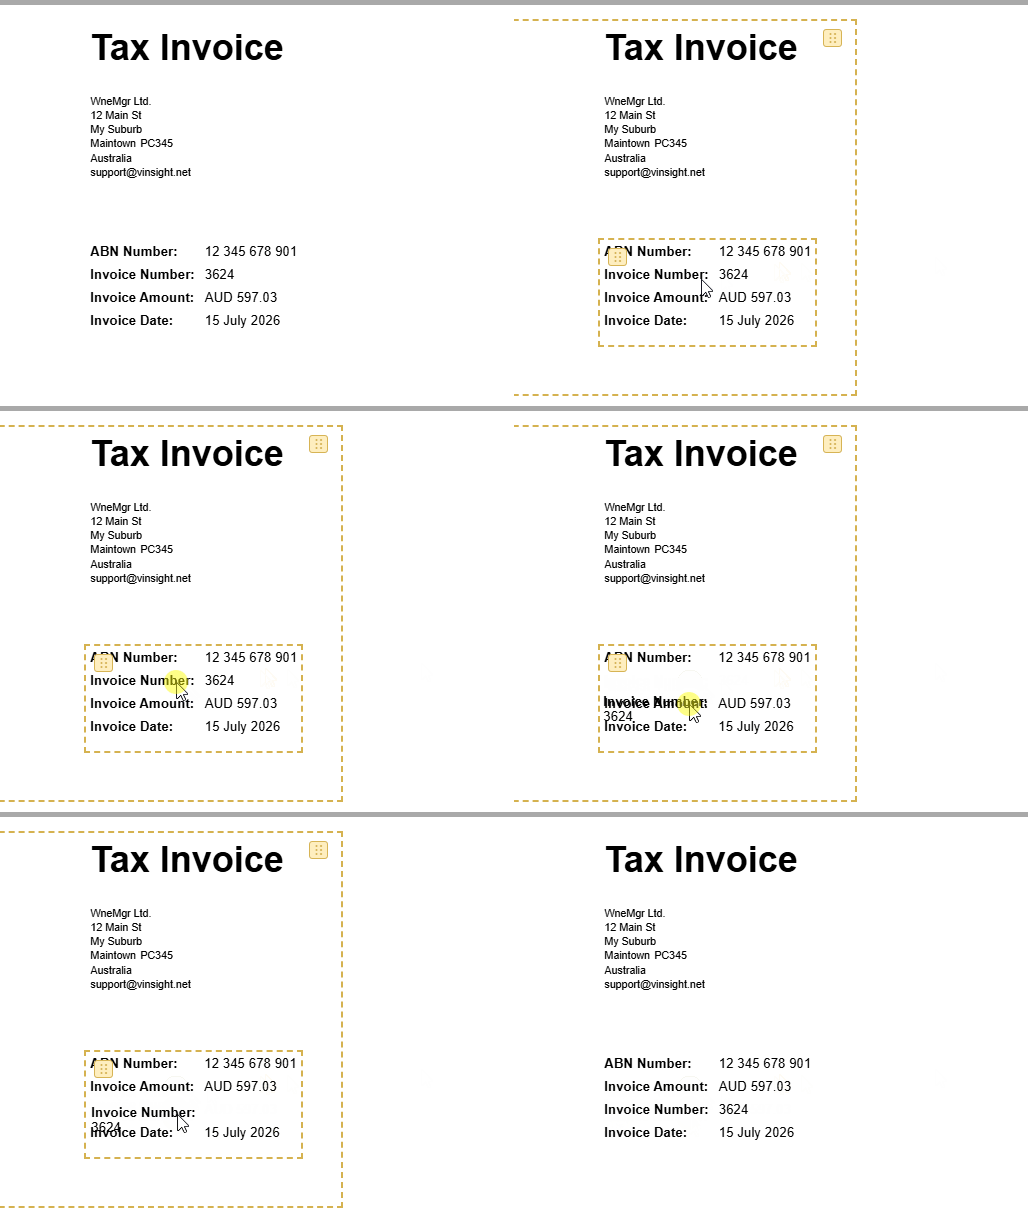
Finally, you are able to move some properties using this method as well, such as lines within the Order Details or within the various addresses.
You can also reorder regions, header blocks and properties from the checklist without dragging on the template itself. See ‘Showing, Hiding and Re-ordering Properties’ above.
12. Stylesheet (Only for users who are already proficient in HTML and CSS):
A Stylesheet box has been provided for people who would like to make simple changes to their template using HTML and CSS. You can write new CSS rules directly into this textbox.
In some cases, the selector can be automatically generated. Try clicking on the item you want to adjust. If the area selected changes to light blue, and a New rule button appears above the Stylesheet, clicking the New Rule button will enter the selector into the stylesheet for you. You can then add the rule you want to add.
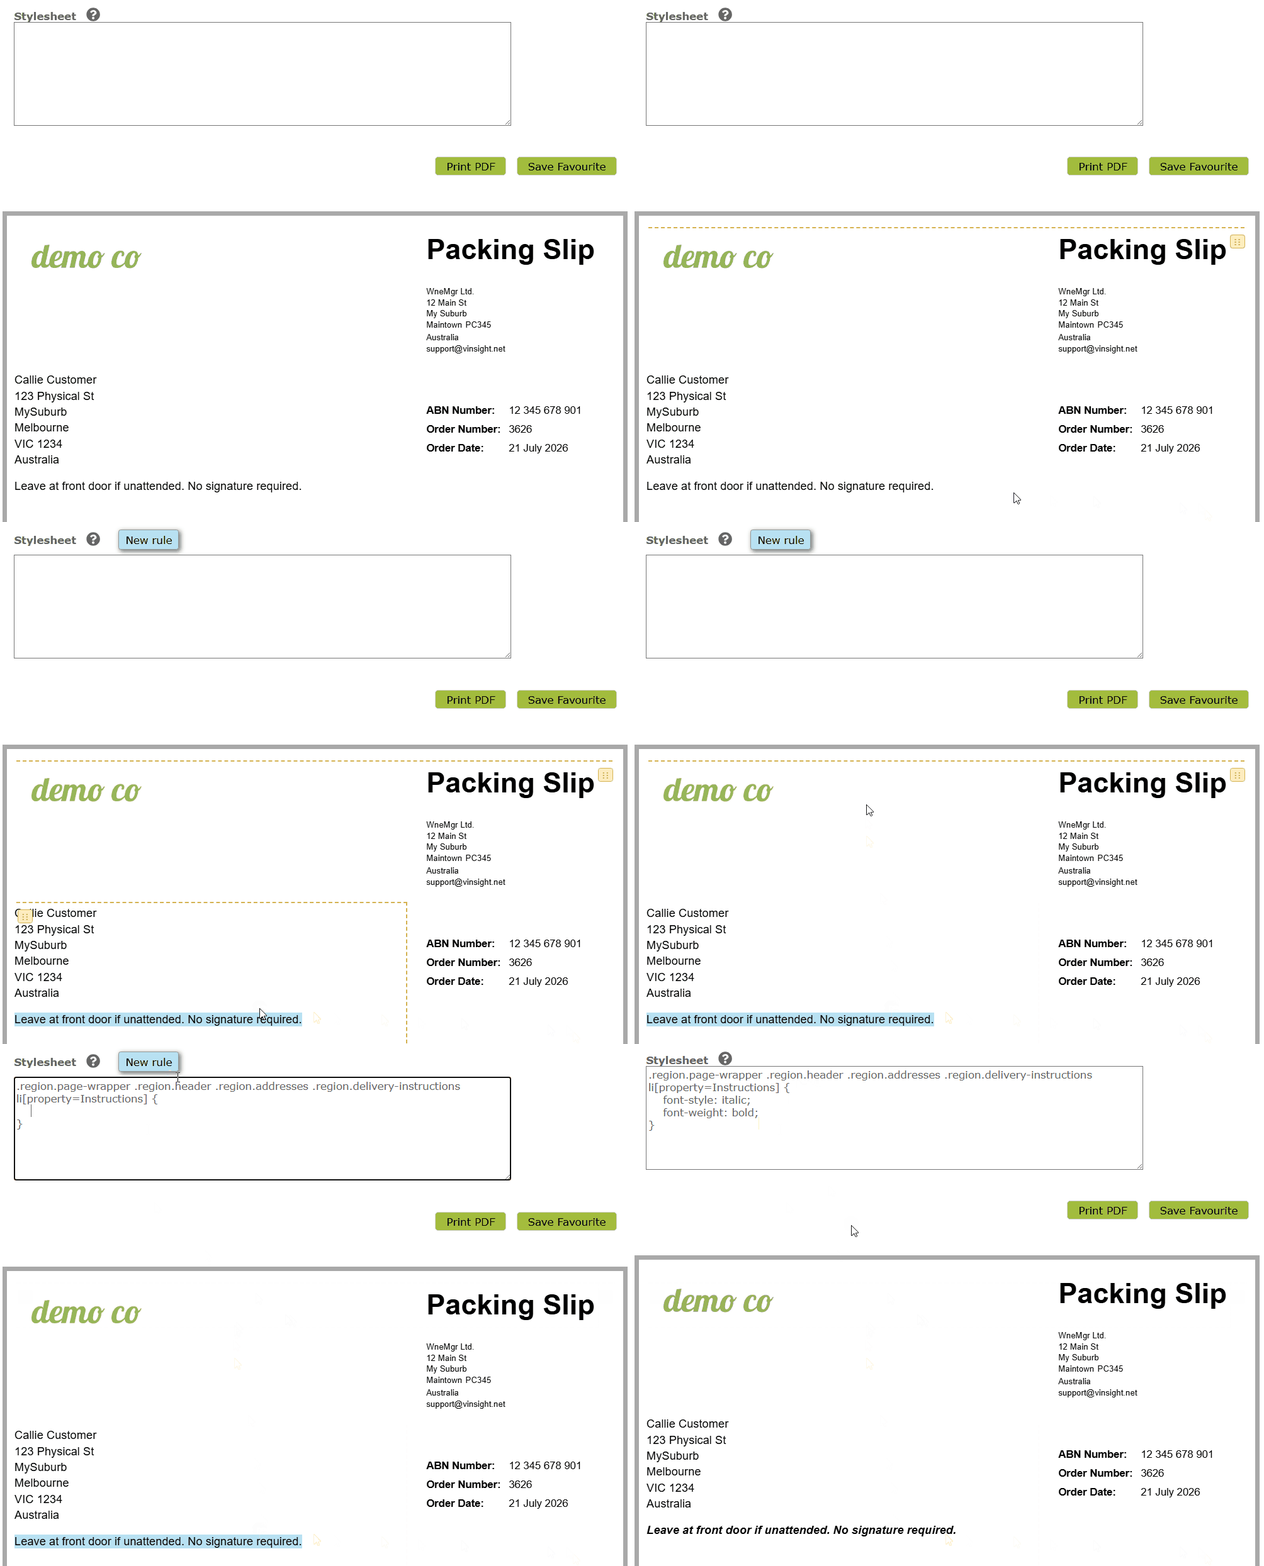
Clicking on ‘Theme 2’ shows you an example of a stylesheet and how that stylesheet adds css to alter the look of the invoice.
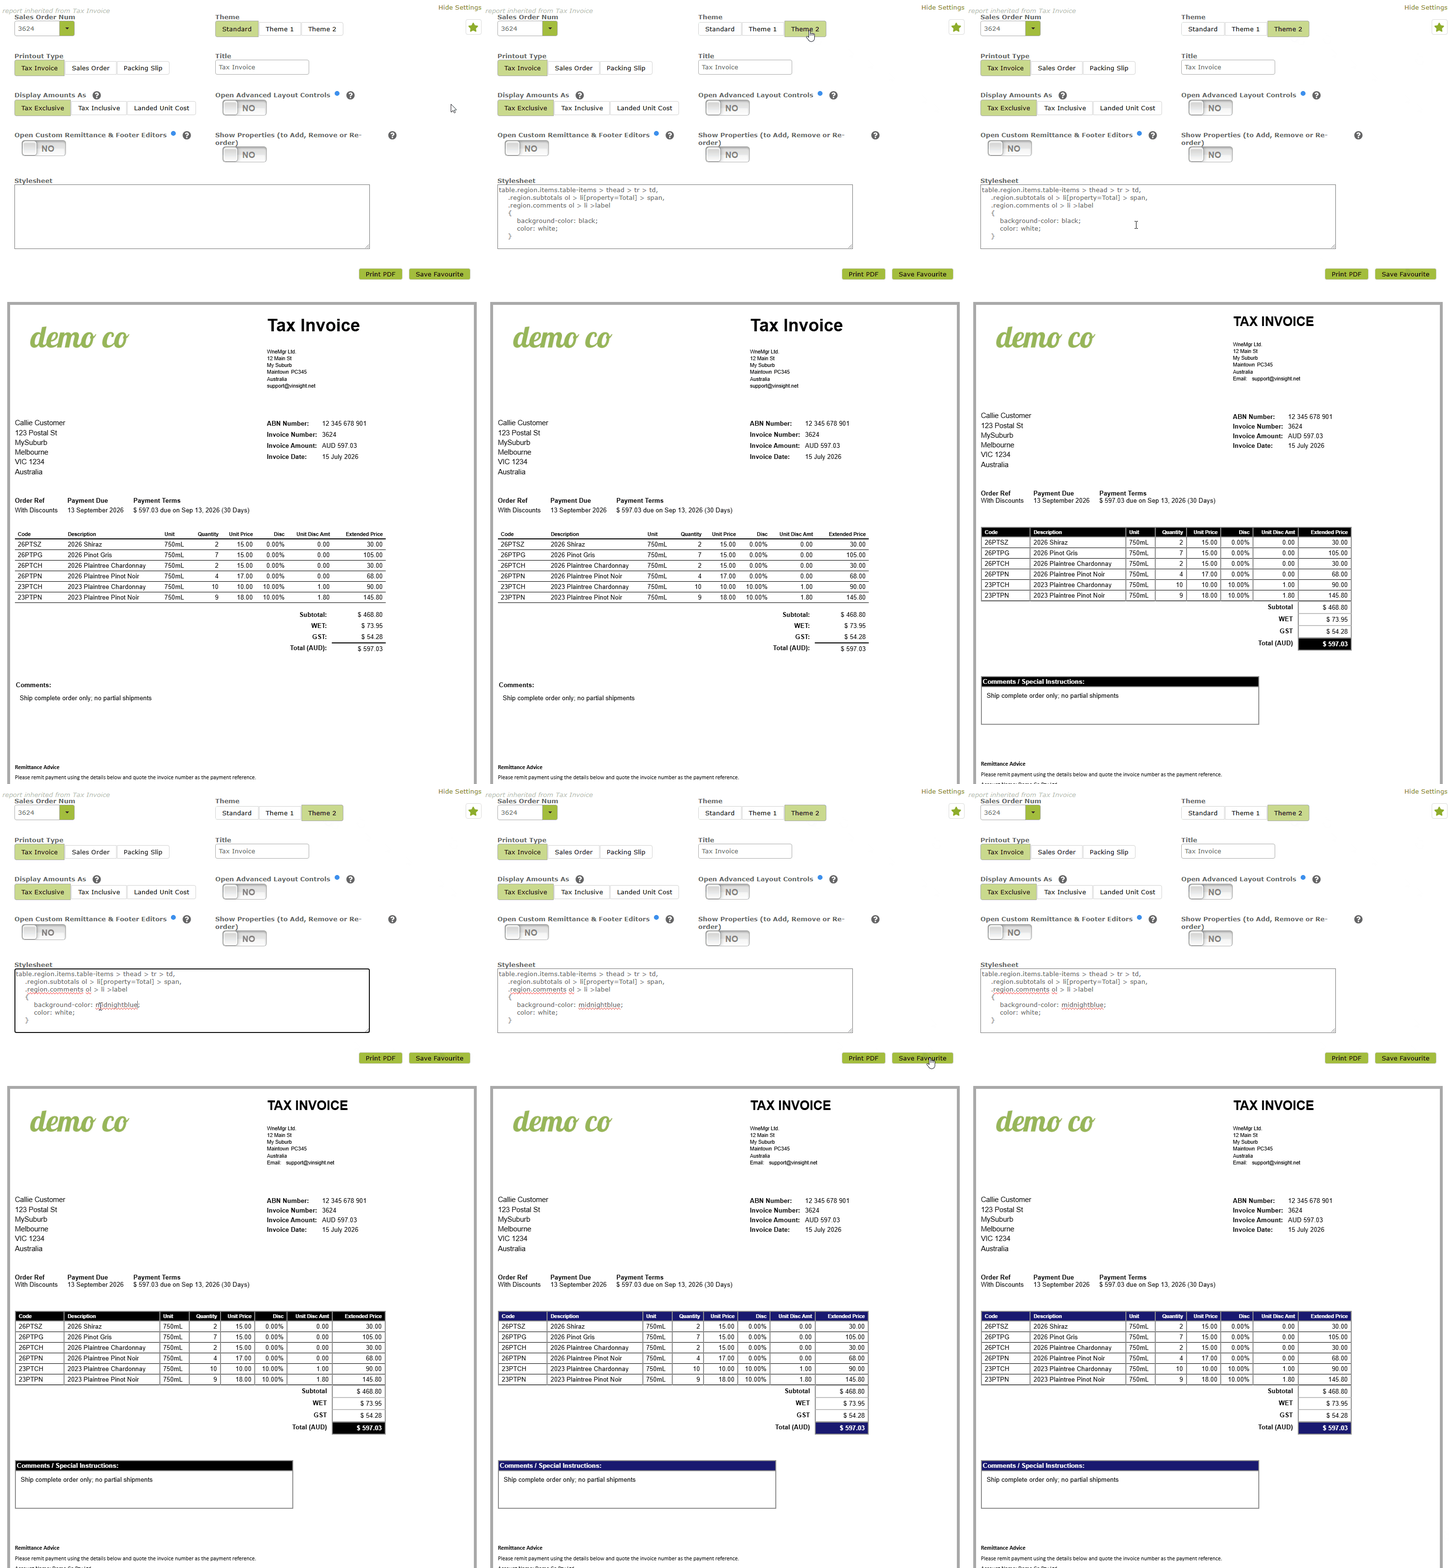
IMPORTANT: Making adjustments of this nature requires some knowledge and understanding of HTML and CSS. If you are not familiar with these languages, you should stick to the default options provided. Support for HTML and CSS-related issues is outside the scope of our services. We recommend consulting web development resources or forums for further assistance on these topics.
13. Saving Your Changes
You will not want to make these changes every time you print or email a sales order. To avoid this, once you have settled on a format you are happy with, make sure you save the format by clicking the star at the top of the page or the ‘Save Favourite’ button at the top of the order itself.
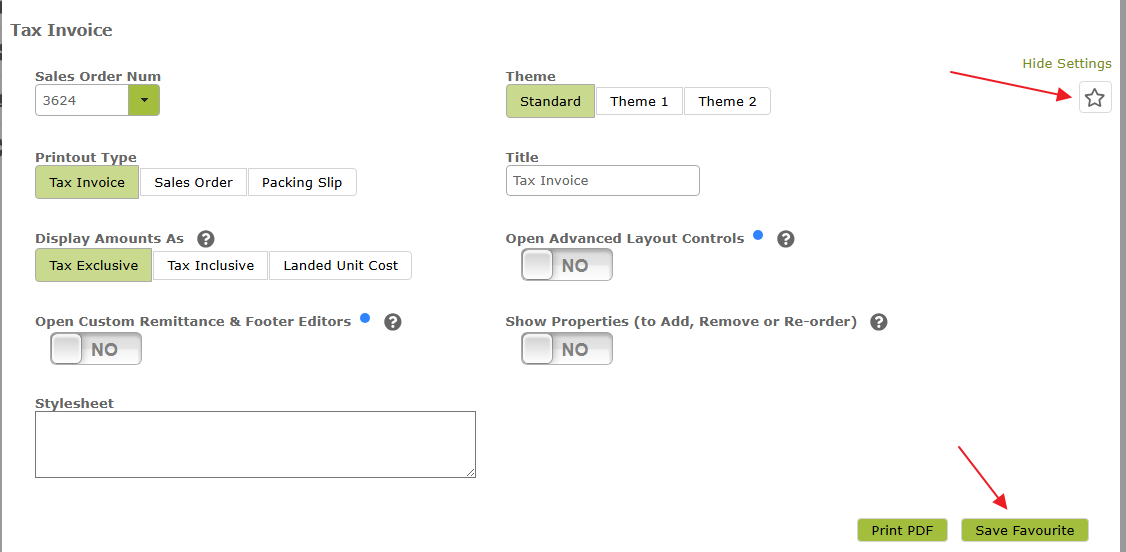
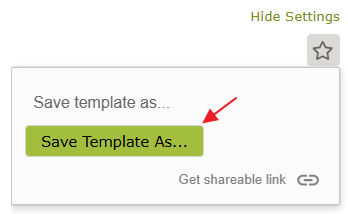
Click the ‘Save Template As…’ button
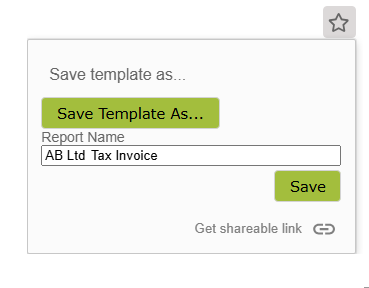
Enter a name for your template. (If you have created a template for a specific customer or market, consider including that in the template name.)
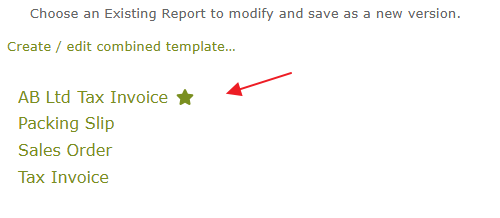
Once saved, you will see your new template in the template list.
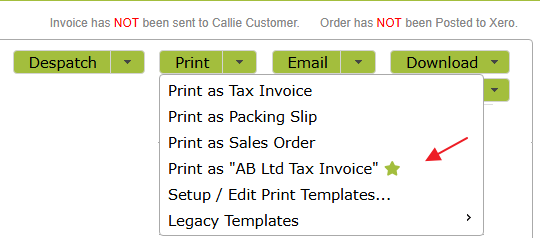
The new template option will also appear in the Print and Email dropdown lists on the Sales Order.
14. Deleting a Template
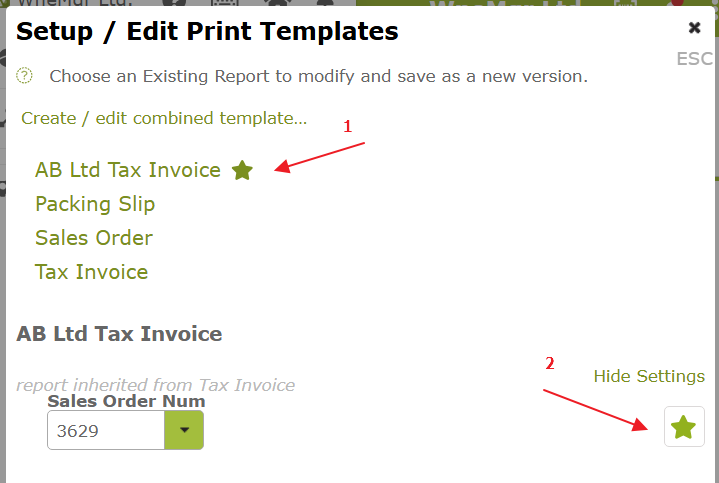
To delete a template, open a Sales Order and select Setup / Edit Print Templates from the ‘Print’ drop down list. Then click the link for the template you wish to delete. Once opened, click the star . . .
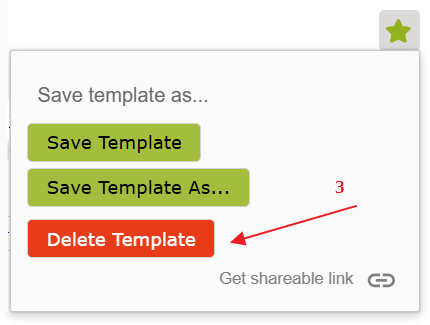
This will open a window with a ‘Delete Template option.
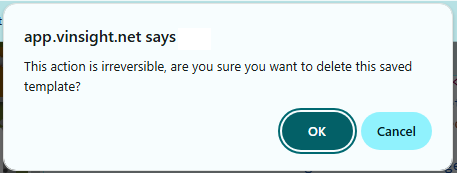
Once you click the ‘Delete Template’ button, you will then get one final option to proceed with (‘OK’) or stop (‘Cancel’) the deletion.
15. Combined Print Templates
If you regularly print more than one document for an order — for example a Tax Invoice and a Packing Slip together — you can create a ‘Combined Print Template’ that prints several documents as one PDF per order.
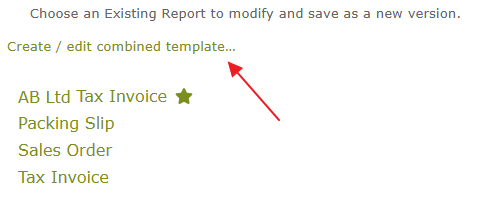
From the ‘Setup / Edit Print Templates…’ dialog, click ‘Create / edit combined template…’
Give the combined template a name, optionally set a download file name, and choose which saved templates to include and in what order. You can also choose whether to include page breaks between documents.
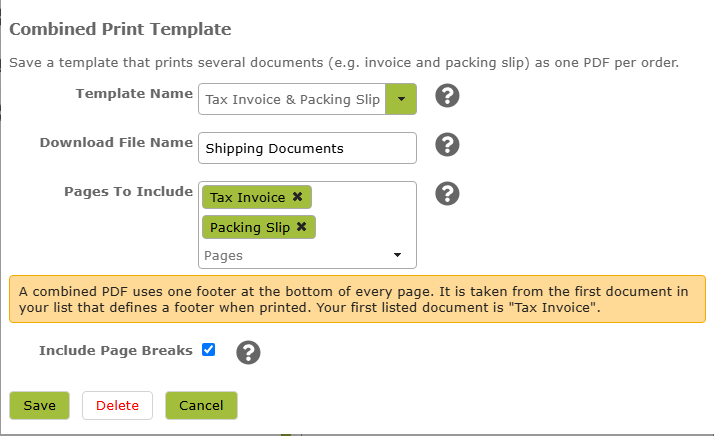
Note: A combined PDF uses one footer at the bottom of every page. It is taken from the first document in your list that defines a footer when printed.
Once saved, the combined template will appear in the ‘Print’ and ‘Email’ dropdown lists alongside your other saved templates.
16. Converting Legacy Templates
If you already have custom templates under Legacy Templates, you can convert them into the new template style. Conversion creates a new saved template. Your original legacy template is left unchanged and remains available under Legacy Templates.
Conversion is ‘best-effort’. Most common settings are mapped across, but the new layout is not an exact copy of the old printout. After converting, always review the preview and print or download a PDF before relying on the new template day to day.
How to convert:
On a Sales Order, open the ‘Print’ menu, choose ‘Legacy Templates’, and look for your custom template. Any templates that have not already been converted will have an ‘Upgrade’ button next to them.
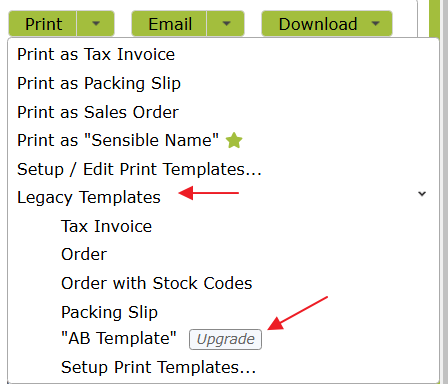
Click the ‘Upgrade’ button, enter a name for the new template. then click ‘OK’.
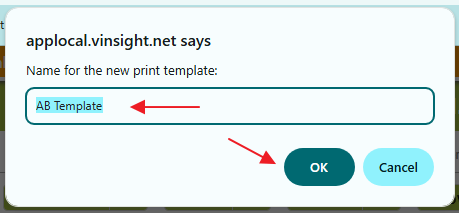
The App saves the new template and opens it in ‘Setup / Edit Print Templates…’ so you can preview the changes.
If you make additional changes to the template, don’t forget to save them using the ‘favourite star’ or ‘Save Favourite’ button. (See Saving Your Changes ).
After conversion, your new converted template will appear in the Print and Email drop-down lists. Your original template will also remain, but the ‘Upgrade’ button will no longer be visible.
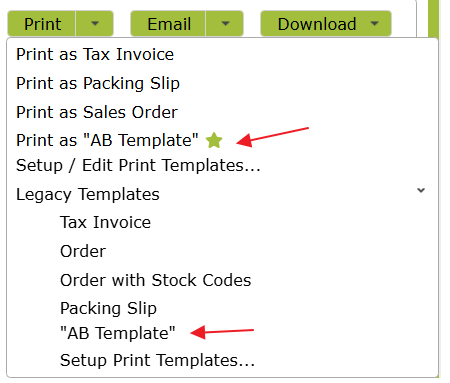
Templates can also be upgraded by going to ‘Legacy Templates’ on the ‘Print’ drop-down list, selecting “Setup Print Templates…”, selecting the template you wish to upgrade and clicking the ‘Upgrade to new template…’ button at the bottom of the page.
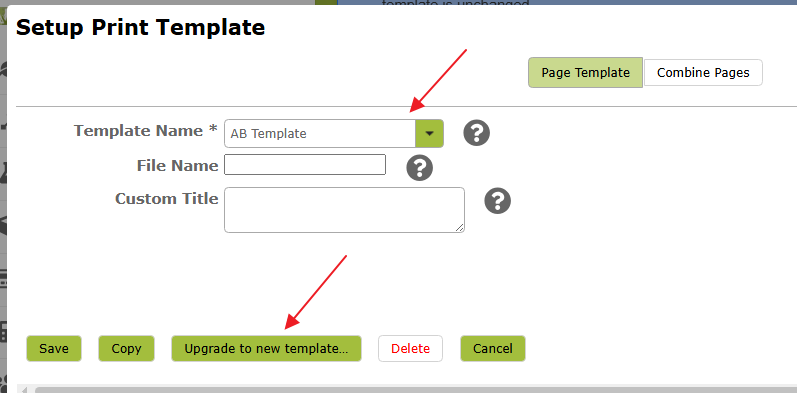
What gets converted: Document type (Tax Invoice / Sales Order / Packing Slip), title, which regions and columns are shown, discounts, addresses, tax display mode, summary categories, logo and footer logo sizes, and custom remittance or footer text.
What you should check after converting:
- Logo and address positions are not copied across. In the old templates, positions meant “from the top left of the page”. In the new templates they are offsets from the default layout, so copying them would usually look wrong. Logo and footer logo sizes are kept. Use Advanced Layout Controls if you need to nudge placement.
- Tear-off remittance (the perforated-style strip with company / payment layout) is not supported in the new format. If you wish to retain something like this, you will need to recreate it in Custom Remittance Instructions and Footer.
- There is no separate Extended Landed Cost column in the new templates. To show ‘Extended Landed Cost’, set ‘Display Amounts As’ to ‘Landed Unit Cost’. The ‘Extended Price’ column will then show the landed line total.
- Print a copy of the new template to check that you are happy with the layout. The ‘Preview’ on screen is only indicative, so may not mirror the printed version exactly (in terms of layout on the printed page etc.).
Once you have reviewed the converted template, you can use it from the main ‘Print’ and ‘Email” menus like any other new-style template.
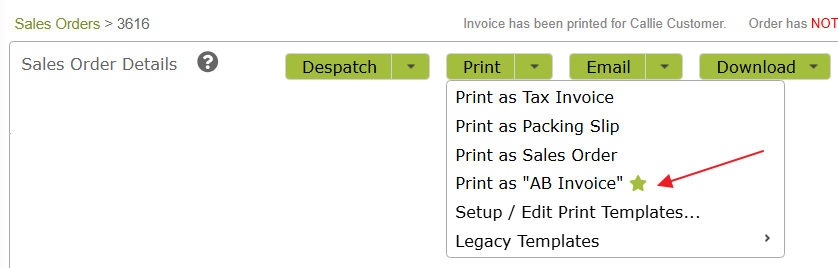
If a customer’s Default Sales Order Template still points at the old legacy name, update it to the new template name when you are ready to switch them over.
Setting a Default Template per Customer
If you want Sales Orders for a particular customer to default to printing and emailing a certain template, just set the ‘Default Sales Order Template’ property on that customer’s Contact page under the ‘Ordering Details’ section.
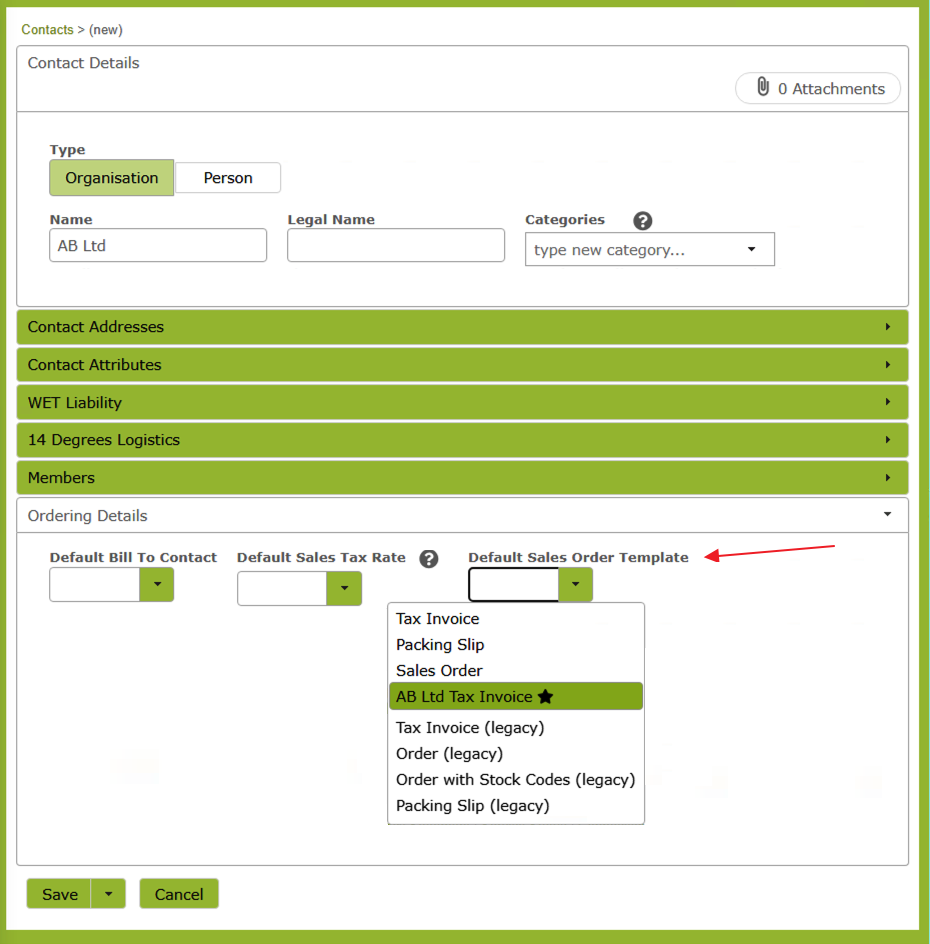
When set, that customer’s preferred template will appear at the top of the template list when printing or emailing orders for them.
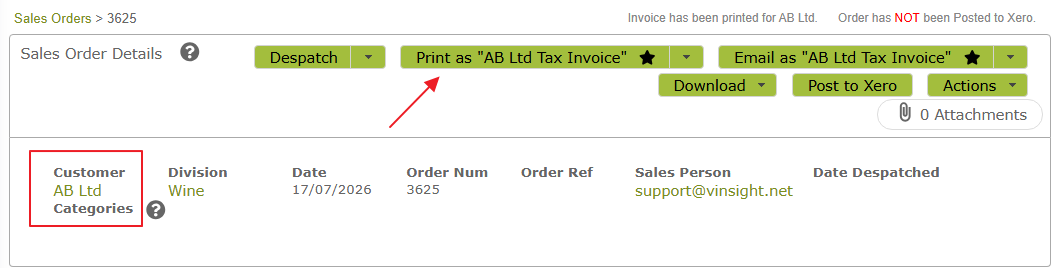
Printing from the Sales Order List
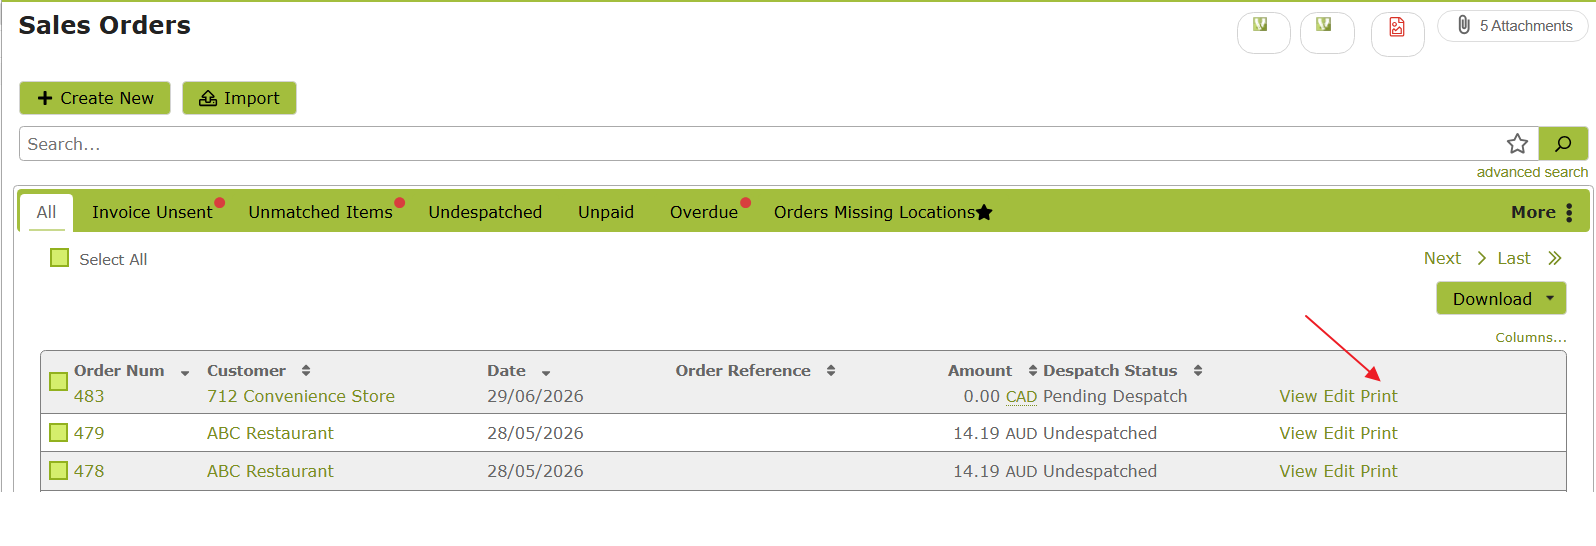
Print a single order from the list
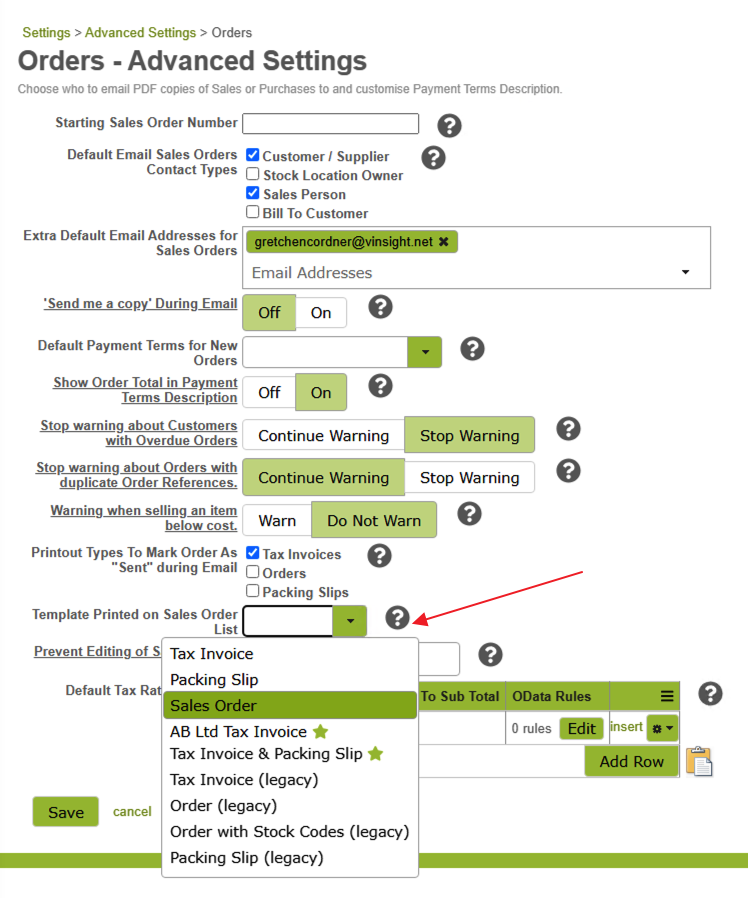
Template Printed on Sales Order List
When printing from the Sales Order List, system ‘Tax Invoice’ template will print by default.
To change this to another system template or one of your custom templates, go to Settings > Advanced Settings > Orders and select the template you wish to use from the ‘Template Printed on Sales Order List’ drop-down list.
To use a different template for one order, open the order and use the ‘Print’ drop-down on the order page instead.
Print multiple orders to one PDF
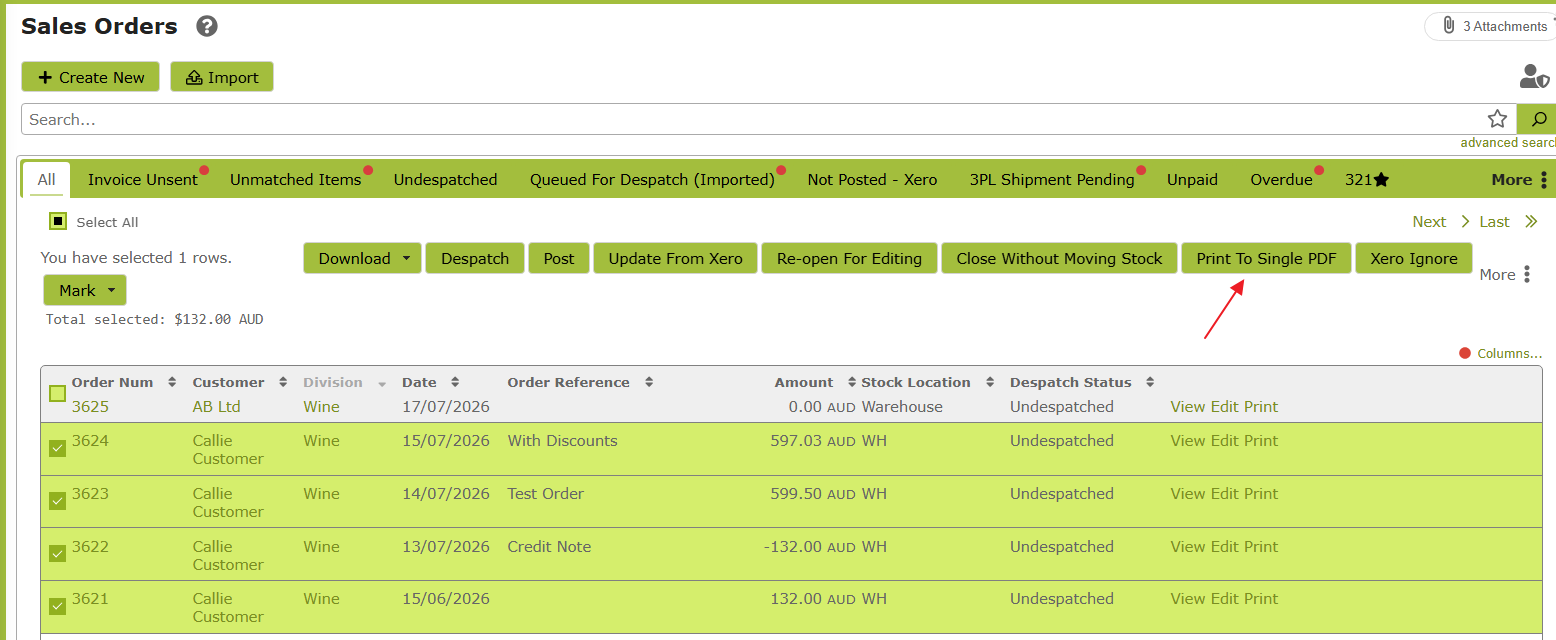
Select one or more orders on the list, then choose the bulk action ‘Print to single pdf’.
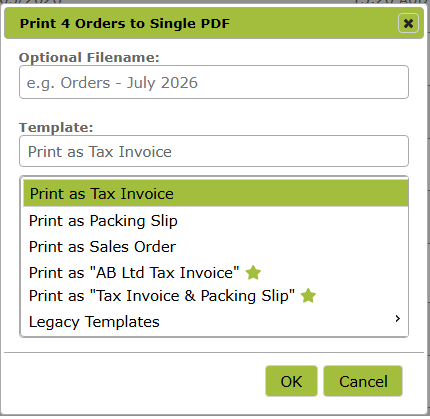
A dialog lets you:
- Choose a template
- Optionally set a custom filename (for example
Orders - July 2026.pdf)
As with combined printouts, it is not possible to print different footers when printing in bulk. The footer from the ‘lowest- numbered’ order will be repeated on every order in the bulk printout. For this reason it is best to limit a bulk printout to a single division or other grouping with shared footer. Bulk printing is limited to 50 orders at a time. For larger batches, print in multiple groups.