Packaging Operations (Bottling and Labelling)
Overview
Packaging Operations should be used when you want to transfer your finished blends to finished inventory or add items to finished inventory. They are used to record the transfer from bulk product into bottle and record any additives or packaging items used, such as bottles, caps, labels and cartons. The packaging operations also allow you to track lot code information.
In this document:
- Listing and Searching Packaging Operations
- Planning Packaging Operations
- Bulk to Pack (bottling)
- Pack to Pack (labelling)
- Pack to Pack (disgorging)
- Creating Child Lots for Created Items
- Pack Additions (e.g. adding medal stickers)
- Allocating Packaging Used From Purchase Orders
- Adding External Packaging Costs to Operations
- Deleting Lines
- Applying The Last Change To All Selected Lines
- Completing a Packaging Operation
- Reviewing and Approving Costs
- Undo a Completed Packaging Operation
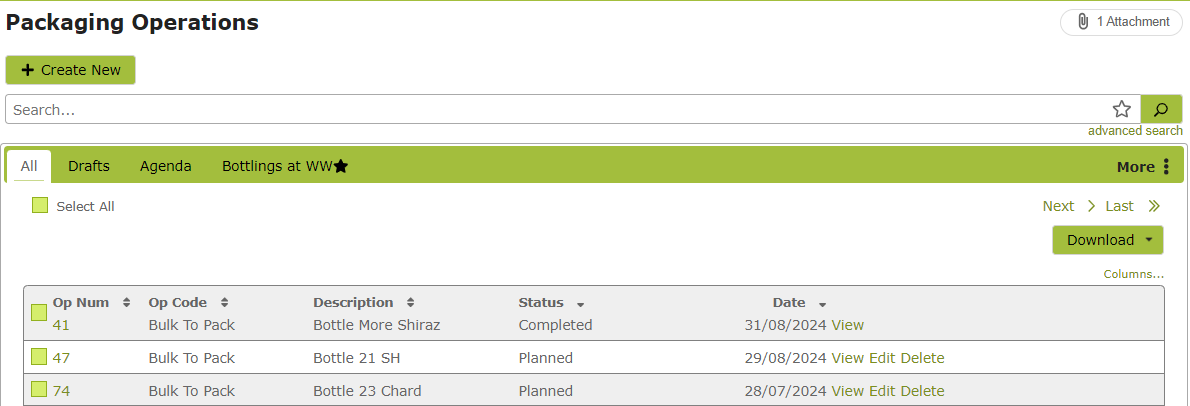
Listing and Searching Packaging Operations
The Packaging Operations list works in the same way as all the other major lists in Vinsight. You can search for particular packaging operations by using the search box located next to the “New” button near the top of the screen or the advanced search button directly below that.
Planning Packaging Operations
Packaging Operations can be planned in advance to create a schedule for you or your staff to follow and implement. Simply create a packaging operation using the instructions detailed below, but ensure you put the date you are scheduling the operation for in the Date field. The operation should be saved but not completed.
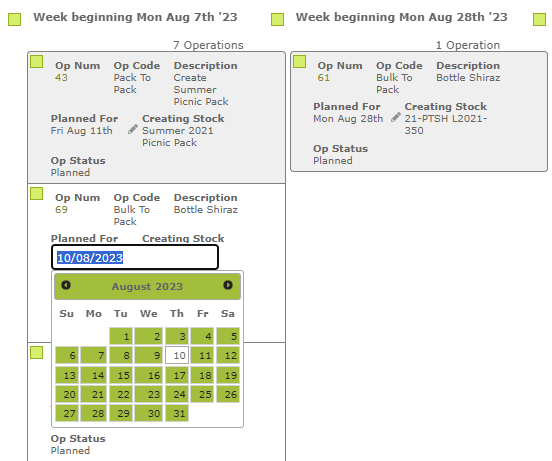
A quick look at the “Agenda” tab will detail all the packaging work scheduled for a particular time period.
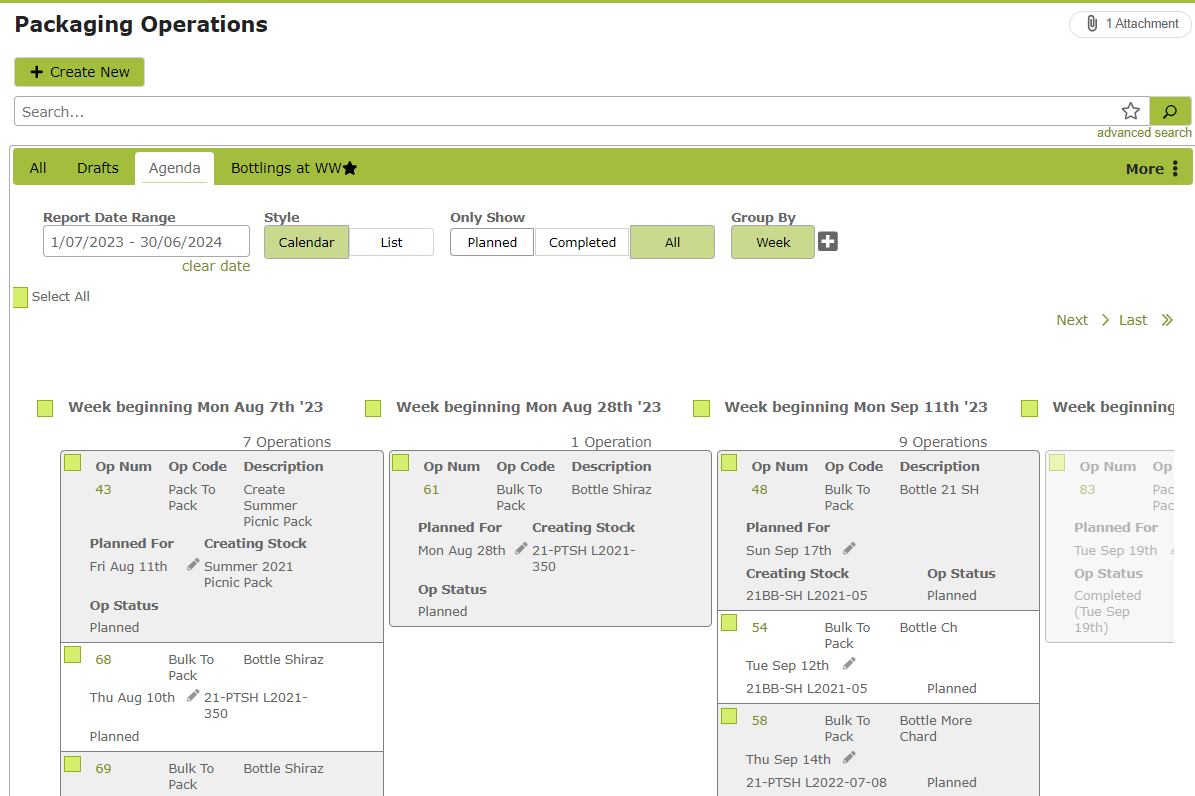
You can also adjust the schedule from this view. You can drag and drop the operations to move something forward or backwards.
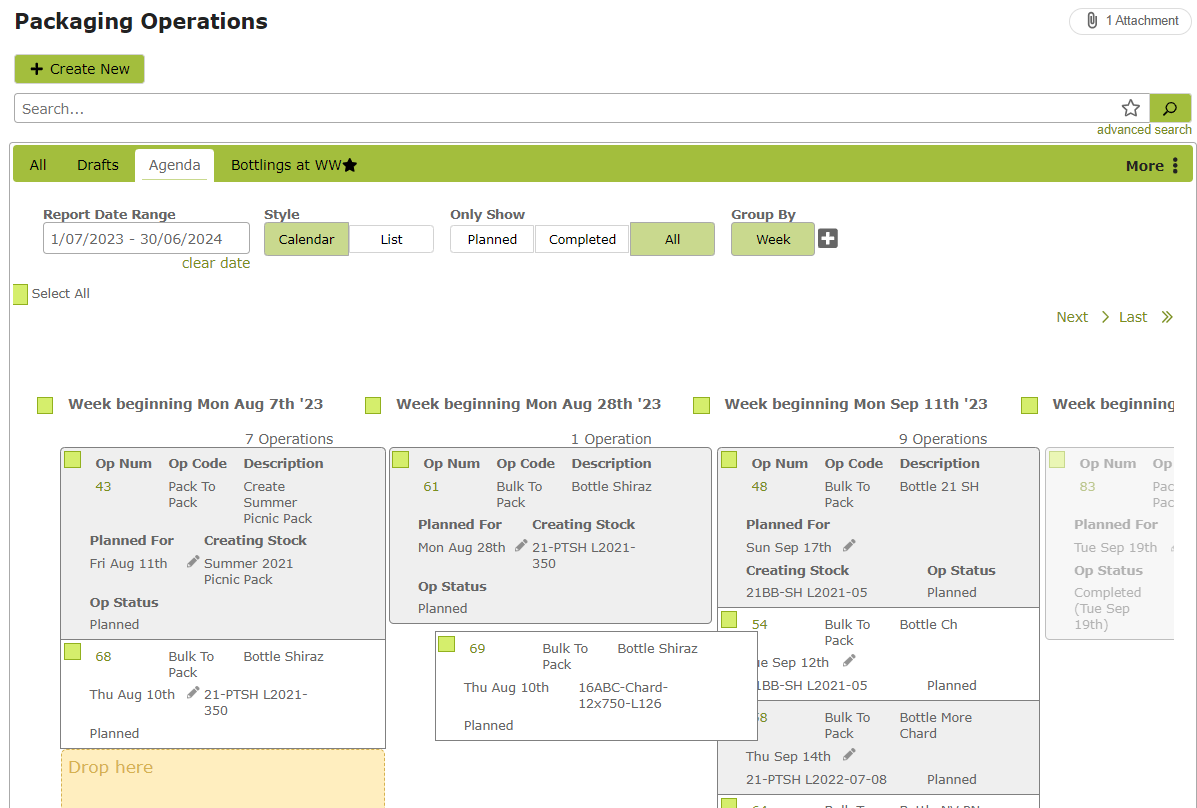
The date will automatically change to reflect the day, week or month it has been dragged to. Alternatively, you can edit the planned date directly by clicking on the “Planned For” date and selecting a new date from the dropdown calendar. The operation will then move to the column that reflects the new date.
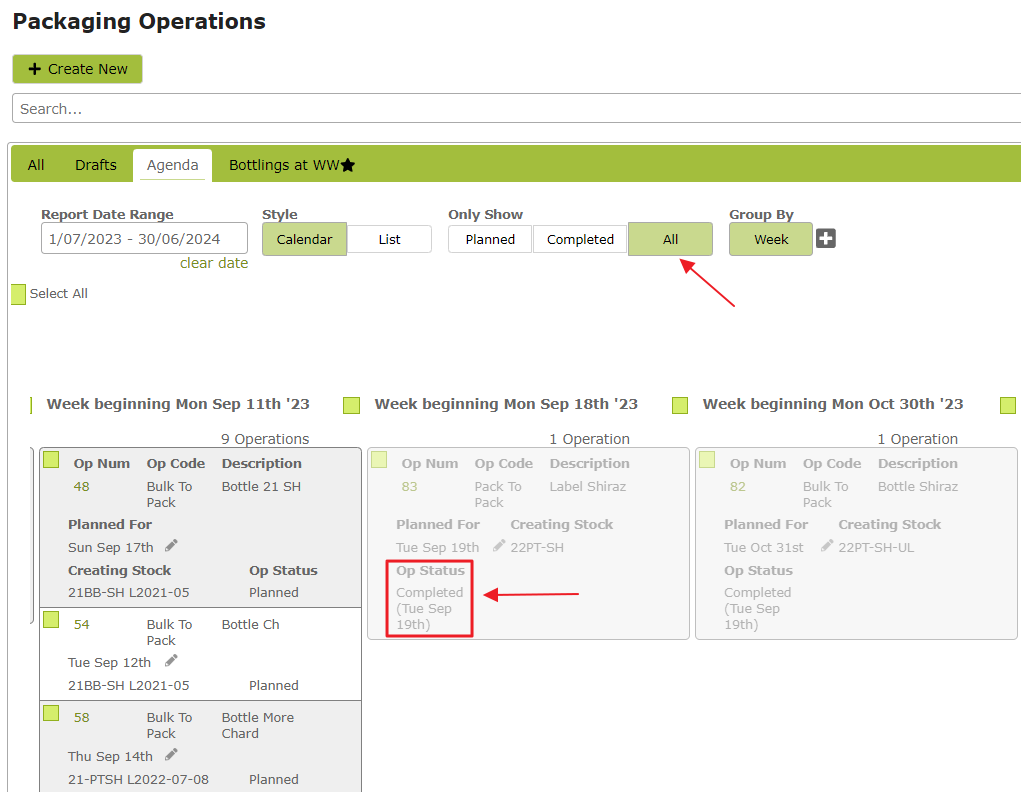
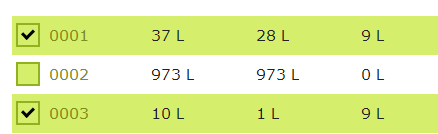
Once the planned work has been completed, remember to complete the operation. This will execute any movements of stock and mark the operation as completed. To view both planned and completed operations within a time period, simply select “All” on the Agenda view. Here we have Completed Op Num 83 (Label Shiraz) and it is now shown as completed on the Agenda view.
Creating New Operations
To create a new Packaging Operation, click on the “New” button at the top of the Packaging Operation List. You will be taken to an empty Packaging Operation page.
Bulk to Pack (Bottling)
Overview
The “Bulk to Pack” is used when you are transforming bulk product into packaged product, for example bottling or, if completed together, bottling and labelling.
In this section:
Operation Details
Select Op Type “Bulk To Pack”, add a description and stock location. You can also change the date here if you need to:

Bulk Used
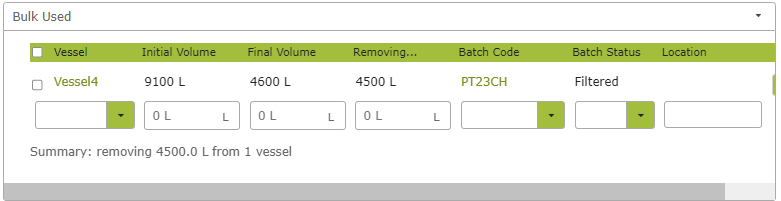
This section describes the product coming out of vessels. It works in exactly the same way as the Source Vessels section of a Winery Operation.
Just pick a vessel from the dropdown list, enter the transfer amount and the final volume will be calculated automatically.
To save the line, simply move off that line by clicking outside it, or on a mobile device, by hiding the on-screen keyboard.
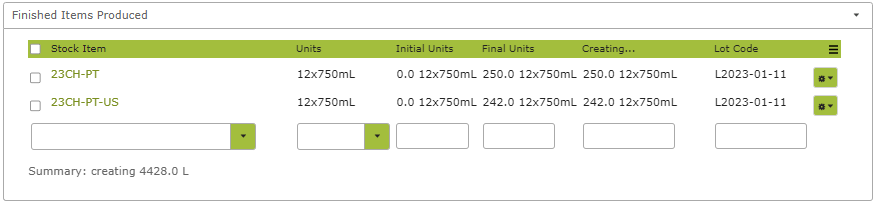
Finished Items Produced
This section describes the Finished Wine Stock Items that are being created by the Operation. Choose an item from the dropdown list and then enter a “creating” amount. The units you are working in for each item will be the default Units In Stock unit of measure. Here you can also split items out by Lot Code.
Bulk Additions
You are unlikely to need this section when doing a “Bulk to Pack” as any non-packaging additions, such as yeast or PMS, should have been added using a winery operation while in tank. See Transfers, Adjustments & Additions.
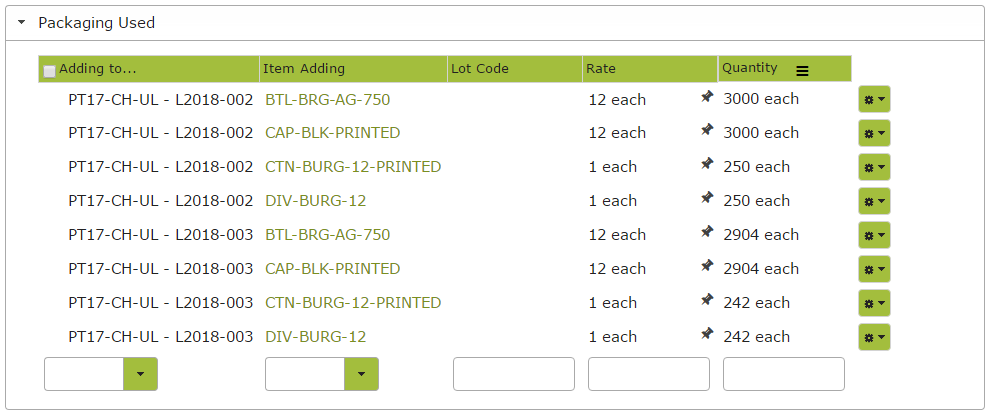
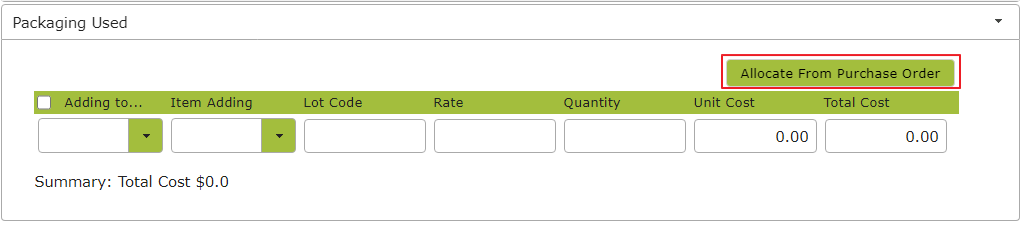
Packaging Used
This section works in a similar way to the additives area of a Winery Operation.
Any items you have detailed in the Default Components section of the stock item, such as bottles, caps and cartons, will automatically appear here. See Stock Items / Bill of Materials.
You can edit or add to this list as required.
Operation Summary
Once you have completed the “Bulk Used” and “Finished Items Produced” areas, you will see an Operation Summary towards the top of the page that looks like this:
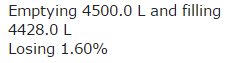
Or it might look like this:
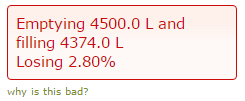
If this box is red, that indicates that the percentage gain or loss is outside of what is defined as normal by the Operation Code. “Vessel To Pack” has a variance of +/- 2%. This means that if you are gaining or losing more than 2% of the wine, you will see this box. This will also mean you will need to supply a Variance Reason when you try to complete the operation.
Pack to Pack (Labelling)
Overview
The “Pack to Pack” operation transforms a packaged stock item into a new packaged stock item. You would use this if you are, for example, starting with an unlabelled bottled product and transforming it into labelled bottled product.
A Pack to Pack (Labelling) operation should be completed in much the same way as a Bulk to Pack. Areas of difference are set out below.
In this Section:
Operation Details
Select the “Pack to Pack” Op Type, complete the description and change the date if you need to.
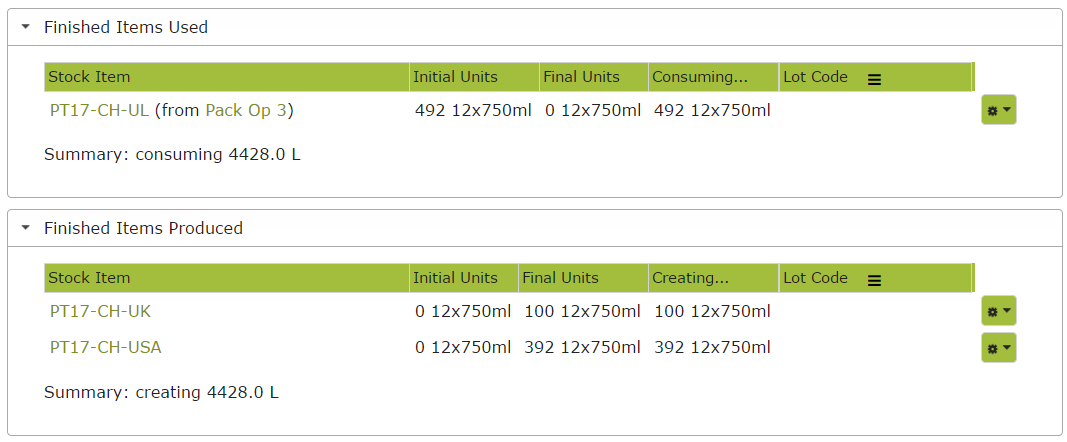
Finished Items Used / Finished Items Produced
Choose the packaged item you are dealing with from the Stock Item dropdown list provided and, if necessary, edit the initial and final units. Then select the Finished Items Produced and again edit units as required.
In the following example, we are using the 492 cartons of unlabelled PT17 Chardonnay that we bottled in Packaging Operation 3 and transforming it into 100 cartons labelled for the UK market and 392 cartons labelled for the US market.
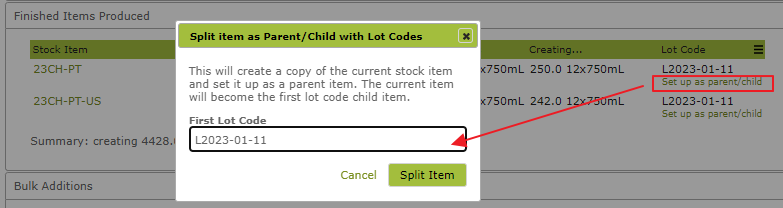
Using Lot Codes for Finished Items
On subscriptions that support Parent and Child Stock Items, if you do multiple bottlings of the same product, you should use our Parent / Child feature to manage Lot Code. Read more here: https://docs.vinsight.net/count/stock-items#lotcodes.
Vinsight makes this easy to do when you are bottling, because you can write the packaging operation using the parent item before you know the lot code of the child item that you will be producing, for example if the lot code would contain the date of the bottling but you have not completed the bottling yet.
So begin by saving the operation as a draft using the parent code, and you do not have to supply a lot code yet.

Once you are ready, put the Lot Code into the lot code field and the system will see if the parent already has children. It will add a link to add a new child, or if the parent has no children yet it will add a link to set up the parent to have new children.

Either add a new child:

Or split the existing parent to have a new child:
Bulk Additions
You probably will not use this section during labelling. However, if using a “Pack to Pack” operation to, for example, add dosage ingredients to bottled sparkling wine, this is where the ingredients would go. See Pack to Pack (Disgorging).
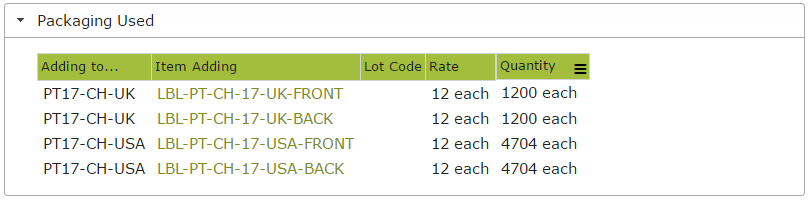
Packaging Used
As with “Bulk to Pack”, if you have detailed default items used in the Default Components area of the Stock Item, such as front and back labels, these will automatically appear here. See Stock Items / Bill of Materials. You can edit or add to this list as necessary. If no default items appear, simply use the dropdown menus to add the packaging items being used.
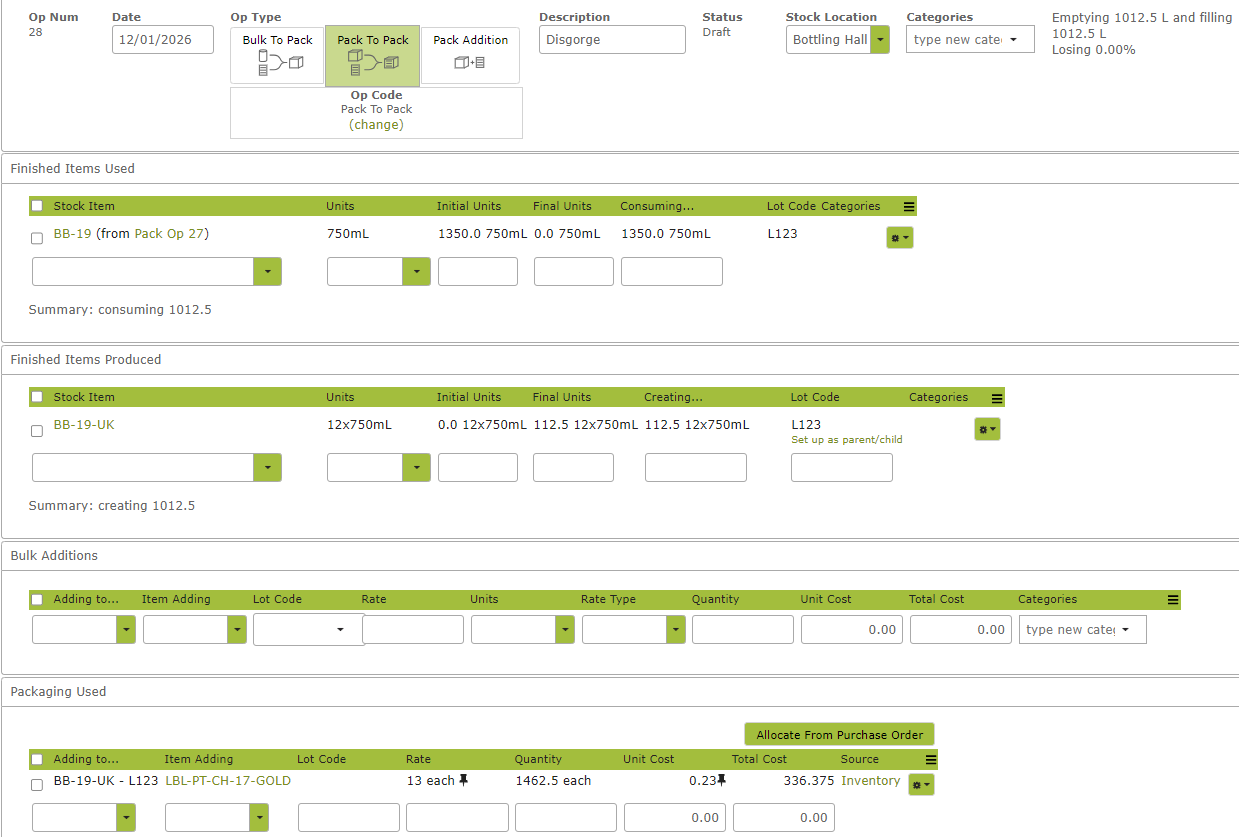
Pack To Pack – (Disgorging)
If you are adding a non-packaging item, such as your dosage ingredients for sparkling wine, to a packed item, you would add this product in the Bulk Additions area of the Pack to Pack operation. An example operation is set out below:
Pack Addition
A Pack Addition operation is used to add any further items to an existing stock item. For example, adding a medal sticker after bottling and labelling. The operation is completed in the same way as a Bulk to Pack or Pack to Pack operation with the following minor differences:
Operation Details
Here you would select “Pack Addition” as the Op Type.
Finished Items Used
Choose an item from the dropdown list. There will be no Finished Items Produced section to complete as you are simply making an addition to an existing Stock Item, not creating a new one.
Bulk Additions
You will not need to complete this section.
Packaging Used
Select the item you are adding and the stock item you are adding it to from the dropdown lists provided.
Allocating Packaging Used from Purchase Orders
When selecting Packaging Used for any of the Packaging Operation types — Bulk to Pack, Pack to Pack or Pack Addition — instead of manually selecting the packaging used, you can allocate the packaging used items from a Purchase Order. The main advantage of doing it this way is that purchased quantity and purchased unit cost will be brought into Packaging Used.
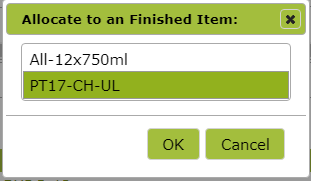
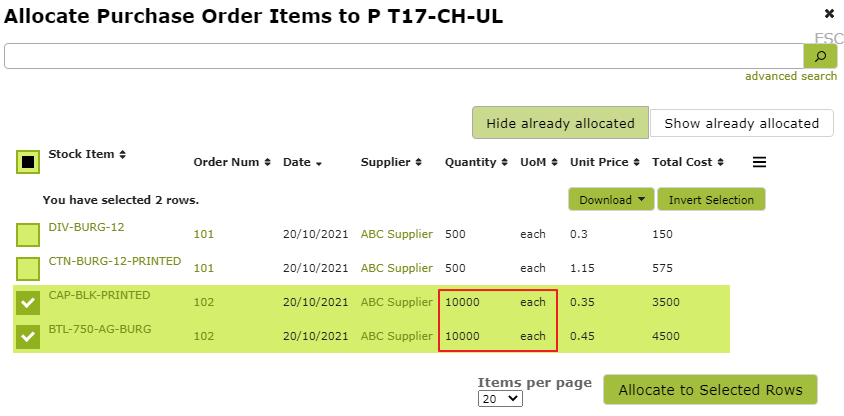
Select what Finished Item to allocate the Packaging Used to.
Select the Packaging Used items and allocate to selected rows.
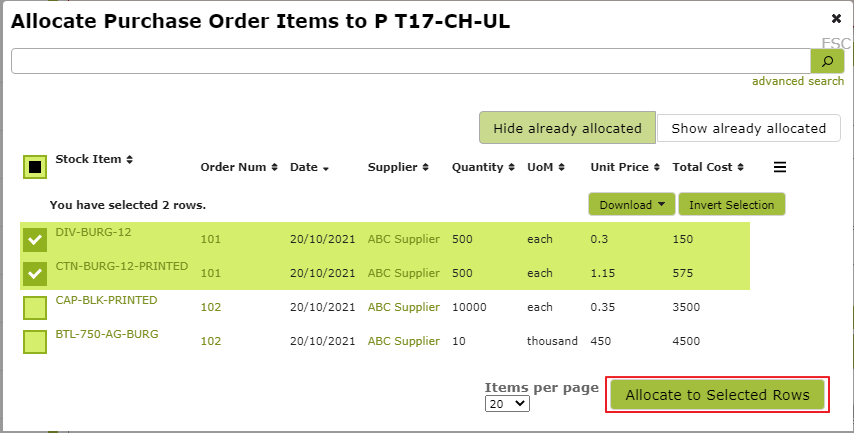
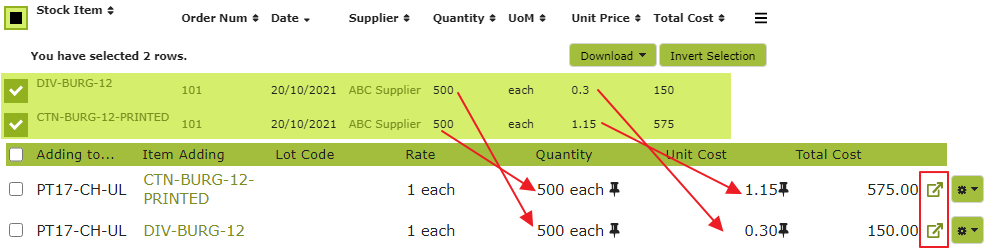
Once selected you can see that the quantity and unit price from the Purchase Order are brought over into Packaging Used. You can also see that there is a link at the end of each row that will direct you to the Purchase Order each Packaging Used item was allocated from.
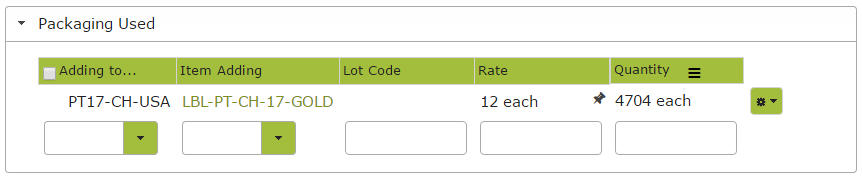
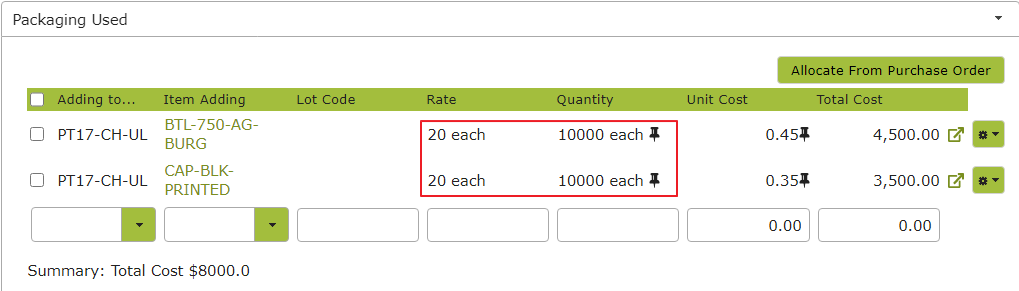
Partially Allocating from Purchase Order
You can also allocate a partial amount of Purchased Quantity to Packaging Used. Here I am about to allocate bottle caps and glass bottles to the finished item. In this case I have purchased more than what is needed for this Packaging Operation.
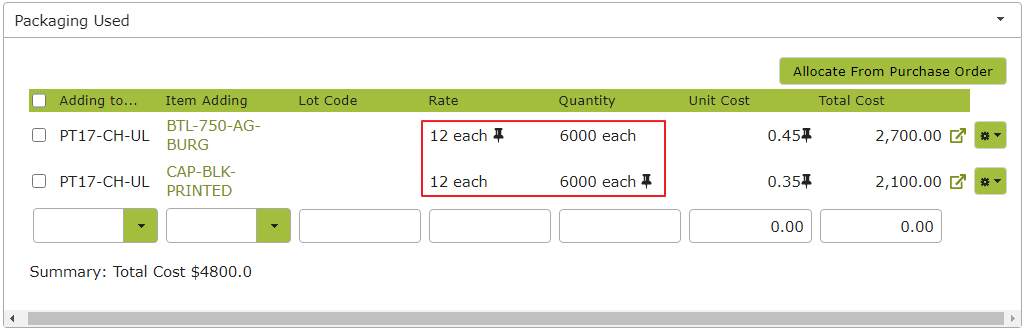
To fix this you can either change the Rate or the Quantity to the correct values.
Adding External Packaging Costs to Operation
If you have costs related to contract bottling or labelling, you can add these costs into your Packaging Operation to ensure the product created includes these costs. To do this, take the following steps.
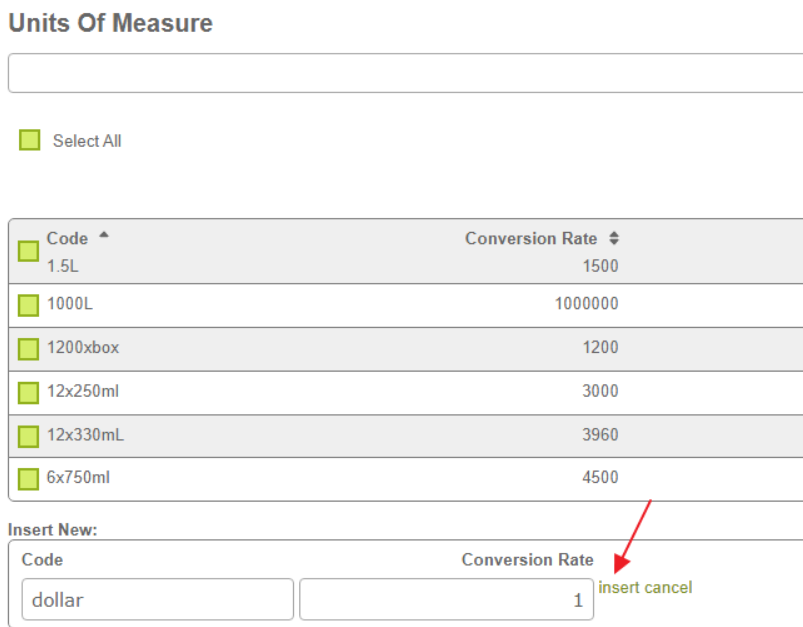
First, if you do not already have one, add a “dollar” unit of measure at Settings > Units of Measure. It should have a conversion rate of 1. This will enable you to add the costs to the operation in dollar units, which will likely make the most sense.
Next create a Stock Item called “Bottling Costs” or similar. Setting the Packaging attribute to Yes will make this item available in the Packaging Used area of a packaging operation, enabling it to be recorded as a packaging cost. If you would rather it be recorded as an addition and appear in the Bulk Additions area of a packaging operation, you could set the Bulk Additive attribute instead. Use the dollar unit of measure wherever a unit is required in the Stock Item and set the Standard Costs to $1.
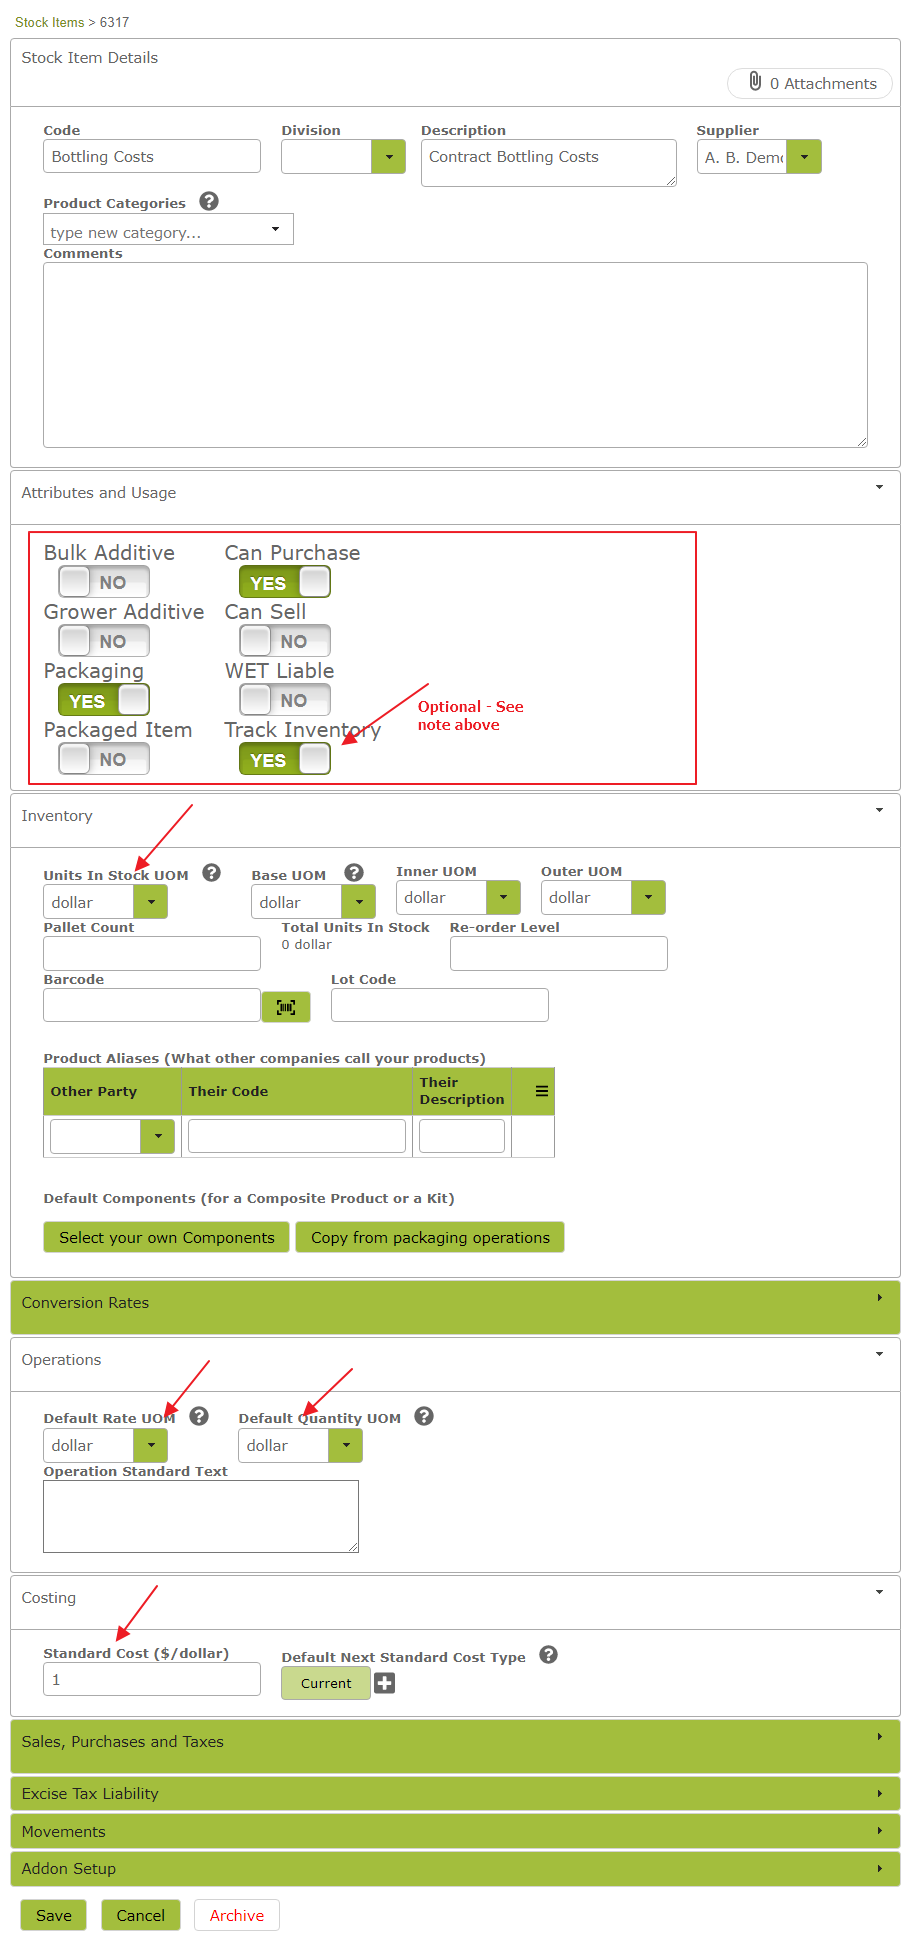
If you set the Stock Item up like this, you can add it to a packaging operation in the same way that you add other packaging items.
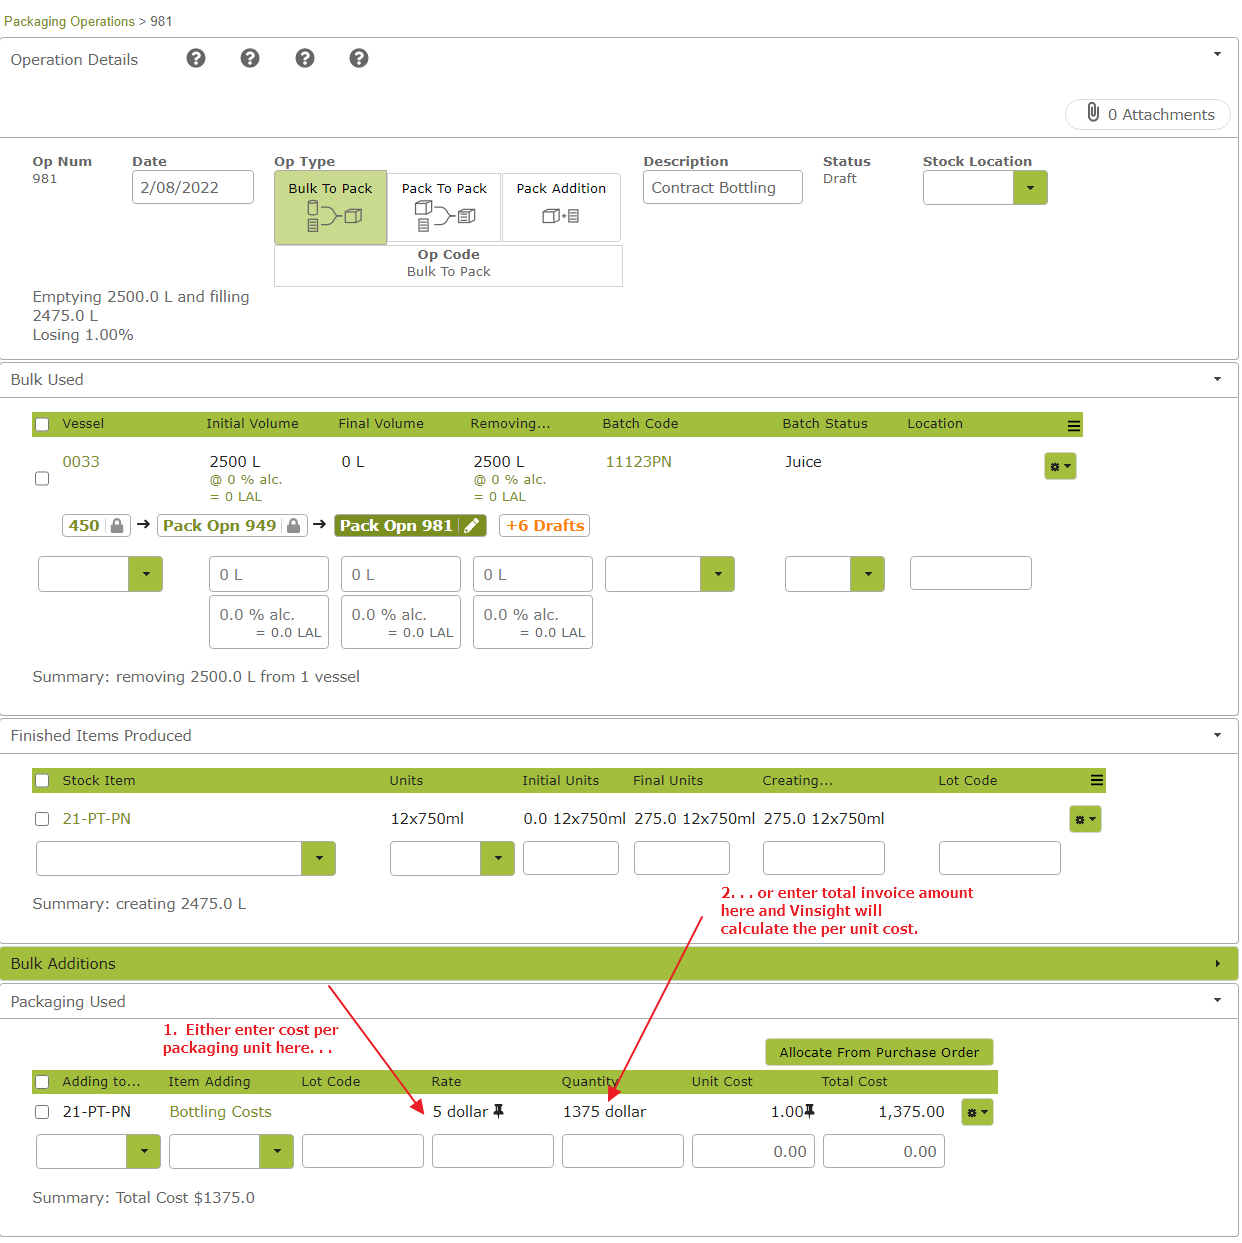
Deleting Lines
There are two ways to delete line items from tables in Packaging Operations.
The first method is the same as in Winery Operations: click the gear icon to the right side of the row and select “Delete”:
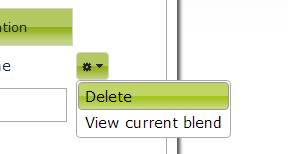
The second method allows you to bulk select rows and delete them all at once. Simply check the boxes to the left of the rows you want to delete, and then at the top of the table you will see a “Delete Rows” button that you can use to delete them all:
Applying The Last Change To All Selected Lines
If you want to change something like the transfer amount or the batch code for a bunch of rows, you can select them all at once, change one of the rows, and then press “Apply Last Change to Selected Rows”:


Completing a Packaging Operation
When you save an operation, it is still just in a draft format. None of the changes you have specified will actually happen until you press “Save and Complete” at the bottom of the page. When you complete an operation, the wine will be removed from the tank, finished wine stock item inventory counts will increase, and any packaging additives used will be taken out of inventory.
If working on a long or complicated draft operation, you can save as you go by selecting “Save and Continue Editing” from the Save dropdown menu. Select “Save and Add New” if you wish to save the draft and proceed straight to a new operation screen.
Reviewing and Approving Costs after completing a Packaging Operation
Vinsight tracks the quantities and costs of any additives and packaging used to create a finished item in Vinsight. When you complete a packaging operation, there is a manual review point after bottling that allows you to approve the costs before the cost per unit is committed to the item you produced.
On the stock item, under the Finished Item Components section, there is a “View Composition” button:
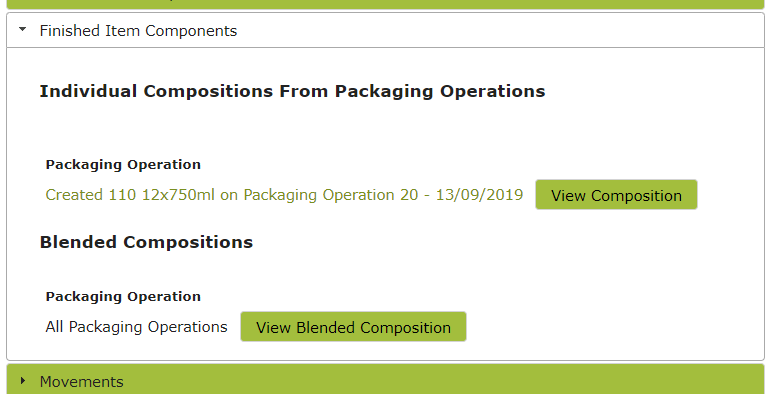
This shows the components, additive and packaging etc, that went into making the item you have packaged:
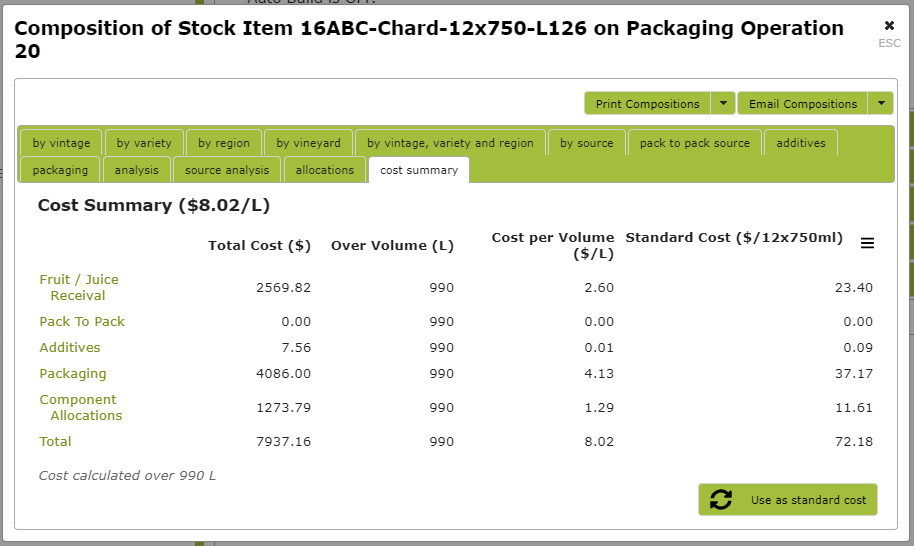
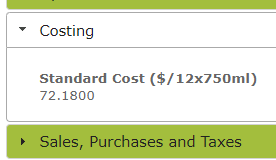
If these costs appear correct, then you can commit them to become the new Standard Cost of the item, which will be used in turn to calculate your inventory valuation and cost of goods sold. When you click the “Use as Standard Cost” button, you can confirm or approve the new cost:
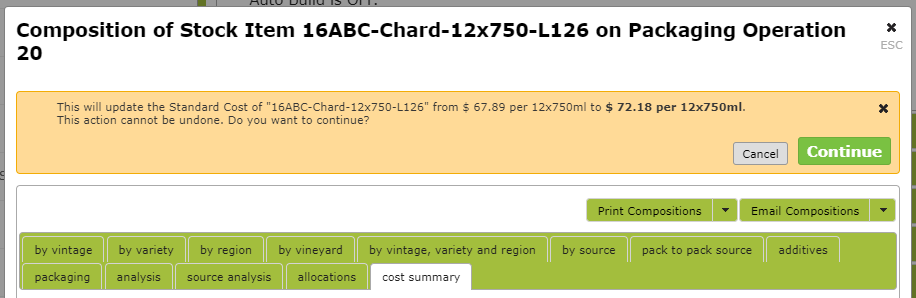
This copies the new value to the Standard Cost:
Undo a Completed Packaging Operation
If you have completed an Operation and you need to edit some of the details, then you will have to undo the completed operation before you can make changes. This can be done by pressing the “Undo” button at the bottom of a completed Operation.
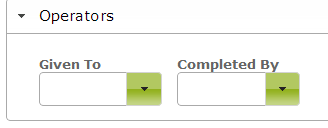
Assigning Operators
You can assign two types of operators for any one job, if you have a Premium subscription. To do this, go to the Operators section at the bottom of the operation and pick names from the dropdown lists.