Overview:
Sales Orders can be raised when selling services or stock items out of inventory. Sales Orders are multi-currency and sales tax aware, allow despatching from multiple warehouses and have the inventory reflect changes at that location. You can even post your sales invoices directly into your accounting package for invoicing and debtor management.
In this document:
- Listing Sales Orders
- Creating Sales Orders
- Importing Sales Orders
- Posting to Xero
- Custom Stock Item Description
- Sales Order for Services
- Assign to a Sales Person
- Through Billing
- Payment Terms
- Adding Line Items
- Discounts
- Troubleshooting
Related Topics:
Listing Sales Orders
The Sales Orders List is found in the Buy and Sell > Outwards Goods area. This list contains both pending and already despatched sales orders. You can search for particular orders by using the search box located next to the ‘New’ button near the top of the screen or the advanced search button directly below that. The pending (undespatched) sales orders will have an edit option for you to amend then update or post.
Creating Sales Orders
To Create A New Sales Order:
- Click the ‘New’ button on the sales order list.
- Select the Customer you wish to sell to from the drop down list provided or click ‘Create New’ to add a new customer.
- Select the Stock Item you with to sell from the drop down list:
- Select the Price List Item and ‘Unit of Measure’ from the drop down list:
-
- If the desired Unit of Measure does not appear in the list, see here.
-
- Adjust the Quantity, Unit Price, Discount or Tax Rate if required.
- Save as you go or once complete by clicking:
-
- ‘Save’ to complete the Sales Order and take out of ‘edit’ mode
-
- ‘Save and Continue Editing’ to save the data entered so far and continue in ‘edit’ mode
-
- ‘Save and Add New’ to save the existing order and open a new blank order.
-
Optionally:
- Assign to a Division (for ‘Premium’ subscriptions only)
- Assign to a Sales Person (for ‘Standard’ and ‘Premium’ subscriptions).
- Adjust the Delivery Address if required.
-
- Delivery address will default to the ‘Physical Address’ of the ‘Contact’.
-
- Through Billing – Sell to individual store, bill Head Office.
-
- Adjust the Currency and Payment Terms if required:
-
- See Payment Terms for information about custom and pre-defined drop-down options.
- See Customer defined Currency and Payment Terms to set default terms for a customer.
-
- Post to Xero (for all subscription levels)
If you are on a subscription that tracks inventory, the Sales Order is not sufficient in itself to remove stock from inventory. To do this you need to ‘Despatch’ the product ordered. See Despatching Sales Orders.
See Customising Sales Orders for Printing or Emailing for printing and emailing information.
For information regarding Sales Order payments see Tracking Payment of Sales Orders.
Importing Sales Orders
You may create multiple sales orders in one go by simply inputting the relevant detail into a spreadsheet (such as Excel or CSV) and importing the whole lot at once. To do this, instead of selecting ‘New’ to create the new order, simply select the ‘Import’ button towards the bottom of the page. See How to Import Data for more information on the import process.
Posting to Xero
By selecting the ‘Post’ option you can post your completed order from Vinsight directly into Xero. Your accounting staff can then log into Xero to approve the sales order (and purchase orders too, for that matter). See Posting Sales to Xero.
If a Stock Item has a Revenue Ledger set, then this will be sent to Xero as well. You can override this for a whole order by setting a Revenue Ledger on the Customer instead of the individual Stock Items.
You can also sync payment and currency conversion information directly from Xero. See Syncing Data from Xero.
Custom Stock Item Description
If, for any reason, you wish to override the default description of a Stock Item on a Sales Order, simply type the description required into the ‘Description’ box. This is useful if you need to add detail to the order, such as alcohol content for customs purposes, or if you wish the invoice to reflect your customer’s description of a product rather than your own.
Sales Orders for Services
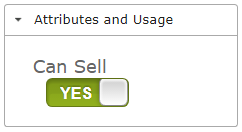
To create a Sales Order for services, simply create a Stock Item for the relevant service, ensuring that ‘Can Sell’ is switched to ‘yes’ (and ‘Track Inventory’ is switched to ‘no’ ) in the Attributes and Usage section. Then create a new Sales Order and use the ‘Custom Description’ field to add the line item detail needed.

Assign to Sales Person
On our multi-location subscriptions, you also have the ability to assign a sales order to a specific person. Simply select the sales person’s name from the ‘Sales Person’ drop down menu before saving.
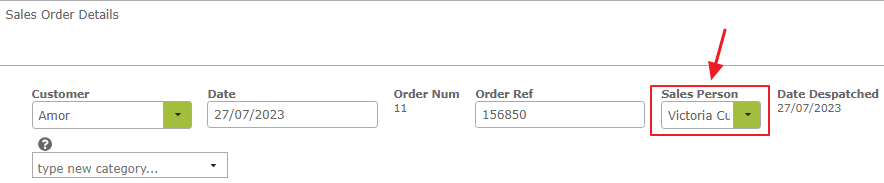
This enables you to track which sales person is responsible for which sales orders. You can use advanced search to search for all orders assigned to a particular sales person. To add a person to the drop down menu, add them as a Contact with the ‘Sales Person’ flag set.
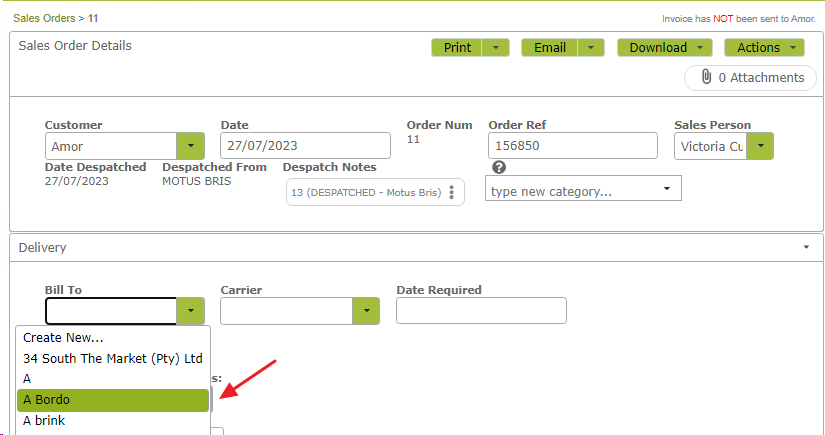
Through Billing
If you sell to large chain stores, such as supermarkets, you may wish to track and report sales by individual store and sales person, but bill that customer’s head office. To do this, put the individual store’s details in the ‘Sales Order Details’ area, and select the Head Office name in the “Bill To” text box in the ‘Delivery’ area.
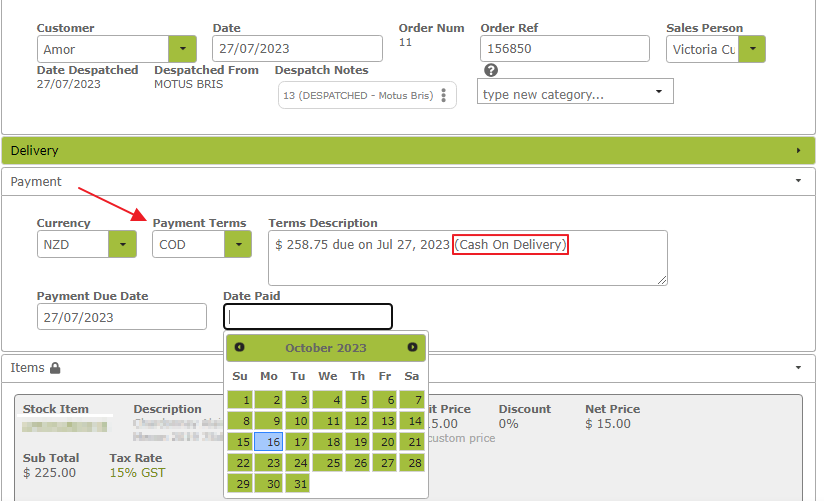
Payment Terms
When creating or editing a Sales Order, you can either input the due date directly into the ‘Payment Due Date” textbox, or select from a series of pre-defined payment terms, such as ‘COD’ (Cash On Delivery) or ‘EOM + 20’ (20th after End Of Month). These pre-defined terms are found in the ‘Payment Terms’ drop down menu. Selecting one of the pre-defined payment terms will save you from having to work out due dates, as these will be calculated and inserted automatically.
For example if you have a Sales Order for $193.60 dated 23 July 2014 and you select ‘EOM + 20’, the ‘Payment Due Date’ will be automatically filled with the date 20 August 2014. In addition the ‘Terms Description’ field will automatically state that $193.60 is due on 20 August 2014 (20th after End Of Month), providing both you and your customer with a clear and unambiguous description of the payment due date and terms.
If you subsequently edit the price in the ‘Items’ field, this change will automatically be updated in the ‘Terms Description’. However, if you wish to override the selected payment terms and input a specific payment due date, you will need to delete the ‘Payment Terms’ and ‘Terms Description’ entries to avoid them appearing on the Sales Order.
If the default payment terms are insufficient for your requirements, go to Create New Payment Terms for instructions on how create new, customised payment terms.
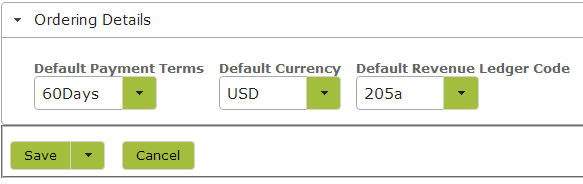
Customer defined Currency and Payment Terms
For regular customers you will probably want to define default payment terms. This will mean every time you create a Sales Order for that particular customer, the default payment terms will be inserted automatically, saving you from having to input them every time.
To set up default payment terms for a particular customer, simply go to the customer list in the ‘Contacts‘ area, select the ‘edit’ button next to the customer in question and expand the ‘Ordering Details’ area. From here you can select the required terms, currency and revenue ledger code. Click ‘Save’ to save any changes made.
Adding Line Items
Add items you wish to sell by selecting them from the Stock Item drop down list. Only stock Items that have the ‘Can Sell’ attribute set will appear in the drop-down list. Once selected, choose the Unit of Measure from the UOM drop down list. Please note that you will need to have set sales prices for the particular units or measure in the relevant Stock Item, in order for them to appear on this drop down list. See Stock Items – Sales and Purchases.
To find out how to have prices auto-filled on Sales Orders for particular customers or categories of customers see Managing Customer Pricing.
Any prices auto-filled on the Sales Order can be manually edited or overwritten in the order itself.
Applying Discounts
When applying a discount to a line item, you can add the discount percentage directly into the ‘Discount’ field. Alternatively you can enter the new discounted price of the individual item in the ‘Net Price’ field or the total discounted price in the line item ‘Sub Total’ field and Vinsight will calculate the percentage discount for you.
In the following example, I offered to sell this customer the 21-PT-PN stock item at the discounted price $94 a case. I also agreed I would sell them 10 cases of the 22-ABC-CH for $900 rather than the usual $1000. I don’t want to change the price, as I want these customers to see the discount recorded on the sales invoice I send them. I can record these as follows:
You can also choose to apply a discount to every line item in the order at once. To do this use the ‘Apply Discount’ link in the Sub Totals area at the bottom of the order. (You will need to be in ‘Edit’ mode to see this link.)
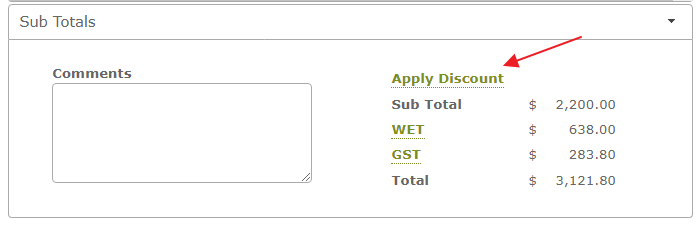
This will open a window as follows:
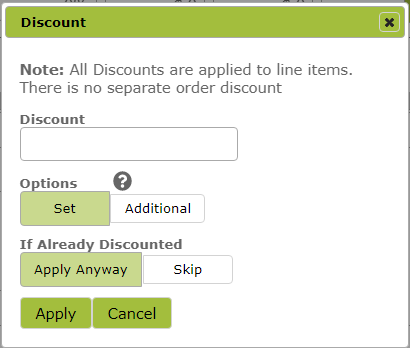
To apply the same percentage discount to each line item in the order, type the percentage amount in the Discount field and click ‘Apply’. If the line item(s) already have a discount, then choosing the ‘Set’ option will override the previous discount with the new one. In contrast the ‘Additional’ option will apply the new discount to the already discounted Net Price.
Troubleshooting
Stock Item not in Drop Down List
Ensure that the Stock Item has been created in the system and that the ‘Can Sell’ flag has been set in the ‘Attributes and Usage’ area of that Stock item.
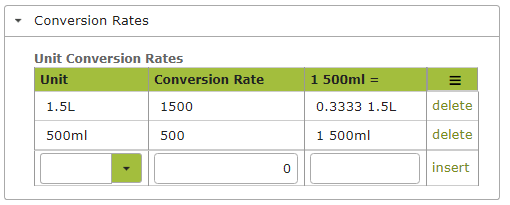
Units of Measure not in Drop Down List.
The Units of Measure required will need to be listed both, in the ‘Unit Conversion Rates’ table in the ‘Conversion Rates’ area of the Stock Item:
. . . and in the ‘Prices’ table in the ‘Sales, Purchases and Taxes’ area of the Stock Item.
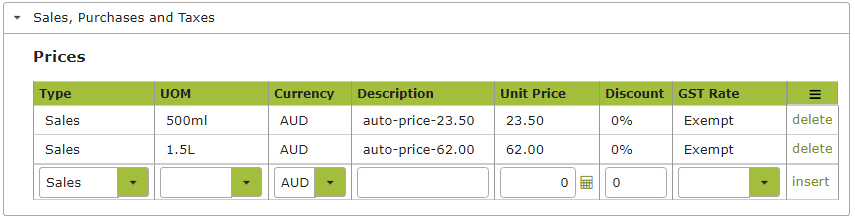
You will need to insert the ‘Conversion Rate’ first, for it to be an option in the ‘Prices’ table
Sales Person not in Drop Down List.
Ensure the Sales Person is set up as a ‘Contact’ and ‘Sales Person’ flag set in ‘Contact Attributes’ area of that contact.

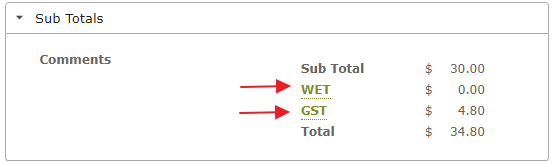
Tax not Displaying as Expected
If the Sales or WET Tax shown on your Sales Order does not appear as you expect, and you want to understand why, simply click on tax link in the Sub Total area of the Sales Order.
Doing this will bring up a window that will explain what the tax is. . .
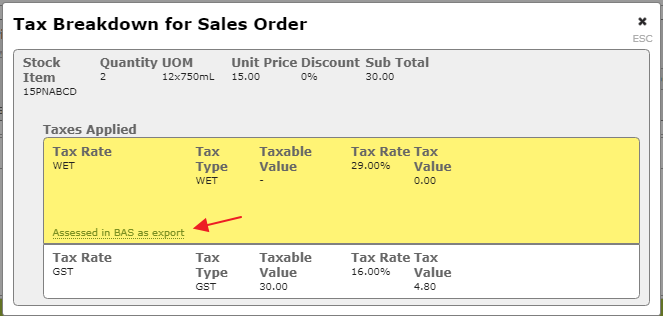
If, e.g. the WET categorisation (“Assessed in BAS as export” in the above example) looks wrong to you, click on the link shown for a complete breakdown of the reasons for the categorisation. See Calculating Wet Tax With Vinsight for examples of common WET tax categorisation errors and how to fix them.